


Introduction
When distributive system of top technologies and strategies adopted Internet of Things, social medias like twitter has become focused sessions through which we reach people locally, regionally, nationally and internationally to send tweets in their personal, political and even official life. Independent of the interest of the intended audience whether an engineer or a teacher or an IT manager or even the targeted person may be the one interested in recent developments in Internet of Things (IoT) might be curious about the social media applications of embedded sensors and IoT. Twitter seeks high audience potential and used for building business promotions which encourages the dependency of multiple parties in a public platform rather than other sites. So to stick to the daily tweets to make themselves rich in information, it has become necessary to design a system to read tweets daily and also to post tweets using Python programming from Raspberry Pi. This article provides information about API and social media applications mainly targeting on Twitter API using Raspberry Pi computer. This article mainly reflects on:
- How to create Twitter API keys to use in an application?
- How to use Twython to send tweets using Python?
- How to live-stream the real time data from Ds18B20 temperature sensor?
- How to live-stream images to Twitter using Twython?
Requirements
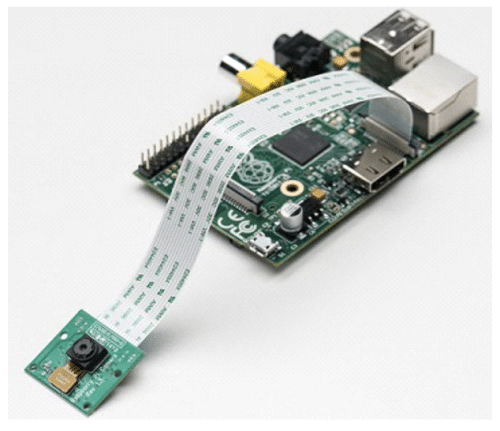
- Raspberry Pi with any variations in Raspbian Operating system
- Python 3 IDLE or any other variations of python like Geany, Thonny etc.
- Twython Python module
- Twitter account and a Twitter API
- DS18B20 digital temperature sensor and CSI Raspberry Camera
Twitter API
API – Application Programming Interface is a software intermediary exposed by a particular software, that allows the third party to access the features and functionality of that particular software. This session explains what Twitter’s APIs are, the various information that are made available through them, and the protections by Twitter that enable the user to personalise their messages. Or in more clarity it is an application specific computing interface exposed by a particular software program or operating system to allow third parties to extend the functionality of that software application beyond its capabilities as they existed out of the box. APIs has affected the daily lives of most of the users of web applications. Each time when you use an app new breed of social tools such as Twitter, Facebook, Google and LinkedIn that enable high levels of effective interaction mainly rely on APIs to deliver information and to connect users. Linux and Berkeley Software Distribution are examples of operating systems that implement the POSIX APIs. Without logging into Twitter we can use the Twitter API to update our status, send Tweets, upload media Tweets about a specific hashtag etc. There are four key methods used in twitter API to facilitate the above features. They are GET: to retrieve some data, POST: to create some data, PUT: to update some data, DELETE: to remove some data.
To facilitate the Twitter API, it is necessary to follow these steps

- Open a twitter account
- Create a twitter API
- Generate the API keys and configure the twitter
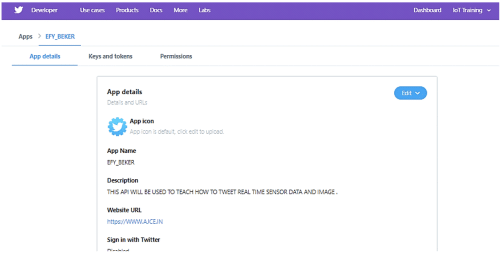
To open a twitter account go to https://www.twitter.com and signup with mobile number and other credentials required, it is essential for automatic tweet using API. Next step is go to https://developer.twitter.com/apps and create app so we can refer the corresponding keys that Twitter has generated for this app. Select create a new app from the window, https://developer.twitter.com/en/apps/create. In this window we should give proper information related to the requested one. The required fields are,
- App name – it will be visible to the members of twitter API
- Application description- this will be visible to the users and is a better forum to explore our project details to the twitter community
- Website URL – it is necessary to provide a genuine URL. If you don’t have a personal website, we can give our company site address or any other genuine website URL.
- Tell us how this app will be used- this field is visible only to the twitter authorities, and it will help them to understand how and what things can be done by us on this facility.
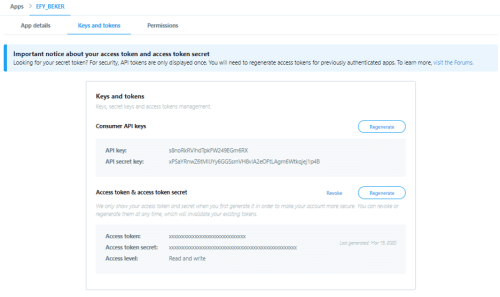
After validating the information submitted, twitter authorities will allocate an API as per our requirements. After validation process they will allocate App ID (17259680 -this is my App ID for this case) along with the four personal token or keys. After the successful creation of Twitter Application, click on ‘Keys and Access Token’ tab, we get the keys, note down first two keys, (Consumer API keys) scroll down and click on ‘Create my access token’ and note down remaining two keys. The keys associated with the app are,
- API_key
- API secret key
- access_token
- access_token_secret
The next step is to update date and time, else twitter and other web application including chrome may not be permitted. To update the system time, we have to use the command sudo date -s “01 May 2020 09:26:53”
Twython on Raspberry Pi for message tweet
There are so many twitter API modules that are available in the market. Some of them are listed below. In this article we are using twython as our API.
- Twython is a library providing an easy and up-to-date way to access Twitter data in Python
- Botometer –it checks the activity of a Twitter account and gives it the score based on how likely the account is to be a bot.
- Twitter Avatar – This is a RESTful API to a Twitter user’s avatar.
- Twitter Interest Graph – Twitter VuGraph generates social persona from the publicly available profile of a Twitter user by aggregating interests inferred from tweets, photos, vines, checkins, and commerce to produce the richest behavioral persona.
- Twishort – Twishort API can be used by Twitter applications to post the long text to Twishort, and receive a tweet-sized message with a link to the complete post.
Once logged into the Raspberry Pi, update the list of available packages and their version, to do this we can make use of two commands ‘sudo apt-get update’ and ‘sudo apt-get upgrade’ in terminal. To install python package manager on Raspberry Pi, type the command ‘sudo apt-get install python-pip’. similarly, you can download twython library by using the command ‘sudo pip install twython’. Here I am attaching keys and codes for sending tweets. Developers need to fill their own keys at the key places in order to get a working code. In my example I have saved my access token and consumer kay as Auth.py. so, if we want to tweet a message “EFY TWEET”, I am using the file2 efymsg.py. while executing the file2 the tocken values will pass from the auth.py file and the message will be updated by the command twitter.update_status(status=message).
File 1:
(Auth.Py) // it will save the 4 tokens as auth.py for further reference and authentication of twitter account for automatic tweet
consumer_key=’s8noRkRVihdTpkFW249EGm6RX’
consumer_secret=’ PSaYRnwZ6tMlIJYy6GGSsmVH8vlA2eOFtLAgm6Wtkqjej1p4B’
access_token=’ 1109308927240331265-ihDtxMXajxlaXMl8pI9Nige3686X8A’
access_token_secret=’ cMce2KqSEGWR8NHc2lEYFdFtYeayEUCc2vAygfGmMbUb7′
File 2:
efymsg.py // program to tweet a message
from twython import Twython
from auth import (
consumer_key,
consumer_secret,
access_token,
access_token_secret
)
twitter = Twython(
consumer_key,
consumer_secret,
access_token,
access_token_secret
)
message = “EFY TWEET” // message to be tweeted is save here
twitter.update_status(status=message) // automatic tweet using the twython function
print(“Tweeted: ” + message) // print a message after successful tweet
DS 18B20 interfacing with RPi & Twitter
The DS18B20 digital thermometer provides 9-bit to 12-bit Celsius temperature measurements and it communicates over a 1-Wire bus that is it requires only one data line and ground for communicating with a microprocessor. DS18B20 can derive power directly from the data line eliminating the need for an external power supply. Each DS18B20 has a unique 64-bit serial code, which allows multiple DS18B20s to function on the same 1-Wire bus. Thus, it is simple to use one microprocessor to control many DS18B20s distributed over a large area. This sensor is available as a transistor package or with waterproof model. Here I am using waterproof model and it has three leads colored as Red, Black and Yellow for VCC, ground and digital data output respectively. A resistor between the value of 4.7k Ohms to 10k Ohms needs to be connected between the 3V3 and GPIO4 pins to act as a ‘pull-up’ resistor.
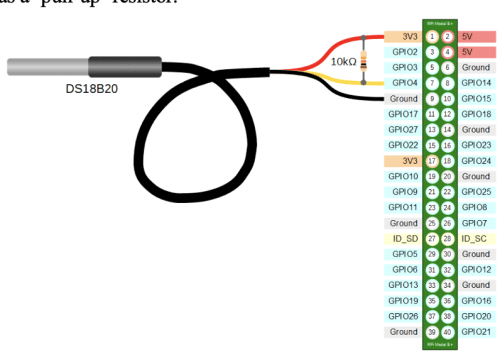
Before interfacing to RPi we have to make some changes in RPi configuration. In this example data line is connected to GPIO4 of RPi. One wire is similar to I2C communication protocol with longer range and low data rates. The pre steps for sensor interfacing are,
Step 1. Add OneWire support: Start by adding the following line to /boot/config.txt, edit the file with nano by running sudo nano /boot/config.txt and then scrolling to the bottom and typing it there dtoverlay=w1-gpio. After pasting the command, we have to overwrite the configuration file by ctrl+o and exit from the window using ctrl+x
Step 2. reboot Pi with command sudo reboot.
Step 3. When you back up the Pi and you’re logged in again, type the following on terminal window. When you are in the ‘devices’ directory, the directory starting ’28-‘ may have a different name, so cd to the name of whatever directory is there.
Step 4. Type the command in terminal sudo modprobe w1-gpio and
Step 5. sudo modprobe w1-therm
Step 6. cd /sys/bus/w1/devices. it will change the working directory to wire 1 device folder
Step 7. Ls. This command will list all the hardware devices connected to the Rpi with their hardware address. In our case it will display the device address as 28-00042d8165ff.
DS18B20 sensor address is starting with 28 remaining values will be different. If the sensor is listed, we assume that all connections are good and ready for programming. If more than one device is connected use cd /sys/bus/w1/devices/ and ls to list all the devices and cd address where address is the unique address of the device required. For eg.cd 28-00042d8165ff.
File 3:
// program to tweet real time temperature using DS18B20 sensor
from twython import Twython // import twython module
import os // provides functions for interacting with the operating system.
import glob // The glob module implements globing of directory contents.
import time //import time module
// import all the tokens from auth.py file
from auth import(
consumer_key,
consumer_secret,
access_token,
access_token_secret
)
twitter = Twython(
consumer_key,
consumer_secret,
access_token,
access_token_secret
)
os.system(‘modprobe w1-gpio’) //loading one wire communication device kernel modules
os.system(‘modprobe w1-therm’) //
base_dir = ‘/sys/bus/w1/devices/’ //point to the address
device_folder = glob.glob(base_dir + ’28*’)[0] //The glob.glob returns the list of files with their full path, her it will return the path with address starting with 28
device_file = device_folder + ‘/w1_slave’
def read_temp_raw():
f = open(device_file, ‘r’) // open the device folder in read mode
lines = f.readlines() //read the device details
f.close()
return lines
def read_temp():
lines = read_temp_raw()
while lines[0].strip()[-3:] != ‘YES’: // ignore first line
time.sleep(0.2)
lines = read_temp_raw()
equals_pos = lines[1].find(‘t=’) // find temperature in the details
if equals_pos != -1:
temp_string = lines[1][equals_pos+2:]
temp_c = float(temp_string) / 1000.0 //convert to Celsius
return temp_c // return the current temperature to the main function
while True:
Temperature = read_temp()
time.sleep(1)
Print (Temperature)
twitter.update_status(status=message)
print(“EFY Temperature Tweeted: ” + Temperature)
while True:
print(read_temp()) // call the function to read the temperature
time.sleep(1)
message = read_temp()
time_now = time.strftime(“%H:%M:%S”) # get current time
date_now = time.strftime(“%d/%m/%Y”) # get current date
tweet_txt = “OSFY Temperature Tweet @ ” + time_now + ” on ” + date_now +” ” +str(message)
twitter.update_status(status=tweet_txt) // //update the temperature to twitter along with real time data from OS
print(“Tweeted: “)
CSI Raspberry Camera for Real Time Image Tweet
The Camera Serial Interface of the Raspberry Pi Board is capable of directly attaching Pi camera module. It is widely used to take photos and videos. Its main advantage is the extreme speed with which it transfers data to the Broadcom BCM2835 system-on-chip processor through camera serial interface(CSI-2). With the help of a 15-pin ribbon cable also known as flex cable, the camera module is connected to the mount ZIF 15 socket.
This camera module communicates with the pi using the MIPI camera serial interface protocol. Since the payload of camera is very small it proves its wide application in image processing, machine learning, surveillance drones etc. So, we are ready with the connections, after which the program can be excecuted. Initially the tocken values are accessed from auth.py. Then the message and the photo captured by the CSI raspberry camera module is uploaded automatically in the twitter.
The above program will report an error after the first execution. This happens because of the repetition of the file or a text. Or this is due to the duplication of the name of the image and the message uploaded in the twitter account. So, in order to meet up this, in a matter of fact what we have implemented is the real time. Along with the text and name of the image the real time is added. This is very significant since the whole system revolves around time
File 4:
// program to tweet time image
from twython import Twython
from auth import (
consumer_key,
consumer_secret,
access_token,
access_token_secret
)
twitter = Twython(
consumer_key,
consumer_secret,
access_token,
access_token_secret
)
message = “OSFY PHOTO TWEET”
image = open(‘/home/pi/Desktop/osfy.jpg’, ‘rb’)
response = twitter.upload_media(media=image)
media_id = [response[‘media_id’]]
twitter.update_status(status=message, media_ids=media_id)
print(“Tweeted: ” + message)
File5: // program to tweet time image
from twython import Twython
from picamera import PiCamera
from time import sleep
from auth import (
consumer_key,
consumer_secret,
access_token,
access_token_secret
)
twitter = Twython(
consumer_key,
consumer_secret,
access_token,
access_token_secret
)
camera = PiCamera()
camera.start_preview()
sleep(5)
camera.capture(‘/home/pi/Desktop/osfy.jpg’ )
camera.stop_preview()
message = “osfy photo Tweet”
sleep(2)
twitter.update_status(status=message)
print(“Tweeted: {}”.format(message))
with open(‘/home/pi/Desktop/osfy.jpg’, ‘rb’) as photo:
twitter.update_status_with_media(status=message, media=photo)
Experimental result
The experiment has come to an end. Suspense could hardly be greater. By making use of camera module and temperature sensor attached to Raspberry Pi it enables us to explore the reality in photography and variation in real time temperature. Helps us to maintain an optimum condition. well.! we had detected and updated the real time temperature and captured the real time photos.

The real time photos and temperature measured are updated regularly like top tweets. Beyond the limit, the tweets are updated with highest velocity with time specified.
Conclusion
This system has got its highest application in real life. A mother of a newly born baby , hardly of 3 months, who has to leave the baby at home to be present at workplace can frequently monitor her baby throughout the day through API interfacing. Again, she can add features to the existing system where she can monitor her baby with a fewer time delay than normal delay if the baby shows higher temperature than expected or if the baby has a worse physical condition. Using API interfacing one can access a remote host in real time.
In real time application, it allows the user to interface any of the frequently used sites such as Bookmyshow, MakeMyTrip, trivago etc with twitter so that the user can access any notifications as well as can make use of any features of those sites in twitter irrespective of browsing them. So twitter is really convenient and important communicate platform and by introducing API it has improved its applications. In this system quick and immediate updating of the remote host real life has become possible. So this is a very useful tool that improves human life and consumes their time. API has created a forum where all the necessary applications and sites are grouped together and also can be programmed to access the remote locations in real time. So if we could use this system and extend its application, this will become a good.
