


 What if you could make a drone that would recognise people, track someone in a crowd, and help find criminals? What if this drone could also detect traffic congestion on the road ahead, or detect people stuck in floods, earthquakes, or similar disaster situations? This smart AI-enabled drone can do all these tasks. It can shoot video in real time, process the video, recognise people, and detect traffic and crowd during public rallies and gatherings.
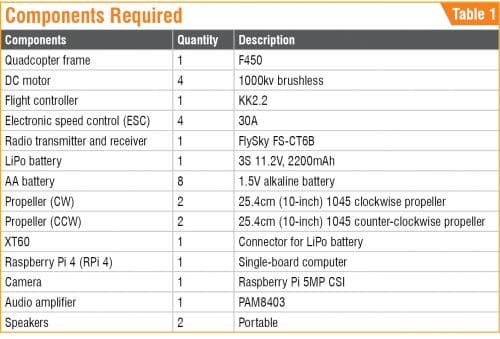
This is a low-cost quadcopter drone using an F450 frame and 1000kv brushless motors. It is equipped with a Raspberry Pi 4 (Rpi 4) board to process images independently without affecting the flight controller.
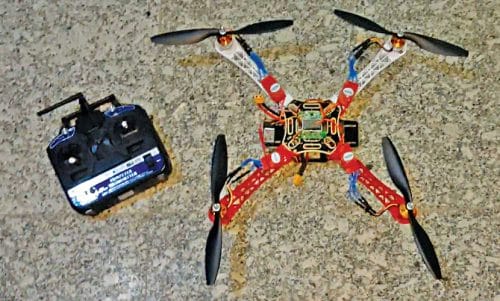
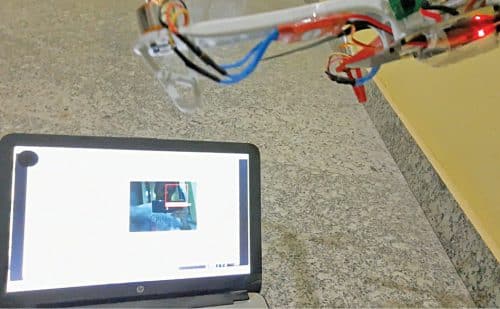
The author’s prototype is shown in Fig. 1. Live image being captured by the camera mounted on the drone during testing is shown in Fig. 2. To make the drone, you will need the components listed in Table 1.
For details regarding drone construction/assembly, propellers, motor rotation, transmitter, and receiver, you may refer to ‘Make Your Own Quadcopter Drone’.
Face recognition
At first, an RPi compute module and balenaFin boards having 1GB RAM and 16GB storage, along with LiPo battery, was tried. But it was found to be a little bulky for the drone. So, Raspberry Pi 4 was used because it can be powered from one of the four ESCs used in the drone, which was found to be a better choice.
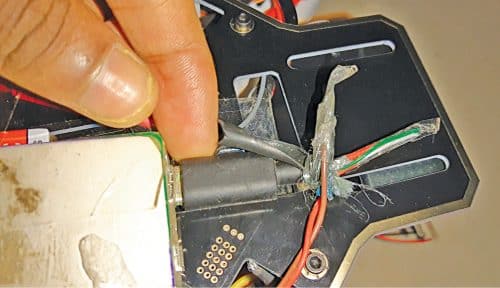
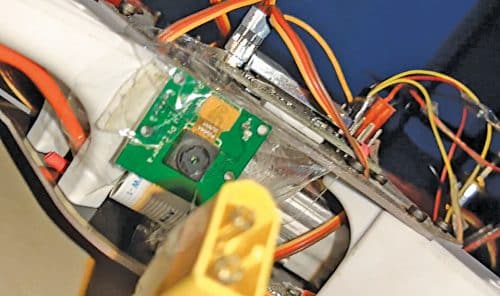
For face recognition, the RPi 4 and camera should be mounted on F450 frame of the drone (refer Fig. 3). These should be fixed with insulation tape, zip-tied, or tied with a self-locking cable. Since the flight controller board uses only the first ESC pin to power it, the remaining three ESC pins are free. So, use one of the free ESCs to power the RPi 4 board. Cut the positive and negative wires of one of the ESC modules that are connected to the flight controller and then connect them to RPi.
Next, mount the RPi camera module on the drone as shown in Fig. 4.
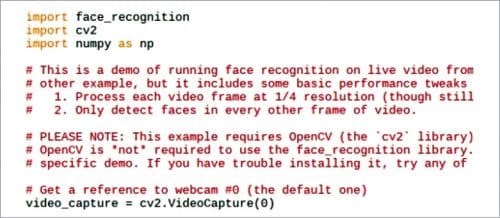
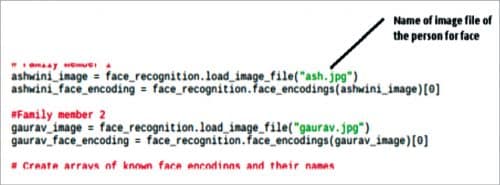
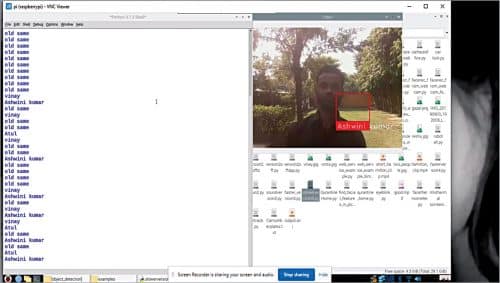
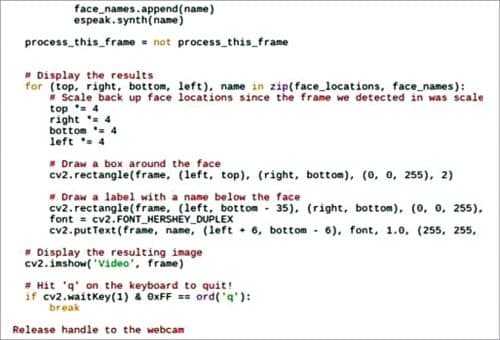
The code (dronecode1.py) used to recognise the person (known or unknown) in front of the drone is written in Python script. In this code, we need to import three libraries/modules: face_recognition, cv2, and numpy. These are defined in the code as shown in Fig. 5. We need to create different arrays for recognising faces and corresponding names of the persons. Make sure to write the image file name of that person for correct face recognition (refer Fig. 6). Live image of the person (with name) being captured by the camera from the drone is shown in Fig. 7.
Audio alert
In the next part of the code, the program compares the faces being captured by the camera with the array of known faces in the database. If the face matches, the code runs the ‘espeak.synth ( )’ synthesiser function to call out the person’s name through the speaker connected to the RPi. It can also include an announcement such as “Hello, please don’t move,” in case a criminal or suspect is to be found with its help. The code with ‘espeak.synth ( )’ function is shown in Fig. 8.
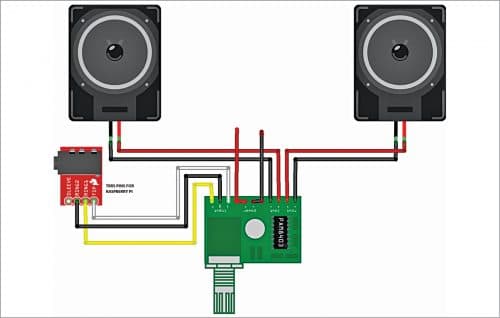
You can connect a digital PAM8403 audio power amplifier and speakers to the RPi for announcements. Connection diagram of audio amplifier with GPIO, 5V, and GND pins of RPi 4 is shown in Fig. 9 for this purpose.
For crowd detection
The drone can be used for search and rescue operations, especially during floods or earthquake. It can also be used for crowd monitoring during public rallies and gatherings. For this we need to install some libraries, including TensorFlow, in Raspberry Pi.
The first step is to update and upgrade RPi 4 operating system and install the required libraries from the terminal by typing the commands given below:
sudo apt-get update
sudo apt-get upgrade
sudo nano /etc/dphys-swapfile
Then change the line CONF_SWAPSIZE=100 to CONF_SWAPSIZE=1024
sudo /etc/init.d/dphys-swapfile stop
sudo /etc/init.d/dphys-swapfile start
sudo pip3 install opencv
sudo pip3 install numpy
wget https://bootstrap.pypa.io/get-pip.py
pip3 install dlib
pip3 install tensorflow
Next, you can proceed with the cloning of TensorFlow modules, examples and files using the following command:
git clone https://github.com/tensorflow/
tensorflow.git
After successful cloning, go to the directory->research folder->create a dronecrowd.py Python file. Open the Python3 IDE and import the following modules in the code:
- os
- cv2
- numpy
- tensorflow
- argparse
- sys
- gpiozero
- time
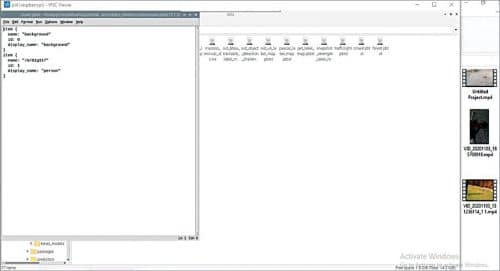
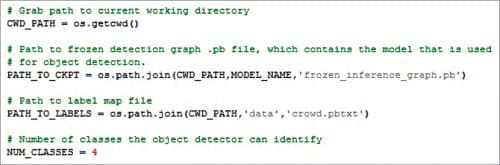
For crowd detection and traffic monitoring, we need to do some setting up before coding. First, we need to create a special .pbtxt file that contains names of the persons/objects to be detected. As our drone is to detect people, so create a crowd.pbtxt file under Tensorflow->models->research->object detection->data folder. Include the display_name as ‘people’ in the crowd.pbtxt file as shown in Fig. 10.
In first part of code (dronecrowd.py), the required libraries are initialised (refer Fig. 11). These include the PiCamera module, which is used to take live video and process it frame-by-frame to detect the crowd during public rallies or gatherings.

Next, define the crowd.pbtxt file name in the code as shown in Fig. 12. Then create a substring that checks the number of people being detected. When the program is run, it calls TensorFlow modules for detection and monitoring. It will estimate the number of people and display images of the persons present in that area on your computer screen.
Traffic detection
The same drone can be used for monitoring vehicular traffic on the streets of a city or town (refer Fig. 13). For this, you must create traffic.pbtxt file in the project folder and add the list of objects, or display_names like car, bus, people, signboard, truck, etc in the file.
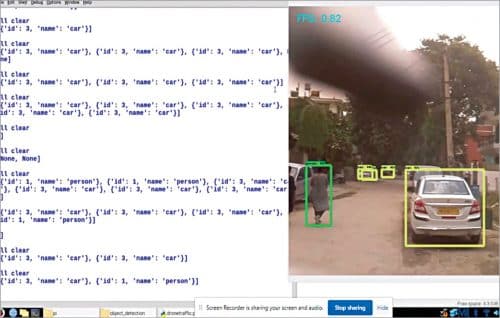
When the dronetraffic.py program is run, it will first check traffic.pbtxt file to start detecting the number of cars, buses, bikes, etc on the road. The program saves the images of the cars and other details in a text file in a folder. If it detects too many vehicles or people on the road/street, it will alert the authority by displaying messages such as “Heavy traffic” in case of vehicles, or “Too many people” in case of commuters on the road.
The project can be extended for use in forest survey and animal detection using the same code but with a different .pbtxt file. For animal detection, create a .pbtxt file with list of the animals to be detected and then change the substring in the code to output the results on computer screen.
Testing
You need to run each code (dronecode1.py, dronecrowd.py, and dronetraffic.py) separately at different times for different applications. For example, when the droncode1.py is up and running, mount it on the drone. You can see live images being captured by the camera on your computer screen. You can send the drone with camera to a designated area for detection and monitoring. The distance the drone can fly depends on the Wi-Fi range.
Download Source Code
Ashwini Kumar Sinha is an electronics hobbyist and tech journalist at EFYi
hello ashiwini
where do i get the components?
pls guide
You can buy the whole kit on kits spares contact the requirements at
[email protected]
I downloaded the source code but it isn’t for this AI project..Please where can I download for the AI facial recognition right code.