


 “An opportunity in life to monitor each and every data of the health and a safety measure which analyze the real-time data and send emergency indication or message with an ornament rather than a device – Welcome to the new age of health monitoring ”
While working on an IoT-based DAQ system using the health monitoring sensors I got a thought that why the health monitoring system can’t be an ornament that we wear in our day-to-day life and thought about what if it’s a smart device that is capable of storing real-time data creating a platform for both monitoring and evaluation of the doctor while we are in our home itself and made sure it also ensures a feature of SoS which is one of the main issues in India where people couldn’t contact the authorities or doctors, thus let’s build a solution both of the problems.
Thus a private channel is created for the person where the health data and the data of the previous day and hour also will be available and the channel has the SoS emergency indication which can be used for the emergency alert by the patient or the person who is present in his or anywhere he can indicate his critical situation through the switch present in the ring he/she could indicate her situation to the doctor or the person closest to you when you are not safe.

It’s amazing right !!! come let’s build a smart solution for the future using ornament.
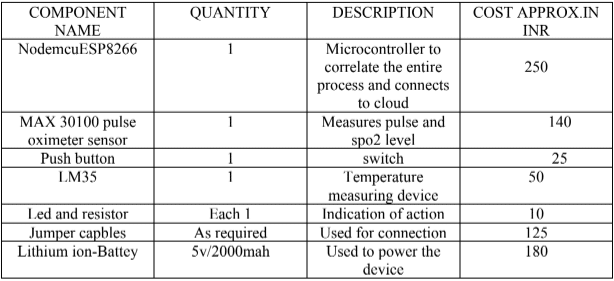
Bill of Materials
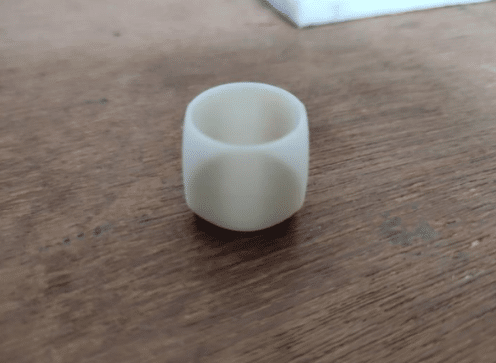
Designing Smart Wearable Ring

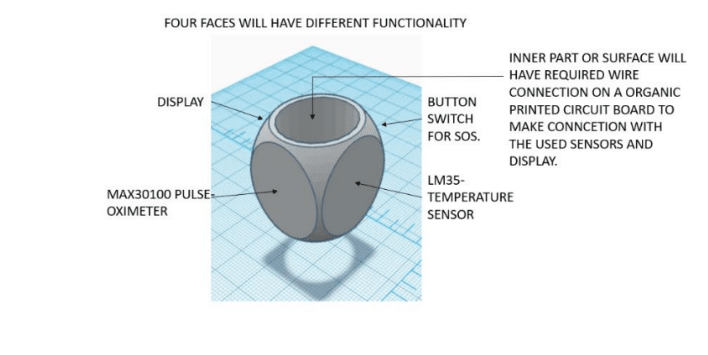
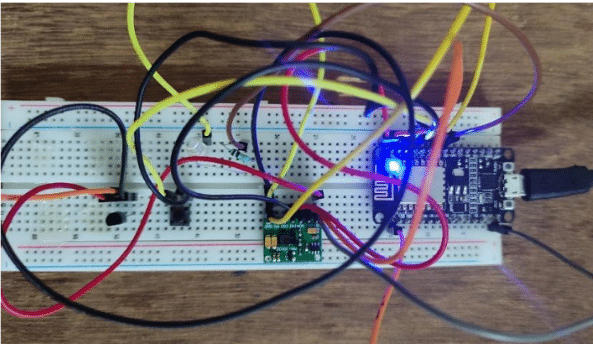
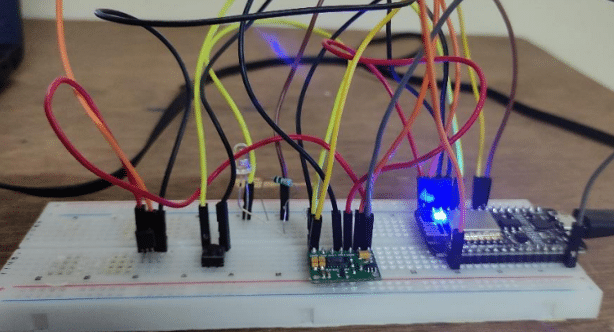
Connections for Smart Wearable Ring
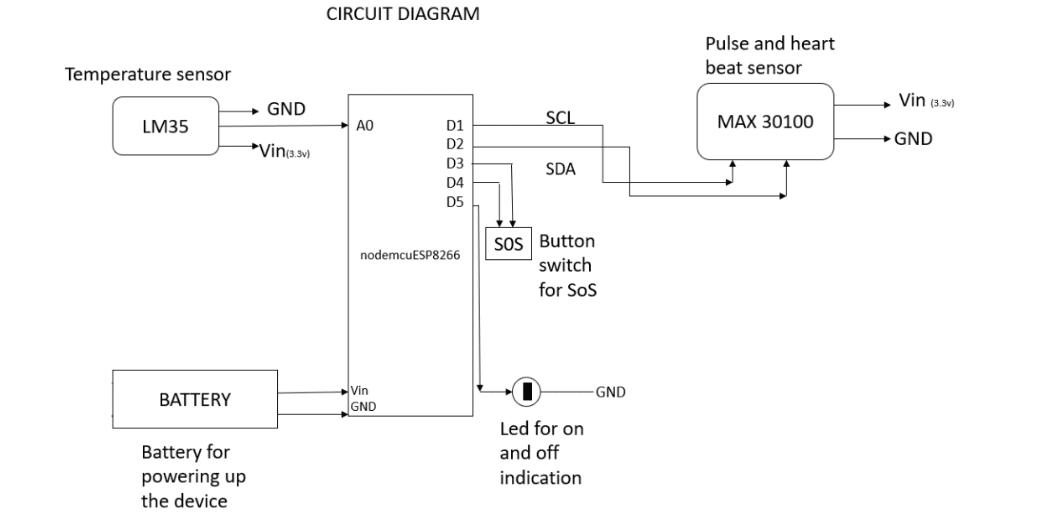
Use a jumper and breadboard for easy connections take a nodemcuESP8266 and place it in the breadboard and then first connect the 5v battery to the Vin and GND of the microcontroller. Now place the MAX30100 pulse oximeter sensor and connect the 3.3v power supply to the Vin and the GND pin to the GND of the microcontroller then connect the D1 pin to the SCL and D2 pin top the SDA both are digital pins. Next, connect the temperature sensor LM35 to the analog pin A0. Finally, connect a led to the pin D5, and the D3, D4 are connected in sires with a push button which acts as a switch for triggering the SOS message.
Now Develop and Connect to a Cloud-Based Monitoring Platform.
ThingSpeak Setup
To create a private cloud-based platform we use Thingspeak which is a cloud-based IoT-enabled monitoring platform with data retrieval. Collect Data in a New Channel
This example shows how to create a new channel to collect analyzed data. You read data from the public ThingSpeak channel 12397 – Weather Station and write it into your new channel. To learn how to post data to a channel from devices, see Write Data to Channel and the API Reference.
Create a Channel
1. Sign In to ThingSpeakTM using your MathWorks® Account credentials, or create a
new account.
2. Click Channels > MyChannels.
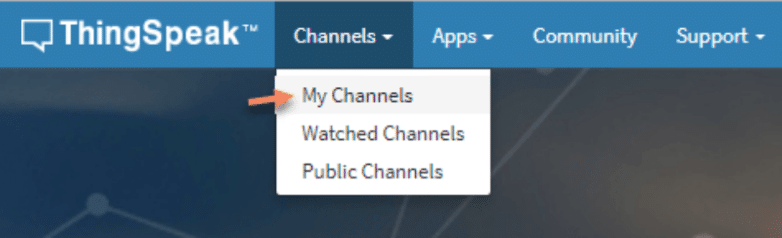
3. On the Channels page, click New Channel.
4. Check the boxes next to Fields 1–3. Enter these channel setting values:
• Name: Dew Point Measurement
• Field 1: Temperature (F)
• Field 2: Humidity
• Field 3: Dew Point
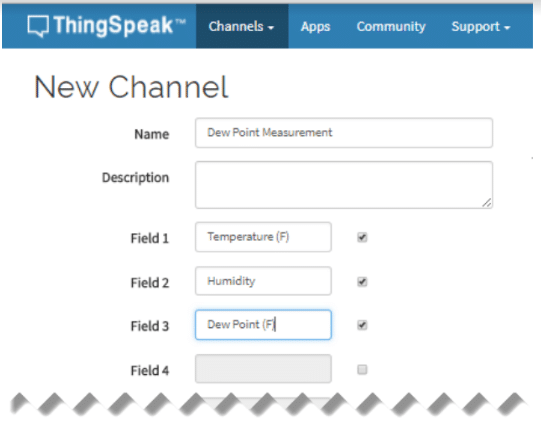
5. Click Save Channel at the bottom of the settings.
You now see these tabs:
- Private View: This tab displays information about your channel that only
you can see. - Public View: If you choose to make your channel publicly available, use
this tab displays selected fields and channel visualizations. - Channel Settings: This tab shows all the channel options you set at
creation. You can edit, clear, or delete the channel from this tab. - Sharing: This tab shows channel sharing options. You can set a channel as
private, shared with everyone (public), or shared with specific users. - API Keys: This tab displays your channel API keys. Use the keys to read
from and write to your channel. - Data Import/Export: This tab enables you to import and export channel
data.
Hence create a private channel as per your requisites and then use the provided api to write the data which is being used to export in different formats hence the data can be extracted in all the three formats XHTML, CSV, and JSON. Hence these data can be projected both in android based apps as JSON format is available and also compatible with web applications.
Hence write the requisites like SSID code, password, and the channel name and the API key should
be changed while you create a new system for different people.
Smart Wearable Ring – Code
Code to be pushed for the functioning of the device-
#include <Wire.h>
#include "ThingSpeak.h"
#include "MAX30100_PulseOximeter.h"
#include <ESP8266WiFi.h>
#define sig D3
#define ind D5
#define temp A0
int sos =108;
char ssid[] = "POCO X2";// your wifi name
char pass[] = "23456789";//your wifi password
#define REPORTING_PERIOD_MS 3000
PulseOximeter pox;
uint32_t tsLastReport = 0;
void onBeatDetected()
{
;
}
WiFiClient client;
unsigned long myChannelNumber = 1692760;// provate channel identificartion number
const char * myWriteAPIKey = "BRPZTFXC51XRL9D0"; // write api key to write the data.

void setup()
{
Serial.begin(115200);
pinMode(sig,INPUT);
pinMode(D4,OUTPUT);

Serial.print("Initializing pulse oximeter..");
if (!pox.begin()) {
Serial.println("FAILED");
for(;;);
} else {
Serial.println("SUCCESS");
digitalWrite(1,HIGH);
}
pox.setIRLedCurrent(MAX30100_LED_CURR_24MA);
pox.setOnBeatDetectedCallback(onBeatDetected);
WiFi.mode(WIFI_STA);
ThingSpeak.begin(client);
if (WiFi.status() != WL_CONNECTED)
{
Serial.print("Attempting to connect to SSID: ");
Serial.println(ssid);
while (WiFi.status() != WL_CONNECTED)
{
WiFi.begin(ssid, pass);
Serial.print(".");
delay(5000);
}
Serial.println("\nConnected.");
}
}

void loop()
{
digitalWrite(D5,HIGH);
digitalWrite(D4,HIGH);
analogRead(temp);
pox.update();
if (millis() - tsLastReport > REPORTING_PERIOD_MS) {
Serial.print("BPM: ");
int pulse = pox.getHeartRate();
Serial.print(pulse);
Serial.print(" SpO2: ");
int spo2 = pox.getSpO2();
Serial.print(spo2);
Serial.print("%");
Serial.println("\n");
tsLastReport = millis();
ThingSpeak.writeField(myChannelNumber,1,temp,myWriteAPIKey);
ThingSpeak.writeField(myChannelNumber,2,pulse,myWriteAPIKey);
ThingSpeak.writeField(myChannelNumber,3,spo2,myWriteAPIKey);
}
if(digitalRead(sig) == HIGH){
ThingSpeak.writeField(myChannelNumber,1,sos, myWriteAPIKey);
}
}
Testing Results for Smart Wearable Ring

After completing all the procedures we finally obtained an end device which is a futuristic device that is applicable for all people even from normal old people to youngsters can wear it can be more appreciable to use for old people, women who are pregnant who have the opportunity to avoid the risk and even this sort of device even reduces the travel to the doctor in future when developed to next level of the device. However, now your smart device Is ready for use.
