


 We have seen different types of human interface devices (HID), such as mouse and keyboard. In older versions of the mouse, optical sensors were used to detect movement relative to a surface, thus they required a smooth surface to function properly. They could work in only two coordinates. With advancements in technology, we are now talking about 3D user interfaces (3D UI). So, let us make a 3D Mouse and Keyboard (3D HID device) which has the capability to work in all three coordinates.
In this project, we are going to make a 3D wireless HID device that will give you a whole new experience of using computers and playing online games. With this device, you will be able to control computers and smartphones by just moving your hand in the air.
This project has two units: transmitter and receiver. The transmitter unit is to be attached to the user’s hand and the receiver unit is to be attached to your computer.
This device can be very helpful in making 3D UI based systems. We can use this device in 3D designing as well. For instance, you can draw any design by moving your hand in the air. Further, you can develop the device for 3D holographic display and virtual reality (VR) that gives us a 3D UI.
The system can be further developed for differently-abled people (without hands) to enable them to use computers and smartphones. They can wear this device on their head and operate gadgets by moving their head.
To start our interesting project, we need to gather the following components:
- Arduino Pro Mini 5V, 16MHz
- Two Bluetooth HC-05 modules
- MPU6050 sensor
- Arduino Leonardo Pro Micro (ATmega32U4)
- Jumper wires
- Micro USB cable
- Four pushbutton switches
Coding for 3D Mouse and Keyboard (3D HID device)
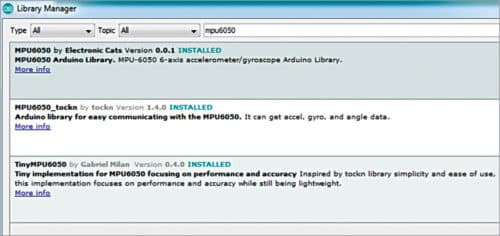
First of all, we need to install an MPU6050 library. Open library manager of Arduino IDE and search for MPU6050, then install the library (refer Fig. 1). Then set one Bluetooth as a slave and another as master; follow the Bluetooth instructions on the Internet to do this.
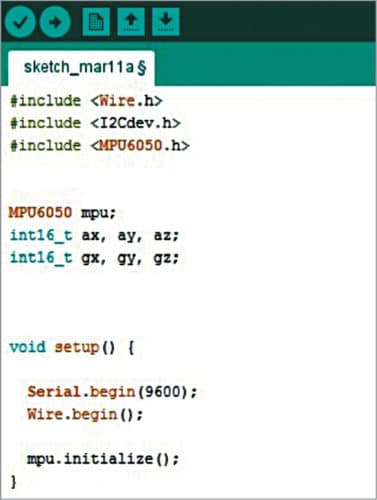
As we have installed the library, now we can start the coding part. In the first part of coding, we will include the library for MPU6050 and set the variables for storing values of the MPU6050 sensor. After that, we can set up the sensor and Bluetooth in set up function (refer Fig. 2). I have used a baud rate of 9600 in this code.
In the second part of coding, we will send the buttons and sensors data to another Arduino over Bluetooth (refer Fig. 3).
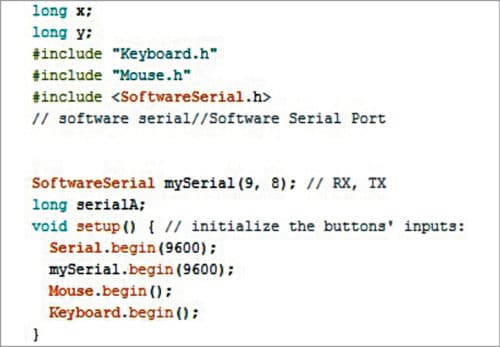
Our Arduino Mini code (transmitter) is ready now. So, let’s start coding for Arduino Pro Micro (receiver). First, we will create variables to store values, then set up Bluetooth to read serial data of the sensor (refer Fig. 4).
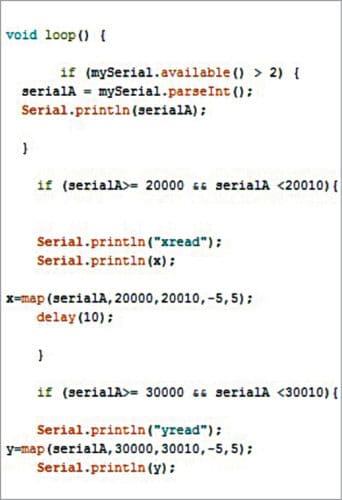
In the third part of our coding process, we will create a loop function and get the serial data from Bluetooth. Here in this code, I have used software serial for Bluetooth connection with a baud rate of 9600.
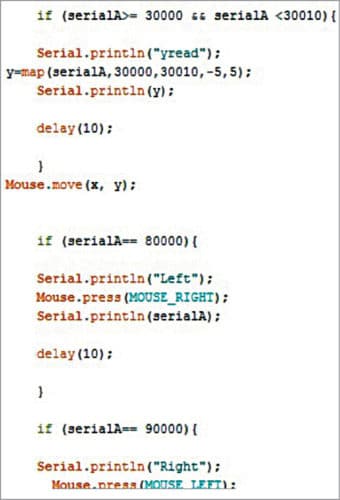
After that, we check the range value of serial data and assign its value for mouse movement as shown in Fig. 5.
Next, we will create if ( ) condition to check how the mouse button functions (refer Fig. 6). We can also add extra keyboard shortcuts and other functions to it. Here in this code, I have added buttons shortcut for copy and paste functions. You can create your own custom function according to your requirement.
As we have completed the coding part, we need to connect the components. Arduino Pro Mini pin-to-pin connections are shown in Fig. 7 and also shown in Table 1.

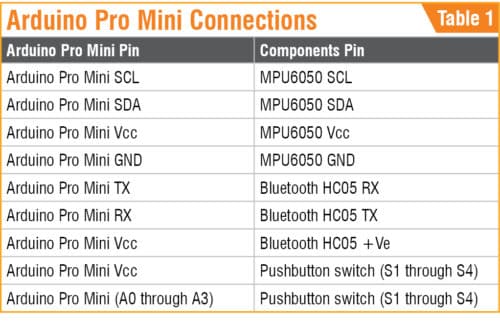
Switches S1 through S4 are connected to pins A0 through A3 of Arduino Pro Mini, respectively. Switch S1 is for mouse right click, S2 for mouse left click, S3 for paste and S4 for copy function.
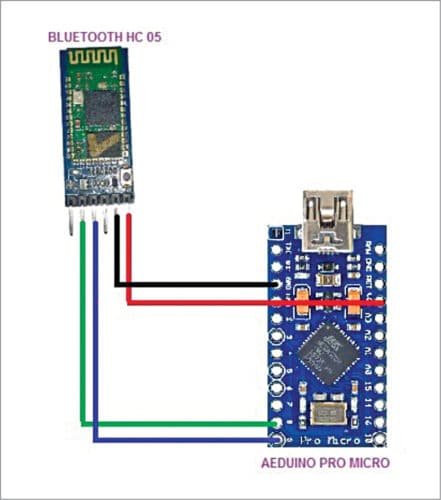
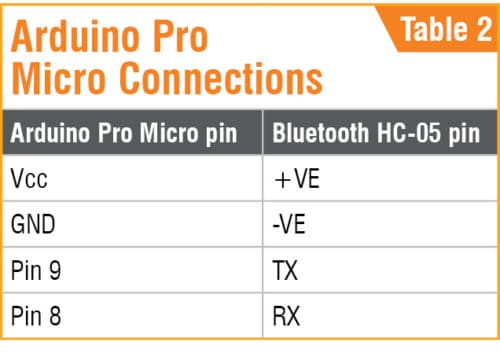
Now we will connect Arduino Pro Micro with Bluetooth as shown in Fig. 8. Arduino Pro Micro pin-to-pin connections with Bluetooth are shown in Table 2.
Next, we need to upload the code to Arduino Pro Micro. For that open Arduino IDE, select the board, COM port and press Ctrl+U to upload the code. Similarly, upload the code to Arduino Pro Mini after selecting the appropriate board.
Congrats! The wireless HID mouse is ready for use. First, make sure that the receiver unit is attached to your computer through a USB port. Keep a distance between transmitter and receiver units. Use pushbutton switches (S3 and S4) to operate functions like copy and paste on your computer. You can also do some awesome tricks with it—you can attach the transmitter unit on your hand or any toy gun and enjoy the real shooting game experience using switches S1 and S2. You can also attach the device on the tip of a plastic knife and play vegetable cutting game with it. Use switch S1 for actions such as shooting and cutting vegetables. Use switch S2 for additional functions such as selection and highlighting objects in video game applications.
Download Source Folder
Ashwini Kumar Sinha is an electronics hobbyist and tech journalist at EFYi
Wow, I love your design.
Have a great day.
Thanks for your feedback.
Thanks for the sharing of the wireless mouse. That is a great idea.
But i have a question for the coding, how should i find the value of the map like 17000, 20000,or -4?
that will independent of different mpu6050? Thank you so much if you can answer.
long x=map(ax,-17000,17000,20000,20008);
long y=map(ay,-17000,17000,30000,30008);
x=map(serialA,20000,20008,-4,4);
y=map(serialA,30000,30008,-4,4);