


Here we designed a smart Pressure Regulation System using Arduino and a Pressure sensor.
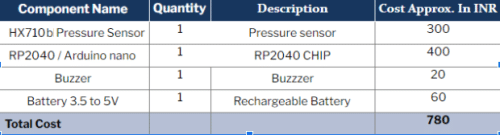
Maintenance of fluid pressure is critical in factories. While high fluid pressure can result in the bursting of pipes, low fluid pressure can create irregular fluid storage and transportation. Having a pressure regulation system can solve that problem. It can alert us of the rising and falling pressure with respect to the threshold pressure level. So today, you will learn to make a smart pressure system that monitors pressure and alerts you when any undesired pressure variation is detected. Let’s start the project by collecting the following components
Bill of Materials
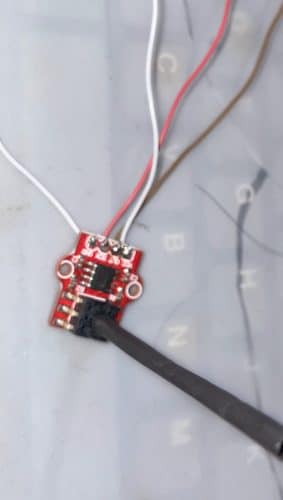
Pressure Regulation System – Setup
First, add the library for the HX710b air pressure sensor and download its .zip file. Then go to the Sketch menu, add its .zip file, select the correct HX710 lib, and add it to Arduino.
Note that the project utilizes Raspberry Pi 2040 chip and Arduino by default. Therefore, go to the Preferences menu and add the following URLs:
https://grumpyoldpizza.github.io/ArduinoCore-stm32l0/package_stm32l0_boards_index.json,https://dl.espressif.com/dl/package_esp32_index.json

http://arduino.esp8266.com/stable/package_esp8266com_index.json,,https://m5stack.oss-cn-shenzhen.aliyuncs.com/resource/arduino/package_m5stack_index.json,https://files.seeedstudio.com/arduino/package_seeeduino_boards_index.json
Now go to Boards Manager, search RP2040 Mbed OS, and install it.
Next, go to boards and select Raspberry Pi Pico under the Mbed OS option. You are now ready to program RP2040 in Arduino IDE.
Pressure Regulation System – Coding
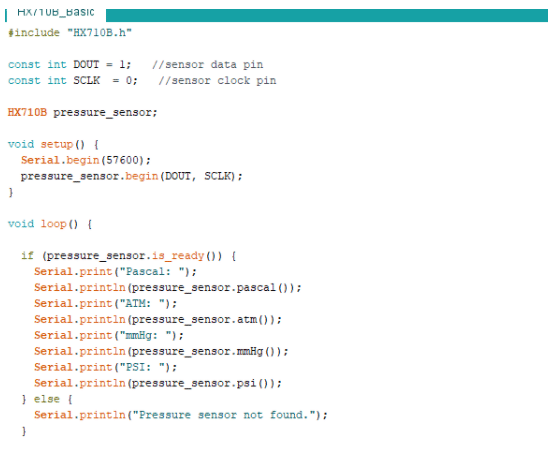
To begin coding, first, initialize the library and then define the pins for DATA and CLOCK lines for the sensor. Here, 0 and 1 pins are used for SCL and DA.
Next, create a setup function for starting the serial port with baud rate = 9600. and a loop function. Then, send the sensor data to the serial port and set the if condition to verify whether the detected pressure is within the threshold range of threshold. If not, then a buzzer will be triggered to alert you regarding any pressure deviation.
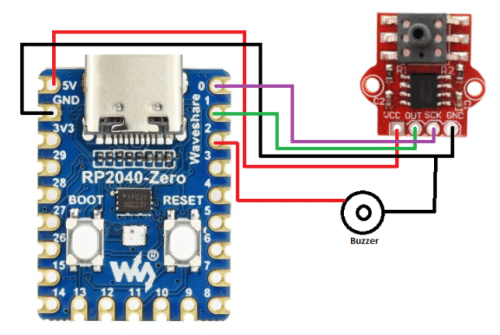
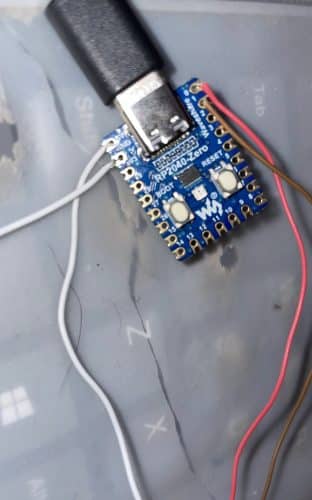
Pressure Regulation System – Circuit Diagram
Connect the components as shown in the circuit diagram. Join the sensor input to the fluid pipe for which you want to monitor the pressure and power the sensor using a battery or USB cable. You are now ready to use the completed device for monitoring and getting necessary alerts.
Pressure Regulation System – Final Prototype

Upon powering the device, increase the pressure of the pipe. When it exceeds the threshold level, the buzzer should alert regarding any undesired change. You can also monitor the pressure in real-time using a serial port.
Sir, do we need to calibrate the pressure sensor?
Fig.2 & Fig.6 are the same with pressure sensor not found.
Buzzzer should be buzzer in the BOM description.
You might need to caliberate the pressure sensor , But it give right reading is almost correct. The fig 2 shows sensor not found after giving reading because of the wire loose connection on bread board