


We all have seen a physical doorbell outside the buildings. It is very useful; but in current scenarios where dangerous diseases like corona spreading exponentially in the entire world, the physical doorbell is not the right option.
Continuously touching the bell switch by different people is harmful as coronavirus communicates via touching anything that already comes in touch with the infected person. So protection from coronavirus at the entrance (doorbell switch) is necessary.
Now the question is what we can do?

Here is the hack…
Hand sanitization is one of all good precautions to prevent transmission of the coronavirus in addition to social distancing.
So here in our proposed project, we designed and implemented a Corona Protected Automatic touchless Doorbell using Arduino and MQ3 Sensor.
You can check the demo video below to understand how this project will work.
Components Required
Here is a list of the components along with the price.
| NAME | QUANTITY | APPROX. COST |
| ARDUINO-UNO | 1 | 500/- |
| 12v,2A adapter | 1 | 230/- |
| MQ-3 ALCOHOL SENSOR | 1 | 130/- |
| IC-ULN 2003 | 1 | 15/- |
| 5V RELAY | 1 | 20/- |
| ELECTRIC DOORBELL | 1 | 150/- |
| LED | 1 | 2/- |
| 220OHM RESISTOR | 1 | 1/- |
| Breadboard | 1 | 75/- |
Note: We can use a 12V, 1A adapter also, instead of a 12V, 2A adapter.
MQ3 Sensor:
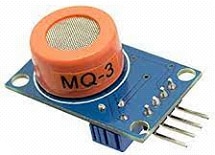
This is the heart of the touchless doorbell. MQ3 sensor is a metal oxide semiconductor (mos) type of sensor also known as chemiresistors due to its sensing based on the change of the sensing material when exposed to sanitizer order (which contains ethanol).
MQ3 sensor consists of a heating element that actually heats the conductive material layer whose resistance will be measured. The resistance changes when the sanitizer smell comes into contact with mq3.
MQ3 sensor has both analog and digital output. Here we use the analog output from the mq3 sensor because a huge range of values from 0 to 1023 in signal (analog) is transmitted which corresponds to the intensity of alcohol in a sanitizer.
ULN-2003 (RELAY DRIVER IC):

ULN2003IC is a relay driver IC. We use this IC when we require to drive high current loads by using digital logic circuits like an operational amplifier, 555 timers, logic gates, Arduino-Uno, microcontroller, etc.
ULN2003 is basically used to drive a relay, dc motors, and stepper motors. This relay driver IC is used to drive a 5-volt relay in the proposed work.
Arduino Touchless Doorbell Circuit Diagram
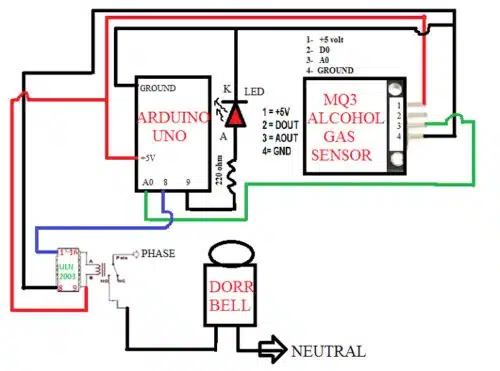
How does Touchless Arduino Doorbell Work?
When someone wants to ring the bell, he/she should put his/her hands in front of the MQ3 sensor after sanitizing hands (2 to 5 cm. distance).
At this moment mq3 generates an analog output which will drive the interfaced Arduino-Uno to generate a signal at pin-8 and pin- 9.
Here the LED is connected to pin-8 which will glow when mq3 senses the odor of sanitizer.
Pin 9 is connected to ULN2003IC which actually drives the relay at the same time and the relay is connected to the doorbell so it will ring.
Advantages of Automatic Touchless Doorbell
- Automatic bell ring facility at the entrance of the Building
- Mandatory use of hand- sanitizer so protection From corona
Arduino Doorbell Source Code
//rakesh Jain program
#define MQ3 A0
#define Thresold 420
int value;
void setup() {
pinMode(MQ3, INPUT);
pinMode(8, OUTPUT);
pinMode(9, OUTPUT);
Serial.begin(9600);
}
void loop () {
value = analogRead(MQ3);
Serial.println(value);
if ( value > Thresold )
{
digitalWrite ( 8 , HIGH );
digitalWrite ( 9 , HIGH );
}
else {
digitalWrite(8, LOW);
digitalWrite(9, LOW);
}
delay (500);
}
Here is a prototype of the corona-protected automatic doorbell.
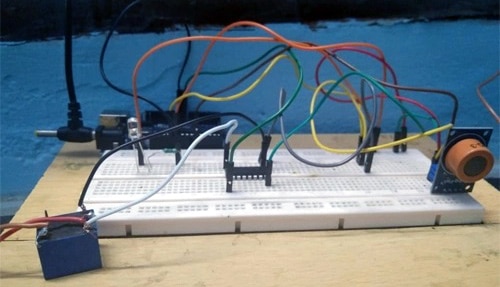
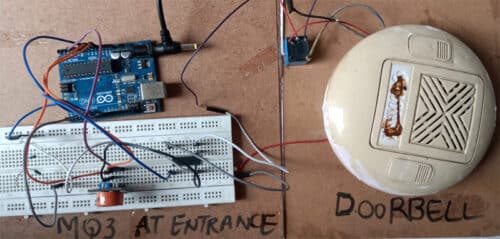

This is how you can build your own smart doorbell project at home.
If you face any issues while making this project, please feel free to ask in the comment section below.
We have also build other smart doorbells like Touchless doorbell using IR Sensor and Wireless Doorbell.
RAKESH JAIN received a Master’s degree in VLSI, B.E. in electronics and communication, and a DIPLOMA in electronics. He is currently working as an Assistant professor in the ECE department at Geetanjali institute of technical studies, Udaipur. His research area is SENSOR and Microcontroller. He has 17 copyright and 3 Indian patents.
RAHUL MOUD received a Master’s degree in VLSI, B.E. in electronics and communication. He is currently working as an Assistant professor in the ECE department & Dean of Student Affairs at Geetanjali institute of technical studies, Udaipur. His research area is Network theory and analysis.
This Article was updated on 28-09-2022.
Sir i Rakesh jain author of this project have already been mailed you that we can use 12V,1A adapter here instead of 12V,2A adapter as i mention here.
During making of this project I have only 12V,2A adapter only so i used it but anyone can use 12V,1A adapter and circuit will work.
Dear Rakesh, we have added a note with same information at the end of the article.
Great work during this pandemic situation
Thank you for your valuable feedback.
Nice
Thank you for your feedback.
Wow
Thank you for your feedback.
Amazing
Thank you for your feedback.
Useful
Thank you for your feedback.
When will it publish in magazine,i Am quite exited for it,can anyone tell me that when will it publish in magazine,or can anyone please provide me contact number of both the author