


 This digital photo frame is designed using Arduino Uno. Smartphones with high-resolution cameras and enhanced features have motivated people to click photos of almost everything that they come across. It is not possible to frame all photos on a wall and, hence, the digital photo frame was invented in the 1990s, which would accept memory cards directly from digital cameras and display photos on the screen.
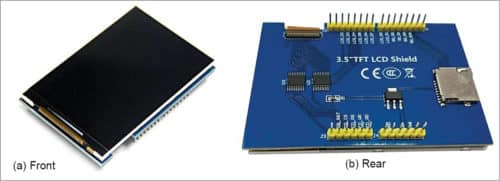
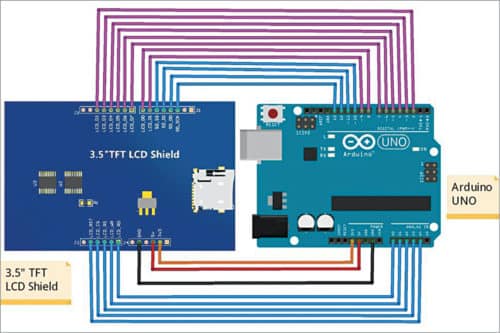
This proposed digital photo frame is quite inexpensive. You just need Arduino Uno, 8.89cm (3.5-inch) TFT colour LCD shield with 320×480 resolution and onboard micro-SD card slot. The main advantage of the shield is that it is compatible with Arduino Uno, Mega and other boards. The TFT LCD shield used in this project is shown in Fig. 1, and the connection diagram between Arduino Uno and the shield is given in Fig. 2.
Hardware library MCUFRIEND_kbv for the TFT LCD shield module can be downloaded from the link.
The library folder consists of several sample programs. Sample code showBMP_kbv_Uno.ino available in MCUFRIEND_kv library folder is a demo program to perform a slideshow of images on the screen, which is refined to display.ino for this project and made available along with this article.
You also need a graphics library, called Adafruit GFX library, for the proposed design. This can be downloaded from www.arduinolibraries.info/libraries/adafruit-gfx-library
Two limitations that were noticed with the demo code are:
1. Images with bitmap extensions (*.bmp) can only be displayed on the screen, whereas the proposed digital frame should cater to various other formats of images, such as *.jpg, *.png, *.jpeg, *.tiff, etc.
2. Resolution of images that can be displayed is 320×480 pixels, whereas the proposed digital frame should cater to images of any resolution.
To take care of these two limitations, a dedicated software called Converter is designed using Python script (converter.py) to convert images of all other formats into *.bmp format with a resolution of 320×480 pixels for the proposed digital photo frame. You can convert format and size of each photo manually using Microsoft Paint, but this is a tedious job for multiple photos. Converter software avoids the need of manual conversion.
To run Python script, you will need Pillow module, which comes inbuilt with some Python distributions. It can also be installed by running pip install Pillow in the terminal. Alternatively, you can directly run converter.exe file to start converting the files.
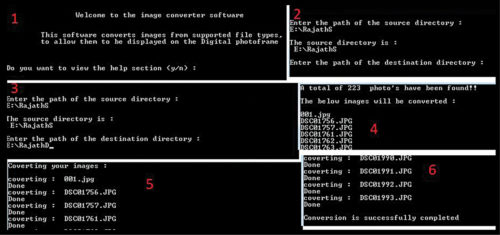
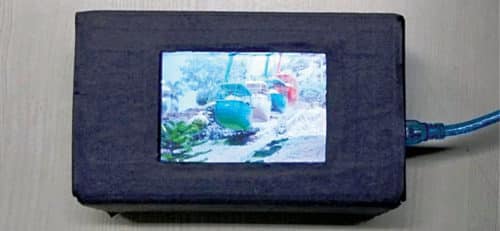
Snapshots of the sequence of software execution process are shown in Fig. 3. Once you select the source and destination folders, the software will identify the number of files and display the progress of the conversion process. As shown in Fig. 3, there are 223 photos detected in the SD card. Once conversion is complete, images from destination folder can be copied onto the micro-SD card and inserted into the TFT LCD shield. The author’s prototype is shown in Fig. 4.
Testing steps
Follow the steps given below to test the project:
1. Install Arduino IDE and copy library files to Arduino library folder.
2. Open display.ino file from Arduino IDE and click verify/compile. (This should show ‘Done Compiling’ message. If not, ensure that library files are in the correct destination.)
After opening Arduino IDE, make sure to select Show Verbose Output During Compilation from File/Preferences/Menu. Otherwise, you will get an error message, ‘warning: converting to non-pointer type ‘int’ from NULL [-Wconversion-null]’
3. Make sure photos are stored on an SD card. Insert the micro-SD card to the TFT LCD shield module.
4. After compiling and uploading the code to Arduino, connect the TFT LCD shield to Arduino Uno.
5. Connect Arduino to a suitable power supply using a USB cable or 12V adaptor.
6. Photos in the SD card should now appear on the display module in the form of a slideshow.
7. Ensure the digital photo frame works as expected.
Download Source Folder
Dr J. Manikandan is professor in department of electronics and communication engineering, Crucible of Research and Innovation, PES University, Bengaluru
Rajath J. is an electronics hobbyist at Crucible of Research and Innovation, PES University, Bengaluru

C:\Users\Kjell 2\AppData\Local\Temp\Rar$DIa9656.29544\display\display.ino:42:14: warning: converting to non-pointer type ‘int’ from NULL [-Wconversion-null]
if (f != NULL) { //file exists
What does that mean. Error message when compiling code
The author Dr Manikandan replies : Thanks to the reader for showing interest in our article. After opening Arduino IDE, make sure to select Show Verbose Output During Compilation from File/Preferences/Menu.
Otherwise, you will get an error message, ‘warning: converting to non-pointer type ‘int’ from NULL [-Wconversion-null]’ Is it possible for the reader to share a snapshot of the error, as we understand it to be a simple warning and can be easily ignored.
I got it that you have to set Show Verbose Output. Then it compiled okey.
Next problem is that when converted in the Converter designed using Python script (converter.py) the pictures comes out inverted in colour. What’s the problem in the code?
I manage to invert the picture in Photoshop and then it get displayed correct.
Best regards Kjell Nilsson
The author Dr Manikandan replies: We haven’t understood the query clearly, as we never expected this problem. We never got any inverted colour image on using the python script converter.py.
One possibility is that you would have modified the code. We would be happy to help you, if you can share additional information on the problem such as the actual input image, inverted colour image obtained and the code used.