


 The modern smartphone uses either a backlight display or an OLED display that can harm our eyes on prolonged use. That’s why the E-ink phone is getting popular nowadays. It produces less strain on the eyes.
You may have wondered how phones are designed and whether you could make your own smartphone.
So, here is how you can make your own smartphone having impressive E-ink technology.

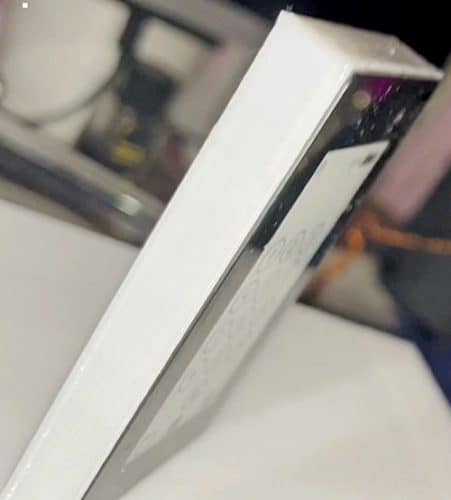
Here we used E-ink Display and Raspberry Pi to make this E-ink Display Project.
This full-touch, finger-sized phone uses UI-powered Linux operating system (OS) that can be accessed using any OS and VNC HDMI. It can perform all the basic functions of a phone.
It is so small that it can be strapped to your little finger.
E-ink technology saves power due to the absence of a backlit display and it is good for those who want to avoid the glare of OLED and backlit displays. E-Ink display, like the printed paper, remains visible even when power is cut off until you refresh it.
However, this is not all. We are going to develop the E-Ink phone, and without any extra cost, you will get a full Linux-based portable finger-sized computer as well!
So, let us start collecting the required components, which are listed below-

Designing E-ink Smartphone
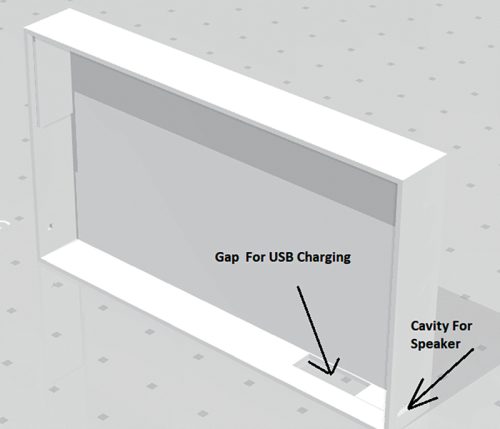
Though it is a totally homemade DIY phone, we can design it to look slim and attractive. So, for the phone, make its body the same size as the E-ink touch display. Then make space for embedding the GSM module inside the phone body.

Next, make a tiny hole where the speaker is to be placed so that you can hear the sound. Similarly, make holes for the mic and power input. Now, after designing the phone body, 3D print it.
Raspberry Pi Configuration
Prepare the Raspberry Pi with its latest OS and then enable the SPI and I2C and serial ports of the Raspberry Pi.
To do that, run the following command in the Linux terminal and enable software configuration one by one.
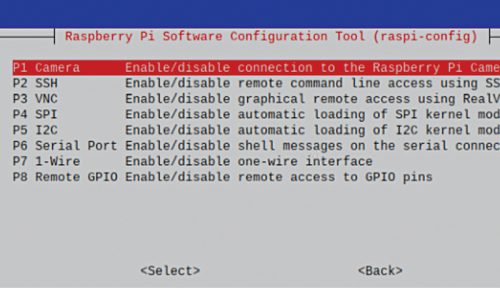
sudo raspi-config
Next, install the driver for the E-ink touch display and the Python modules to use the display. To do that, open the Linux terminal and run the following commands:
wget http://www.airspayce.com/mikem/
bcm2835/bcm2835-1.68.tar.gz
tar zxvf bcm2835-1.68.tar.gz
cd bcm2835-1.68/
sudo ./configure && sudo make && sudo make
check && sudo make install

sudo apt-get install wiringpi

#For Pi 4, you need to update it:
wget https://project-downloads.drogon.
net/wiringpi-latest.deb
sudo dpkg -i wiringpi-latest.deb
gpio -v
#You will get 2.52 information if you
install it correctly
sudo apt-get update
sudo apt-get install python3-pip
sudo apt-get install python3-pil
sudo apt-get install python3-numpy
sudo pip3 install RPi.GPIO
sudo pip3 install spidev

cd ~
git clone https://github.com/waveshare/
Touch_e-Paper_HAT
E-ink Display Phone UI Design
We need to create the user interface (UI) for the phone so that it looks beautiful. You can choose any icon and design a custom UI of your choice. For this prototype, round icons are used.
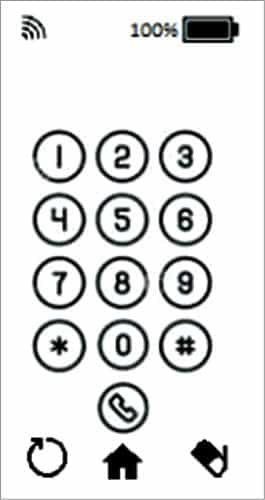
For UI, we must have the basic design to perform the basic functions. So, here is the list of UI pages for the basic phone functions:
- Main screen
- Dialing screen
- Contacts screen
- Messages
- Incoming call
- Calling screen
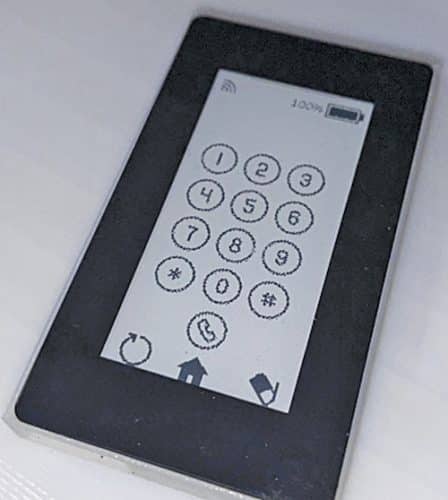
For every screen UI, we need to get the icon, resize it, and place it such that it fits inside the actual size of the phone’s display (5.4cm size in prototype).
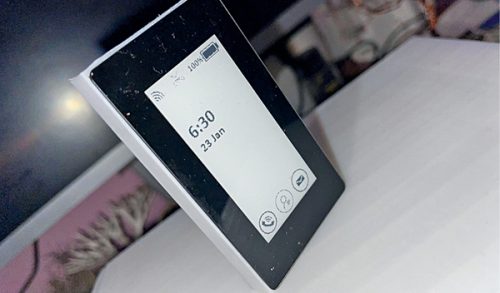
For the main screen UI, the battery icon is used for getting power information, a tour icon for getting the signal info, and a dial icon for the dialing screen, contacts, and messaging screens.
In the middle, it is kept blank to display the time, date, etc.

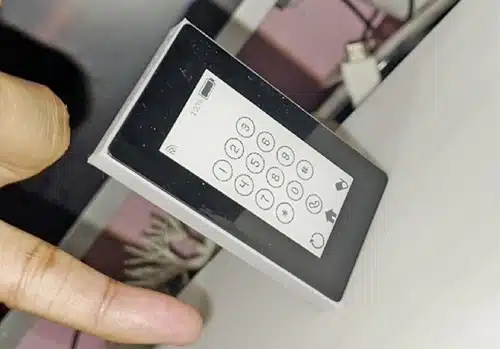
Create the dialing screen UI for the numbers and other icons. Dial a number and go to the home screen, or erase and refresh the screen. Similarly, make UIs for the remaining phone functions and screen.
Save the images from the UIs in the pic folder of the Python library that was cloned earlier. Open the code for displaying.
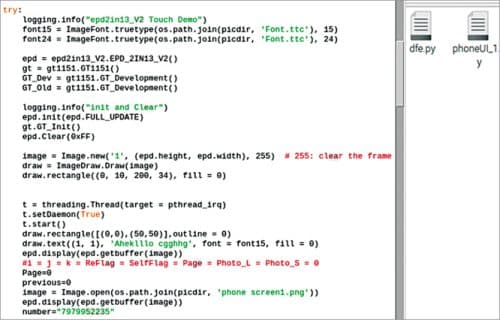
Making our own Mobile OS
To create the code for OS for the phone, import the modules and library for interfacing the E-ink touch display. Then import the Python modules for using the SIM800L GSM module.
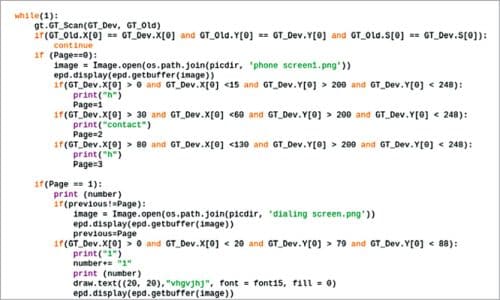
Next, set the path where you keep the UI images for the phone and create the while loop to check the screen. The page to display is similar to the previous one, but new if its previous one has a new page number. Update the display with a UI pic.

For the (first) home page, check the touch points for the icons like the dial icon, contact icon, or message icon. Also, check the incoming call by checking the ring pin.
Then create an ‘if’ condition where you check the touch points to match the range of icons on the UI. If you touch the phone icon, the touch point should match the touch point corresponding to the phone.
Set the function in the if condition to change the page number to next (No. 2). That is, in the UI image of the dialing screen, update the phone screen and set the page number to 2.
Now the phone moves to the dial screen with button numbers. Create the if condition for checking the numbers and icons.
Touch the dial pad screen if the touch point range of the number is one or two, or other number buttons. Update an empty string named number, and add that number to the string.
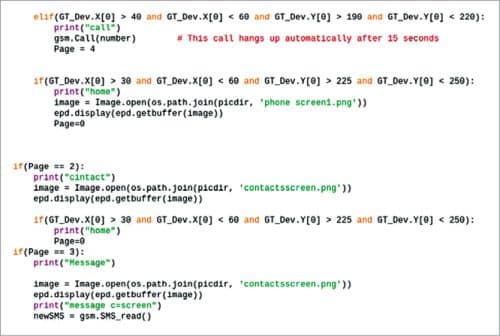
If the touch point matches with the call icon, it sends the command to the GSM module to call that number. It also sets the page number to the calling screen and updates the display with the calling screen.
On the calling screen, check the touch points for the Call Hang icon. If your touch point matches the range of the call-hang icon, the touch point will send the command to the SIM800L GSM module to cut the call and hang up.
It will also change the page number to 0 and update the display with the home screen UI.
Similarly, check the touch points and incoming calls and then change the page number and update the display screen with UI for the message, contact, or ringing screen.
Then on that screen, check the touch point for the button icon, and touch point range, and set the function for those buttons—like hanging phone, home, main screen, calling, and other functions for the button icons.
Download Complete Source Code
E-ink Display Phone Circuit Connection
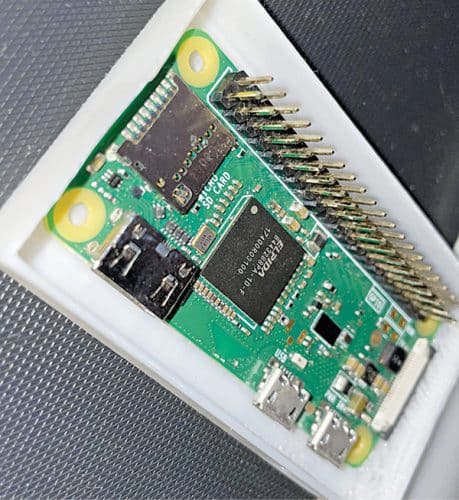
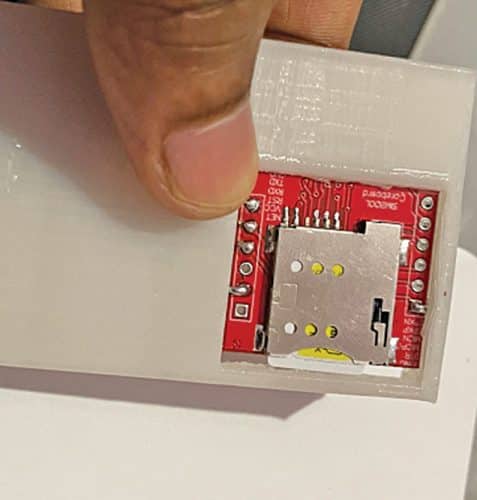
After coding, connect the components as per the diagram shown below. Place the Raspberry Pi and SIM800L module inside the enclosure/body that has been designed. Fix the speaker and microphone against the holes made in the enclosure for them.
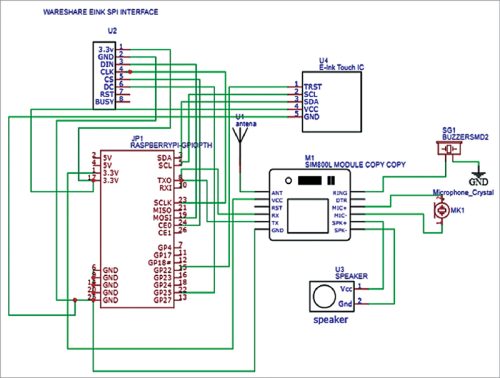
Fix the battery and charging unit in between the display and Raspberry Pi. Then mount the display on the enclosure with the pins matching the E-ink female header-to-header on Raspberry Pi.
Fix the GSM module on the slot and the phone screen on the base phone cover.
Testing
The E-ink phone is now ready to show its magic. Insert the SIM in the GSM module and run the OS code, and you are ready to use it.
In the below video, you can see how the phone looks and it’s working…
Tap on the Call icon and you will get the dialing screen. Key in a phone number and touch on the Call icon to make the call. Touch the Home icon to get the home screen and touch Contacts to see the contact numbers.
Next, try making a call from some other phone to your E-ink phone. When connected, the buzzer starts ringing and it takes you to the ringing screen. Here, touch the Call Attend icon to attend the call and the Call Hang icon to hang up the call.
This is how you can make your own phone at home using E-ink Display and Raspberry Pi.
We have also built the E-ink Display-based smallest Laptop using Raspberry Pi you should check once for sure.
One important thing….
If you face any issues while making this project, please feel free to ask in the comments below.
Hi, Sir i have problem to get the desired value for zener diode current limit resistor. the value i calculate is correct including the power rating, but still the resistor get heated during operation. i want to get the smooth operation.