


 Nowadays, people have smartphones with them all the time. So it makes sense to use these to control home appliances.
Presented here is a home automation project using a simple Android app, which you can use to control electrical appliances with clicks or voice commands. Commands are sent via Bluetooth to Arduino Uno. So you need not get up to switch on or switch off the device while watching a movie or doing some work.
Home automation circuit and working
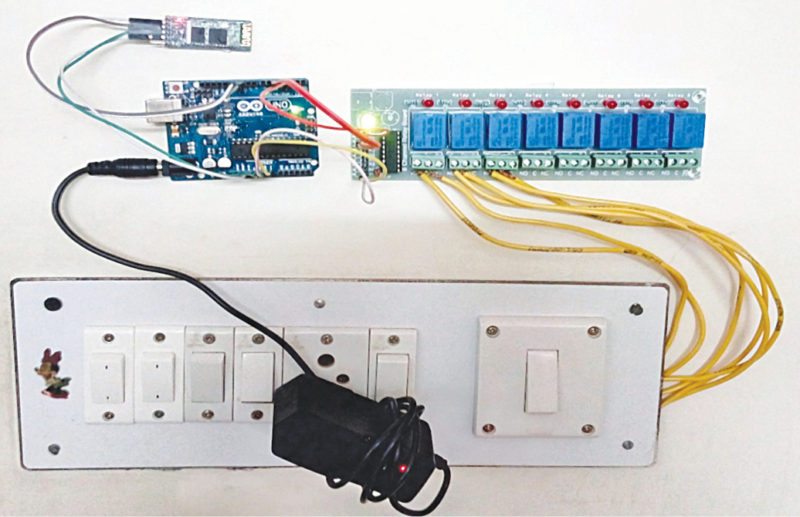
The home automation circuit is built around an Arduino Uno board, Bluetooth module HC-05 and a 3-channel relay board. The number of channels depends on the number of appliances you wish to control.
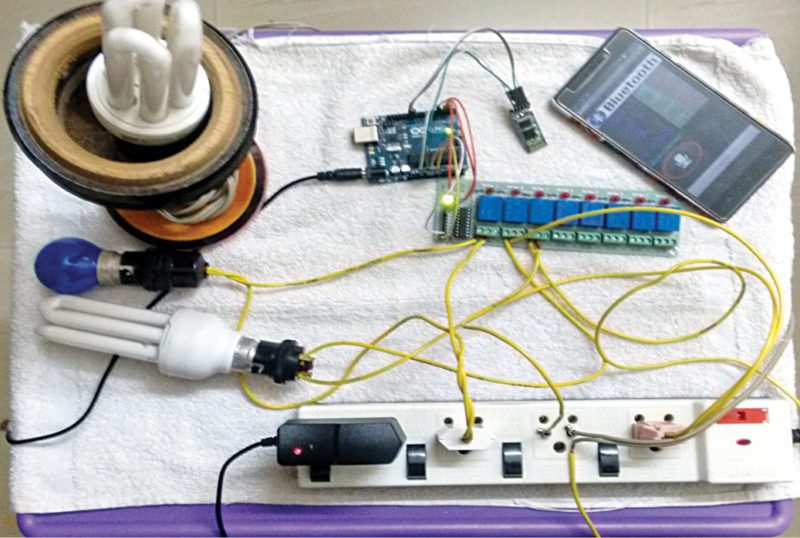
Arduino Uno is powered with a 12V DC adaptor/power source. The relay module and Bluetooth module can be, in turn, powered using a board power supply of Arduino Uno. Author’s prototype is shown in Fig. 1. Connection details for each appliance are shown in Fig. 2.
Bluetooth module
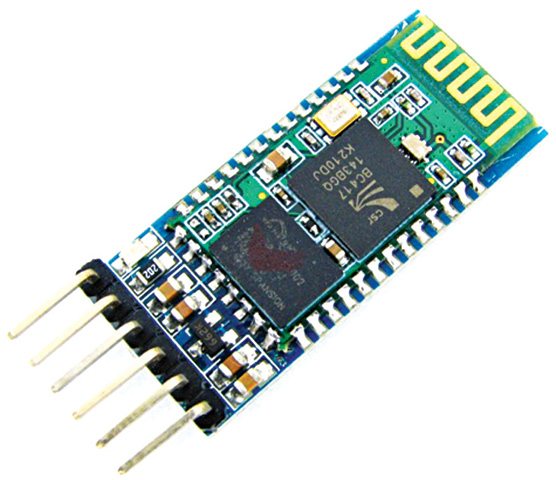
Bluetooth module used in this project is HC-05 (Fig. 4), which supports master and slave mode serial communication (9600-115200 bps) SPP and UART interface. Using these features it can communicate with other Bluetooth-enabled devices like mobile phones, tablets and laptops. The module runs on 3.3V to 5V power supply.
Relay module
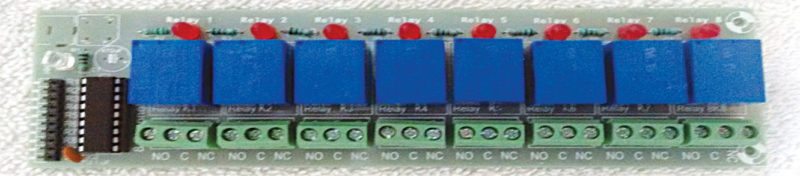
A relay allows you to turn on or turn off a circuit using voltage and/or current much higher than what Arduino could handle. Relay provides complete isolation between the low-voltage circuit on Arduino side and the high-voltage side controlling the load. It gets activated using 5V from Arduino, which, in turn, controls electrical appliances like fans, lights and air-conditioners. An 8-channel relay module is shown in Fig. 5.
Arduino Uno board
Arduino is an open source electronics prototyping platform based on flexible, easy-to-use hardware and software. It is intended for artists, designers, hobbyists and anyone interested in creating interactive objects or environments.
Arduino Uno is based on ATmega328 microcontroller (MCU). It consists of 14 digital input/output pins, six analogue inputs, a USB connection for programming the onboard MCU, a power jack, an ICSP header and a reset button. It is operated with a 16MHz crystal oscillator and contains everything needed to support the MCU.
It is very easy to use as you simply need to connect it to a computer using a USB cable, or power it with an AC-to-DC adapter or battery to get started. The MCU onboard is programmed in Arduino programming language using Arduino IDE.
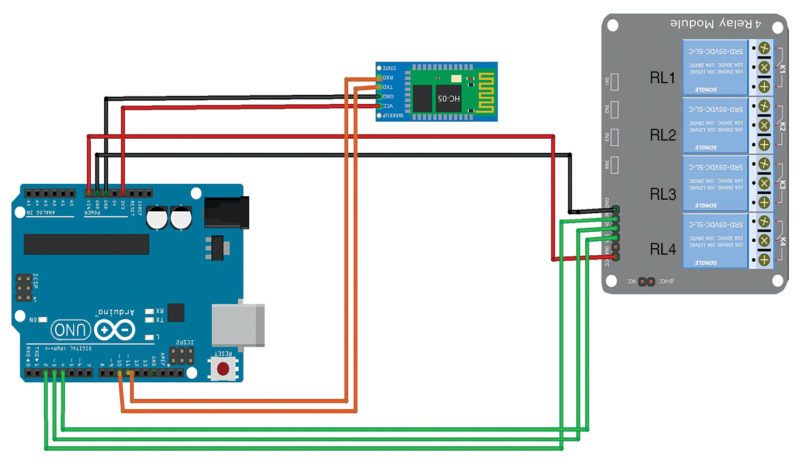
In this home automation project circuit, Pins 10 and 11 of Arduino are connected to pins TXD and RXD of the Bluetooth module, respectively, as shown in Fig. 6.
Pins Gnd and Vcc of the Bluetooth module are connected to Gnd and +3.3V of Arduino board respectively. Pins 2, 3 and 4 are connected to the three relays (RL1, RL2 and RL3) of the relay board. Pins Vin and Gnd of the relay board are connected to pins Vin and Gnd of Arduino board, respectively.
Note. Vin is usually used to give input power, but since we are supplying 12V to Arduino using an adaptor, we can use Vin pin on Arduino to power the 12V relay module.
Software
The software program for the home automation project(homeautomation.ino) is written in Arduino programming language called Processing. Arduino Uno is programmed using Arduino IDE software that you can download from arduino.cc. MIT App Inventor software was used to create the Android app (.apk) for this project.
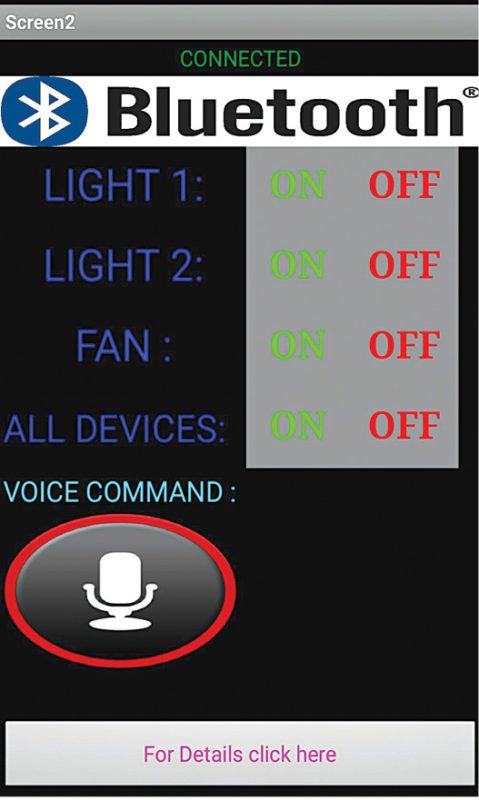
The app on your smartphone sends data when you click on buttons or feed voice commands via Bluetooth in the mobile to Bluetooth module HC-05 connected with Arduino board. Received data pin TXD of the HC-05 is connected to Arduino. Arduino Uno processes the received data and controls the relay board accordingly.
Procedure for installing the Android app (.apk) is as follows:
1. Download the app (homeautomation.apk).
2. Run .apk file. It will prompt you to complete the action. Click Package Installer and then Install.
3. You will also need a voice-recognition app on your Android smartphone. Most smartphones have this app preinstalled. If you do not have it, download one from Google Play Store.
Download source folder: click here
Construction and testing
Assemble the circuit as shown in the circuit diagram. Open Arduino IDE and compile the program (sketch). Upload the sketch (homeautomation.ino) to Arduino board. Switch on the power supply to Arduino by connecting it to 12V power source. Pair Bluetooth module with your Android phone. Type password ‘1234’ (default password) of Bluetooth module.
Click Bluetooth Image on the app to connect it with the Bluetooth module. It automatically connects and displays as Connected in the app.
You are now ready to control the appliances using the app. You can either use on/off buttons or voice commands to control the appliances. You can control more electrical appliances by increasing the number of channels in the relay.
For instance, using an 8-channel relay, you can control up to eight devices. For this, you need to alter the source code by adding input commands and voice commands to control the devices.
Karthik Rajasekaran is a third-year ECE student at Info Institute of Engineering, Coimbatore
More projects are available at: Electronics Projects
This article was first published on 16 August 2018 and was recently updated on 10 December 2018.

from where we can buy these components
You can search for these components at http://www.kitsnspares.com
Bhay kay aap muje program bhej sakte ho by mail
Please
Astech369@Gmail. com
Did you get it?
Please share if yes!
coding please email [email protected]
I need this coding pls
Send to [email protected]
You can download the source code here: https://efy.efymag.com/admin/issuepdf/Home%20automation%20using%20Android.zip
Please there is no page three
I can’t find your script that need to program in Arduino.
You can find the script on the second page of the DIY article.
Can you forward me the coding and the library on [email protected]
please forward me the source code of mobile application
[email protected]
plz forward me codding, library and source code of mobile application on
[email protected]
Where i can buy this component.
Arduino uno board
Bluetooth HC-05
Relay board
You can search for these components at http://www.kitsnspares.com
bro please send me source code of this mobile application i shall be thankfull to you
at this gmail id [email protected]
You can look for online shops like amazon in your country of residence or try ordering from banggood or aliexpress
Aliexpress
Can you suggest any online sites or programs that can run the simulation with Arduino UNO or other boards with a code? Thanks.
From the physical switch and app, both can be controlled ?
Yes, relay is connected in parallel with physical switch but in this case when physical switch turn on then the AC appliances is still on even after off the relay.
if you use a double way switch it working both…i need android code please
Need projects on smart intruder system
Dear Mukesh for reference you can have a look at these reference projects
Would this be good for the main project in final year ???
Yes.
AM WAITING FOR COLLEGE EC BRANCH AUTOMATION ………IS IT HAVE ?…..PLZ SUGGEST ME……BY MAIL….THANKU
Kindly elaborate your query.
circuit deign kon software a kora hoy pls ans
Could you please write in English?
Bro please send me source code of android application I really need it
It’s my humbly request to send me code at
ikramnoormsh127@Gmail. Com
Hi , my friend. How to add more relay and on / off button on apk app ???
where is the arduino uno program file and circuit diagram?
It is present on second and third page.
hello i liked your project.
But where exactly is the arduino program
Can you please send me that on my e mail address [email protected]
if u got the code snd me on over [email protected]
Is there a diagram that shows how the appliances are connected to the power strip and relay module? It’s a little hard to make out the connections from your picture.
Total cost of the project Any idea ?
nice project. where can download the arduino program code? the third page only have android app
plz tell me where i can find arduino program code??
You can download it from here.
Thanks for the feedback!
You can download the code from here.
Hi can you please share the mobile application code for this project
i can’t find app .please guide me
It is present on the third page.
is the given code is based on audio or bluetooth apk
The code given is for Arduino
Can we power the arduino with a USB cable? Instead of the 12V DC?
No. In this project, the relay board used here requires 12V power supply. So an external 12V DC adaptor for the Arduino board is used instead of USB cable. Therefore, 12V is reflected at Vin pin of the Arduino board, which is used to power the relay board.
sir, i need a circuit diagram and connections,
It is present on the second and third page.
I can’t able to update the program in arduino uno board
First compile the homeautomation.ino sketch from Arduino IDE.
Then select the correct Arduino board and COM port from Tools menu. Now, you should be able to upload the code without any problem.
i want to know the clear physical connection of this project all component and how to expand the on/off switch in android application please help me as soon as possible my email id :- [email protected]
sir…can we use arduino nano or arduino mini insted of arduino uno? n can we add more relay and on/off button in apk after using another digital pin of arduino n programing as acording to pin?……..thank you for your answer……
how many voltage relay you are using is relay is 12v ???
Yes, relay voltage rating should be 12V
how much amps
What is the basic use of Arduino which can help common people in their daily life.
Arduino is a ardunio
should we connect a transformer for the relay board to work??
@Saicharan. No. Transformer not required.
can I use wifi module in this project? z
please say about total cost of this project
The approximate cost of the project without mobile phone is below Rs 3000.
hai siddique, are you complete these project using LAN
No. This project is designed for use with Bluetooth module.
Can you please provide the Arduino code which is being used in this project?
You can download the code from here. http://www.efymag.com/admin/issuepdf/Home%20automation%20using%20Android.zip
How much this project cost without mobile ?
hi friend Can you please send the Arduino code my mail
id;[email protected]
Hello sir, I want to know
>how to connect DC fan,
>physical connection of each components,
>circuit diagram,
>block digram,
>flow chart and
>code,
of this project using “audino uno” board android base.
Please…… help me sir as soon as possible my email id-
sikankumarnayak65@gmail. com
mashichya phodyat
sir i am just using 5V RELAY. Can it work? If there any change can I do for the use of 5V use ?
no need to change
How to write a program for 8 chennal relay
I’m 23 year old &I’m handicapped physically ..
& can I use this project for control DC motor.
Do any body can help me,
For aurdino android based whell chair program
sir,,,please send me code…[email protected]
The code is already present within the article.
Hi Sir, Could you send me the source code of the application? I am also creating the same kind of application for my TY project but there are errors. So could you please help me out and send the source code for the application just for reference ?
The source code of this project is available for free download at http://www.efymag.com/admin/issuepdf/Home%20automation%20using%20Android.zip
Bro every thing is fine but when i try to on light in my android mobile corresponding operation in load side is not happening. Can u suggest me where is the problem.
Upload this code into your Arduino board. Make sure you pair the Android Bluetooth with the Bluetooth connected in the circuit. Next, turn on or off ‘Light1’ button on your Android. If the light is still not turning on/off, check the corresponding relay connection.
Sir could you please help me in writing a program for 4 channel relay my email id [email protected]
i cant find the app pleas get me detail how to download the app
Nice project sir i want to make it.
Will you plzz send its circuit diagram to me ?
[email protected]
Dear Hemant, the circuit diagram is already provided in the article.
Can it be implemented practically.? In he rooms.
Can v use 2 controllers
Can v do this in our rooms??
And there can be 2 users or not?
wow!
It’s not working properly,can you help me.
connectionsm are ok, but it is not responding and when responding its like get confuse and execute any command whatever its wants to..
Iam using 3 individual relay and relay driver …
How to connect the relay with power supply and the bulb. The relay has NO, C & NC ports which to connect with what.
Kindly reply soon.
sir Give positive of Ac to commom And Give on wire from bulb to NC
dear sir can u pls give the circuit diagram of Arduino Projects: Home Automation System Using a Simple Android App.its very urgent…….
You can get all the information about the project here: https://www.electronicsforu.com/electronics-projects/hardware-diy/arduino-home-automation-system-android-app
Sir sent cricuit diagram and program
Dear Anandhu V, the circuit diagram is present within the article.
Which app is used to this project pls help me sir
homeautomation.ino
can you pleassseeee tel meeee where is the arduino code icant find it???
As per your instructions I connected the circuit, uploaded the program, paired Bluetooth module with my android mobile & ur app and used a 12volt dc adapter to power the Arduino, still it is not working. Can u define where is the problem?
good project!
where to find the codes for programming the arduino uno??
its not there on your pages. kindly send me the link. would be ver thankful to you.
Dear Surya Kanta ghosh, the code is present on the last page of the article.
How to solve this error : sketch_mar17b.cpp: In function ‘void loop()’:
sketch_mar17b:13: error: ‘class SoftwareSerial’ has no member named ‘available’
Hi sir please send me Bluetooth codes for home automation project with arduino uno
i have a doubt i do the project but we press off the only the light is on,we press on the only the light is off what we do for that plz reply soon sir its urgent
hi sir my name is raja i want to create my andriod application for my home automation. plz suggest me the it is possible or not if it can happend then suggest me how to start ?
sir, could u please provide the source code for Android application or suggest us writing code for the realys.
which ide would be good MIT app inventor or android studio.
i am getting error 516:broken pipe while pressing on or off, how can i overcome this error?
dear keerthi
use hc 06 bluetooth module
sir, I cant find the android bluetooth pp please get me detail how to download the app.
Can you send me the android app source code ?
For android app source code please contact [email protected]
Hi Thanx for this tutorial
I have one question that if we are connected switch board with relay that is fine but how about actual Switch board work
if i have no phone with me then can i start switch manually ?
can u tell me where to get the code/program?
The code/program is already present in the article.
give me source code of android app which us un android studio useable fasstttt…..
Can u tell me why I am receiving “stk500_recv(): programmer is not responding” error while uploading program to port COM 4 ..
please send me code
The Arduino code is already present within the article.
please send me arduino code for this project
The Arduino code is already present within the article.
WHAT COMPONENTS ARE NEEDED IN THIS PROJECT?
What edits we have to make if we are using an 8 channel relay in the code and apk
Plz email me on [email protected]
why you did not connect all the live wire to all common relay and all neutral wire to all appliance?
why you do only one appliance to one plug?
are that same method?
hi
i installed your .apk app in my mobile and is connected with hc05, but when i pressed any button on .apk app ,on serial monitor getting different string (different characters are displaying) so the if condition in program is not matching .plz rectify my problem.
can i do this project on pcb instead of breadboard ?
And can we use arduino nano for this project ?
and can you tell me how to do ac connections for this project?
kindly email me on [email protected]
WHERE TO CONNECT THE BULB IN THE 12V TWO CHANNEL RELAY
sir I want androidapp code for this project
Can i have the android project file of that application? so that, i can do modifications?
The source code is available for download at http://www.efymag.com/admin/issuepdf/Home%20automation%20using%20Android.zip
The total cost of this project is arrond 1,600 rs. & it’s to be depend on you will be started via Bluetooth, ? speaker,wi-fi module etc.
Hi
I have made this and implemented in my bedroom with light and fan.
Its working really great.
But i observed 2 issues. Please help me resolve it.
1. Appliance are depending on only on Arduino, how to make manual connection as well.
2. If appliance are running and suddenlypower goes off. Appliance does on automatically everything need to switch on again from mobile phone.
Please help to overcome these issues.
Thanks
please send me the source code of this android application. i also want to make it for my bed room for light and fan as well. kindly help me please. thanks
What changes do I need to make if I want to use a 2 channel relay instead?
sir i only have voice coding . but in the apk interface have on/off switch do you have combine coding of the on/off and voice . thanks
I have made all the proper connection and uploaded program to Arduino Uno and connect relay module and bluetooth hc-05 to Arduino and my mobile.but i’m facing a problem as i turn ON 12v power supply relays automaticaly turn ON and i can’t OFF it.i’m using optocoupler based 8 relay module which operates on 12v dc supply but its not working,should i use 5v relay module? Plz reply.
Hello sir, I want to know
>how to connect fan,
>physical connection of each components,
>circuit diagram,
>block digram,
>flow chart and
>code,
of this project using “audino uno” board android base.
Please…… help me sir as soon as possible my email id-
[email protected]
Can I use Blacberry 10 instead of Android phone??
Sir this is a wonderful project and i liked it vary much. i am thinking of making this project but i need help to create the app according to my requirement. can u plz tell me details about how to make the app u use here.
thanks.
Can u please let me see the circuit diagram and components required(in terms of both in quality and quality)…..
Hai every one iam use all arduino code to link bluetooth device but out put not given relay is not on..but bluetooth module helth is well
There is no application available where to get it ???
Sir.. please can you send me the code for this program? Please..
[email protected]
Arduino: 1.8.5 (Mac OS X), Board: “Generic ESP8266 Module, 80 MHz, 40MHz, DIO, 115200, 512K (64K SPIFFS), ck, Disabled, None”
Archiving built core (caching) in: /var/folders/xk/9wqzb4p15fnb9z49ncdflsl40000gn/T/arduino_cache_32786/core/core_esp8266_esp8266_generic_CpuFrequency_80,FlashFreq_40,FlashMode_dio,UploadSpeed_115200,FlashSize_512K64,ResetMethod_ck,Debug_Disabled,DebugLevel_None_____aaea6d57e9c1493124cadab90bd5ad9f.a
Sketch uses 224069 bytes (51%) of program storage space. Maximum is 434160 bytes.
Global variables use 32004 bytes (39%) of dynamic memory, leaving 49916 bytes for local variables. Maximum is 81920 bytes.
warning: espcomm_sync failed
error: espcomm_open failed
error: espcomm_upload_mem failed
error: espcomm_upload_mem failed
This report would have more information with
“Show verbose output during compilation”
option enabled in File -> Preferences.
please solution this ??? why comewarning: espcomm_sync failed
error: espcomm_open failed
error: espcomm_upload_mem failed
error: espcomm_upload_mem failed. ??????
Kindly elaborate your query.
Hai ,it’s great .i tried lot of codes in other sites but it won’t work. Finally I got correct code from this site.And I NEED CODE AND APP FOR 8 CHANNEL RELAY.
hello,
i would like to know what happens if the arduino board is powered for a long period of time.
what happens if it is kept powered for more than 3 years.
Hello sir, I want to know
>how to connect DC fan,
>physical connection of each components,
>circuit diagram,
>block digram,
>flow chart and
>code,
of this project using “audino uno” board android base.
Please…… help me sir as soon as possible my email [email protected]
Please code send this email if
[email protected]
Very nice project.
Is it possible to receive the source code for both, the arduino and the MIT APP?
I would like to learn and make some changes/additions to the hardware and to the APP.
Thanks
The source code is present in the article itself.
where exactly is source code for app
Hi Ashish, the source code is present at the end of the article.
sir , please send me arduino code on my email [email protected]
The Arduino code is present at the end of the article.
Plz provide me the coding
Hi, the source code is present at the end of the article.
HELLO, I AM A STUDENT AT SIMAD UNIVERSITY IN SOMALIA AND MY LAST YEAR GRATUATION PROJECT IS GSM BASED HOME AUTOMATION USING AURDINO I NEED THE SIMULATION PLEASE ANY ONE CAN SEND THE SIMULATION FILE OF PROTEUS OR OTHER SOFTWARES PLEASE RESPOND ME
EMAIL:[email protected]
pls sir send me code for this aplliation on [email protected]
hi EFY Team, did you or anyone manage to come up with how to use a WiFi module instead
Sir I’m using 9v supply for to power arudino uno is it ok
could you please send me your full project report to my email [email protected]
Bro Arduino board enga kidaikkum??? circuit diagram & program code please????
Where are buy this product???
Sir Nice project. Can u send me a circuit diagram to my email. I did not find the circuit in the article.
[email protected]
Thanks for the feedback!. Here, Fig.6 is the circuit diagram. You may contact us on [email protected] for the circuit and other help.
Sir, can you guide in programming arduino in this project.
Where is circute,? I cant find it. Please send to [email protected]
Bro Can U send the source code to my mail
[email protected]
Pls provide android source code
Hi Chandranagm, the source code is present on the second page.
when i am running ino program i got error as select the port no.i also selected the board but in tools menu port option is disabled,help me to avoid that error.what i have to do
plzz mail the code
[email protected]
sir , please send me arduino code on my email
You can download the code from the article itself.
Sir plz send me program on [email protected]
Dear Sir/Madam,
Have a good day. Hope you are fine. I need this diagram could you please can send me All components and circuit diagram? If I’ll be happy.
Warm Regards.
Rejaul
home automation using arduino is great ideas. there many projects we can make with the help of arduino. i am very big fan of arduino. thanks for this article.
Can gou please send me aurdino code to this email : [email protected]
can you please send aurdino code to this mail: [email protected]
my bulb is glowing continuously. i am unable to turn ON/OFF using app.i am using 12v 4 channel relay.i connected my arduino to COMPUTER using usb connector
Send mi arduino code to
[email protected]
i want to get this android app source code pleasee
great tutorial i find a lot of material here
Bro please send me source code of android application I really need it
It’s my humbly request to send me code at
[email protected]
The source code can be downloaded from the article itself.
How can I get it’s source coding? If possible please send me
[email protected]
Where can I get the .apk file
OK this is a great project ,Please send an android source code
good project i want the Android application and ardunio full code please send me with this email
Please what if I want to connect and esp8266 wifi module.
Sir Please give me code of this project.
Email: [email protected]
The source code is present at the end of the article.
did u get it bro,no source code for app
this is such a great project with all the required information and steps given by you thanks for post this project. i saved your website in my bookmark for further help.
Thank you for your feedback.
Can you please share the android studio project of the application?
I’m planning a UI/UX Development for it.
my email: [email protected]
Regards,
Sai
Hi EFY Team,
Excellent Project.
i have connected all the components and as per the diagrams shown. but it is not working as desired..
i confirm, Arduino program has been uploaded, HC-05 is been connected in mobile, indicator for relay module are ok.
Kindly help.
Can you please share the link of the software to phone?
bro can you send source code and project report to this mail:[email protected] we are gonna build project @ this sem only so we need quick action on this ?Thank you bro….!
Hi Chiranjeevi, you can get all the information and Source Code for download in the article itself.
bro please send me source code of this mobile application i shall be thankfull to you
at this gmail id [email protected]
Hi Mahesh, you can download the Source Code from the article itself.
i need souce code of apk fike ,,, [email protected]
The apk file of this project is not available with us