 Using this laser based transmitter & receiver circuit you can communicate with your neighbours wirelessly. Instead of RF signals, light from a laser torch is used as the carrier in a circuit. A laser torch can transmit light up to a distance of about 500 metres. The phototransistor of the receiver must be accurately oriented towards the laser beam from the torch. If there is any obstruction in the path of the laser beam, no sound will be heard from the receiver.
Laser based transmitter circuit
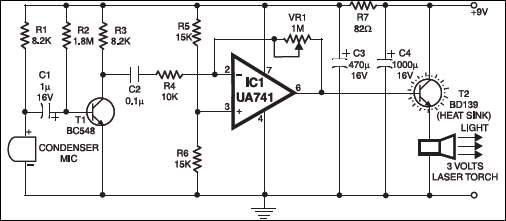
The transmitter circuit (Fig. 1) comprises condenser microphone transistor amplifier BC548 (T1) followed by an op-amp stage built around μA741 (IC1). The gain of the op-amp can be controlled with the help of 1-mega-ohm potmeter VR1. The AF output from IC1 is coupled to the base of transistor BD139 (T2), which, in turn, modulates the laser beam.

The transmitter uses 9V power supply. However, the 3-volt laser torch (after removal of its battery) can be directly connected to the circuit—with the body of the torch connected to the emitter of BD139 and the spring-loaded lead protruding from inside the torch to circuit ground.
Laser based receiver circuit
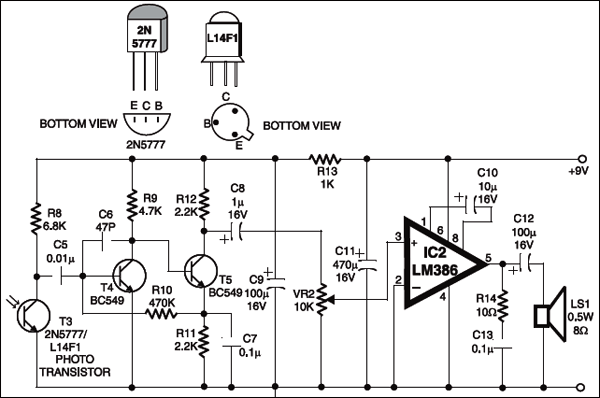
T3 is a photo sensitive transistor which receives the laser from the LED transmitter. The transistor puts out a signal that is proportional to the light from the LED. This not only receives the signal it also demodulates it. C5 couples this audio to T4 and T5 which amplify the signal. The signal is them coupled through C8 to VR2. VR2 is a volume control for IC2. IC2 amplifies the signal more and drives the speaker, LS1.

To avoid 50Hz hum noise in the speaker, keep the photo-transistor away from AC light sources such as bulbs. The reflected sunlight, however, does not cause any problem. But the sensor should not directly face the sun.
The article was first published in January 2005 and has recently been updated.


is this a tested circuit?
Yes, the circuit is fully tested.
Pls reply…Can I use an audio jack instead of condenser mic in transmitter circuit..?
My transmitter laser torch not glow what is the fault…?
Please tell me…
pleas ..help me… I choose this circuit for ma miniproject.
can I get the circuit design ..and PCB design
I have made this circuit but all I can observe is a noise at the receiver speaker. I am using a laser torch and when it is pointed to the base terminal of the 2n5777 photo transistor a sound can be heard.
Other than this I am not even sure whether the mic is peaking up the sound or the transmission is happening or the receiver is working properly.
I am using a condenser mic.
Please reply me soon…
Yes, you may get some noise in the receiver. To minimise the noise please follow the instructions given in the article.
What should be the exact output of the circuit.
Query is not clear. Feed audio signal into transmitter side. Transmit the audio signal wirelessly using Laser torch. You should get the same audio signal at the output of the receiver side.
Is there any specification for the condenser mic used…please reply soon
Electret condenser mic was used during the testing.
It’s working…. perfect…
But to avoid noise I make some changes in transmitter and use a 2v solar panel instead of photo transistor
what kind of panel do you use? can you prepare a datasheet of it? please reply soon
Could you possibly share the details how you reduced the noise.
what is the modulation technique used in the circuit
The circuit works perfectly. But may I know more about it’s working
This circuit works perfectly with all the components as specified. But I wish to know more about its design and concepts.
Will u give me component list
Hi do you have the circuit diagram of laser communication transmitter and wireless laser communication receiver
🙂
please I need to help
Can you find to me circuit diagram of laser communication transmitter and wireless laser communication receiver 🙂
What will happen if we don’t use the lm386 ic???….. Can we connect the output directly to the speaker without using the lm386 ic??
we could not get simulation code how we get it to run the circuit
Which software is suitable to compile it’s simulation?
Are there ‘kits’ available with all the pieces included?
is there a Canadian parts store you can advise if no kits available?
May i know whether this circuit will work for underwater application to be testeed in an underwater tank of length 2 m. If yes what may be the expected distance it can communicate. If i want to design for the underwater application will there be any change i may have to make wrt the circuit and type of laser.
I had the subscription of the EFY magazine in 2000-2004. I remember seeing this project around mid-2003 in the print version. There was no internet back then. This was one of the ideas that blew my mind. I was in 12th and tried to attempt this for my 12th Vocational electronics final year project. Since this circuit was not elaborately explained like every other project, my teammates warned me against wasting my time in this one. However, the fascination with this idea compelled me to hunt for the components and put the circuit together. In one attempt, I was able to transmit a crisp voice 200 meters away along the corridor of my electronics laboratory (Focussed the beam on the receiver using a lens). The received voice was so clear that one could identify who the transmitter was on the other end. Needless to say, we scored a perfect 50/50 for the project. I am truly thankful to EFY for shaping my childhood.
Thank You Niraj for your valuable feedback and keep up the good work.