


 An ESP32 camera (cam) can take pictures at 2MB per second rate and transmit them up to 200 metres using a small antenna on 2.4GHz. But when it teams up with an internet-enabled network it can do artificial intelligence (AI) related work as well.
In this project the ESP32 cam takes and sends the pictures to a remote computer that is connected to the internet, pulls the specified AI model, and analyses the object (model) to identify it. It then sends the object’s identity back to the ESP32 cam, which then executes the object-specific command entrusted to it.

When the detection computer is on, the ESP32 cam is all vigilant and ready for action. Once the model is loaded (identified), an active internet connection is no longer required. However, the computer needs to remain on all the time.
The ESP32 cam also reproduces the live feed from the ESP32 camera. The IP address is set as fixed type (192.168.43.11), which can be changed as per requirement.
The ESP32 continuously draws the image boundary over the image. If it finds two images, it draws two boundaries, and so on. Its confidence level can be set from 0 to 100%.
| Bill of Material | |
| Components | Quantity |
| ESP32 cam | 1 |
| IC555 (MOD3) | 1 |
| BC547 (T1, T2) | 2 |
| 1k resistor (R4) | 2 |
| 100k variable resistor (R2) | 1 |
| Capacitor 10nF (C2), 470µF (C3), 100µF (C1) | 2 |
| Voltage regulator LM1117 (MOD2) | 1 |
| Diode (D1) | |
| 5V relay module (RL1) | 1 |
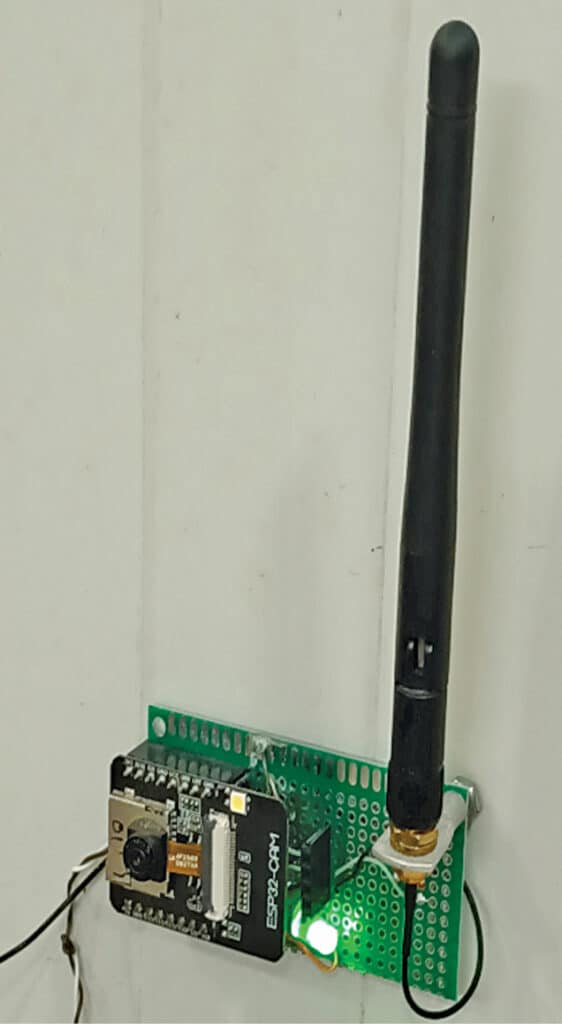
ImageResolution, MirrorImage, Flash (on 100% switch on the in-built LED), Quality, Brightness, and Contrast (see Fig. 6) can be changed. However, on increasing image resolution from 320×240 to 1600×1200 the system become extremely slow. It is better to leave the control at the default level and change only if necessary. Author’s prototype is shown in Fig. 1.
Circuit and working
Object detection by ESP32 cam circuit is shown in Fig. 2. The project undertaken by the author as a test project was to monitor a road intersection or gathering of many people at a place in a restricted area.
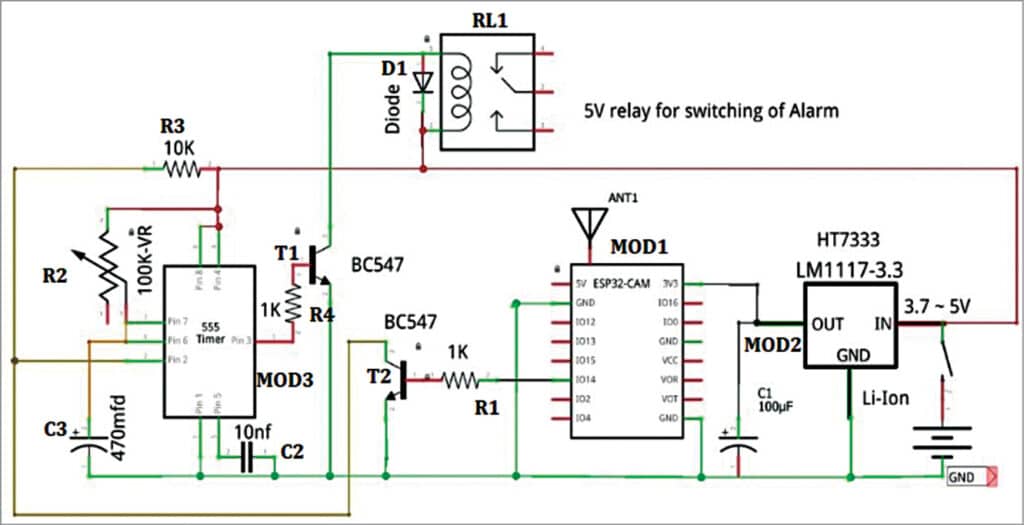
The ESP32 cam detects the people gathering and sets the GPIO14 output as high. A switching transistor triggers input to a monostable delay timer (0 to 10 seconds) that is built around IC 555.
Once triggered, it keeps the relay on for a minimum of 1 to 10 seconds, depending on the preset value of the 100k variable resistor. The trigger pin of IC 555 is its pin number 2, which is connected to the collector of transistor BC547 vide GPIO14. If the GPIO14 is high, it connects the trigger pin 2 to the ground through emitter of the transistor.
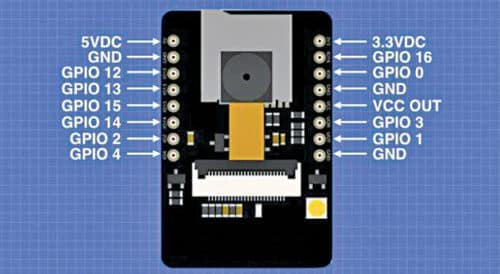
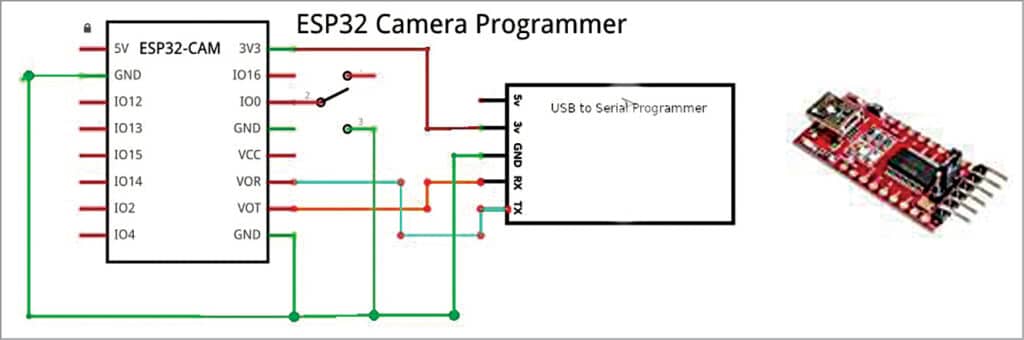
Pin details of ESP32 cam are shown in Fig. 3.
The main part of the project is object detection and an alert system. So, the relay circuit can be replaced with an optocoupler relay module and the regulator circuit can be replaced with a 5V adaptor like a mobile phone charger.
Software
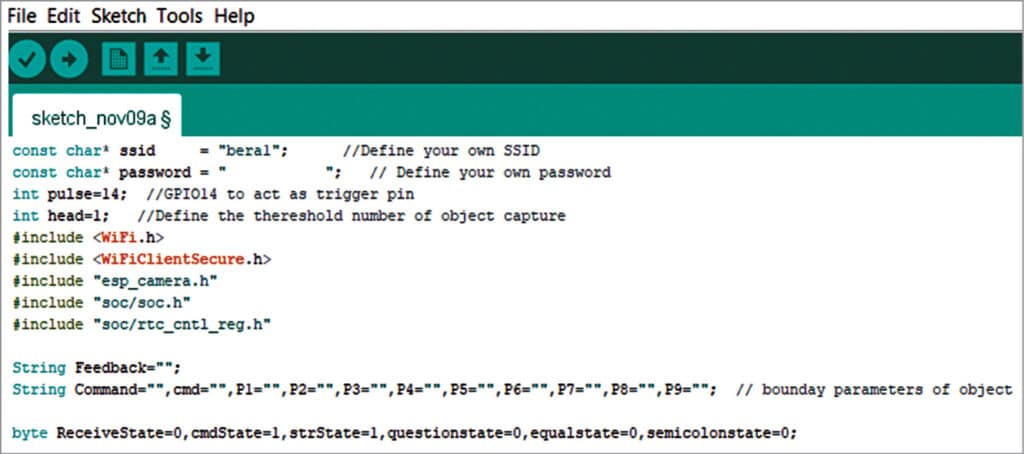
For preparing the code for this project please ensure the latest Arduino IDE 1.8 is installed. Install the Arduino IDE on ESP32 board using instructions given on the esp website and then set the SSID and password in the code. Source code setting screenshot is shown in Fig. 4.
EFY note. You can download the whole code from the link
The programming circuit of ESP cam is shown in Fig. 5. The cam does not come with built-in USB-to-serial interface shown on the right side of Fig. 5. Therefore, to upload the sketch, a USB-to-serial programmer is required. The GPIO 0 is to be pulled to ground during uploading and the reset button of ESP32 should be pressed during the first few seconds of uploading; after that it is to be released.
Construction and testing
Upload the source code in ESP32 cam and assemble the circuit. Power the device with 5V and search the IP address of the device in the browser.
The coco-SSD model used in the project can detect a wide range of objects, which you can select from the pull-down menu that has various objects—from a person to a toothbrush (see Fig. 6).
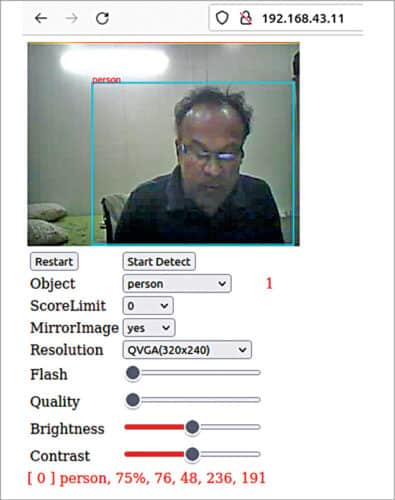
Whatever object is selected, if the number is more than 1, or as decided by you, the ESP32 cam will monitor that number. If it exceeds, it will command the relay to switch on the alarm circuit.
The following additional project ideas can be tried for this project; your imagination is the limit:
- Scarecrow. When birds, dogs, cats, cows, cars, etc come near it will sound an alarm.
- Automatic magic eye. Can be installed at the front door so that when somebody comes it rings the bell automatically, but is not activated by stray dogs, cats, etc.
- Guests counter. Can be installed where people gather—such as in a temple, mosque, or banquet hall—to count the number of people entering from the door where it is installed.
Download source code
Somnath Bera is an electronics and IoT enthusiast working as General Manager at NTPC
