


Thanks to the invention of camera gimbals/stabilizers, we are now able to capture videos  smoothly and easily. You will find plenty of different types of camera gimbals in the market, some with multiple built-in features, but what we are going to make today is also unique in itself.
Apart from keeping your phone steady, our self stabilization system can be used as a car cup holder to prevent spilling your favourite drinks or anywhere where a stabilized platform is needed.
To build a prototype of the stabilizer, we need to first collect the following components.

Components Required
- Servo Motor
- Arduino Uno
- Wires
- Mpu6050
Coding
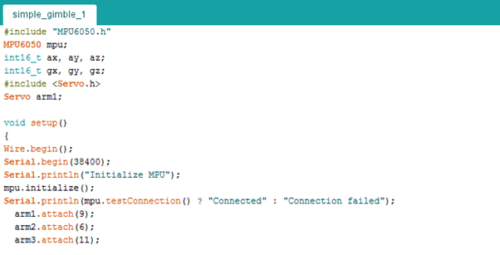
To begin coding, we will first set up the library ‘mpu6050’ in Arduino IDE. Then we will add the mppu6050 library and servo library in our code. Next, we will create some variables for storing the values of our sensors. After setting the pins for servo motor in setup function, we will initialize the mpu6050 library as in Fig 1.
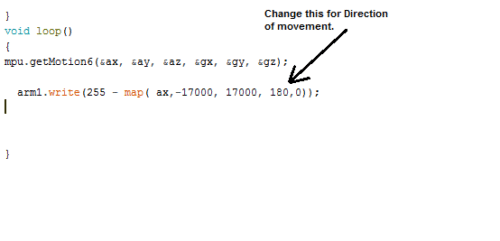
Now, we will move on to the next level of coding. In this part, a loop function will be created to collect all the data of the Mpu6050 sensor. In the loop function, we will map the Mpu6050 X-axis accelerometer sensor with the servo motor rotation. This is the main part of our code. Let’s understand how its works in stabilization.
When we move the mpu6050 accelerometer sensor then the data related to its movement is mapped with the angle of movement of servo. Hence, the servo motor will move with respect to the degree of movement of the accelerometer.
Now, to stabilize our platform we have to move the servo opposite to the direction of the accelerometer sensor motion. That means when we try to move our platform in one direction, the servo shaft will move in the other direction. In this way, the camera or our platform stays in its original position irrespective of the direction the accelerometer sensor moves.
Note:- Reverse the map value of servo if the servo moves in the same direction of motion.
Connection
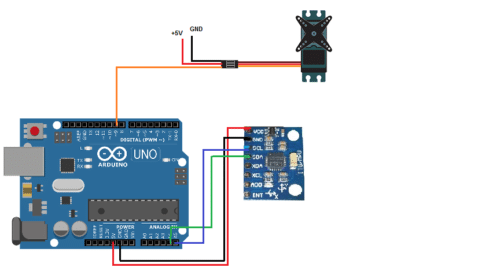
Now connect the components as illustrated below
| Arduino | Components |
| 5v | Mpu6050 VCC |
| GND | Mpu6050 GND |
| SDA | Mpu 6050 SDA |
| SCL | Mpu6050 SCL |
| Pin 9 | Servo Yellow wire |
Download Source Code