


 Cool IoT device with which anyone can control a home appliance by looking at it
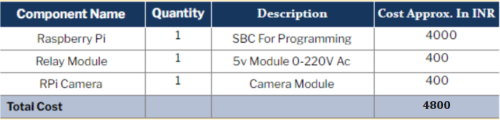
Have you ever thought of controlling electric/electronic home appliances by simply looking at them? Could happen in movies but seems to be impossible in real-life…..Well, no more. Now you can switch on or off any electric/electronic appliance with the blink of your eyes. Besides developing a cool IoT project, it also helps specially abled people to independently control such appliances. So let’s start our project by collecting the following components.


Bill Of Materials
Coding
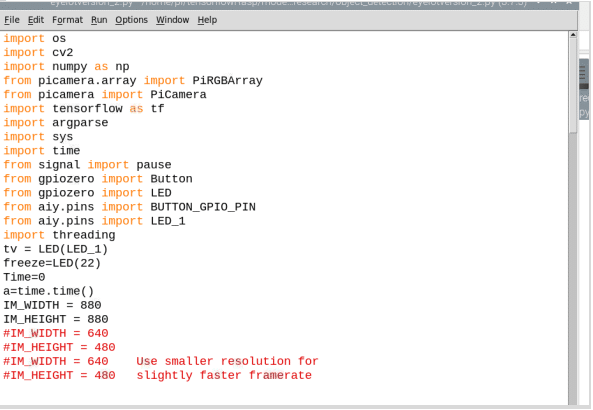
The device needs to recognise the appliances that require to be controlled with the help of commands sent from the eye. Therefore the following code allows us to capture real-time videos for object detection and toggling an appliance on or off.
For the project, we will use OpenCV to capture video from the camera and then TensorFlow (TF) to select the home appliance we are looking at. Then use the gpiozero library so that commands are processed from the eye blink sensor to control the appliances.
So install Python and the required modules in the Raspberry Pi using the following commands:
sudo pip3 install python-opencv

sudo pip3 install tensorflow

sudo pip3 install keras

sudo pip3 install gpiozero
Now duplicate the object detection library. Then in the test folder, create a file containing the list of appliances and save it under the name ‘eyeiot.pbtxt’.
To create the IoT object detection and controlling functionalities, copy the code for object detection to a new file. Make sure to import a few more modules and libraries to the code such as gpiozero to control the pin inputs and outputs.
After this, define the pin numbers to control the appliances.
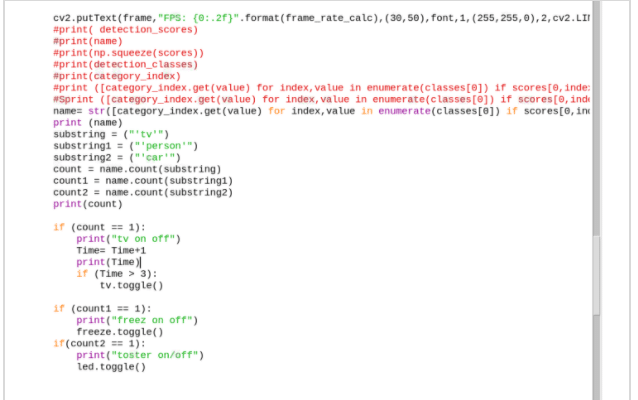
Finally, set the file name in the code so that it can detect which appliance you wish to control from the given list of appliances (whether it is refrigerator, TV, toaster or any other appliance). After doing so, obtain the result where the strings contain the list of detected object names on the video.
Now the code will search various sub-string names in the string format results. These sub-strings contain the name of the appliance you wish to control. A few conditional statements will check the availability of that string i.e. check the presence of an appliance.
For instance, suppose you wish to operate a TV. The code will detect its presence when you look at it. With the help of an if condition, the total time will be counted while looking at it. If it exceeds five seconds, then the TV will be switched on or off.
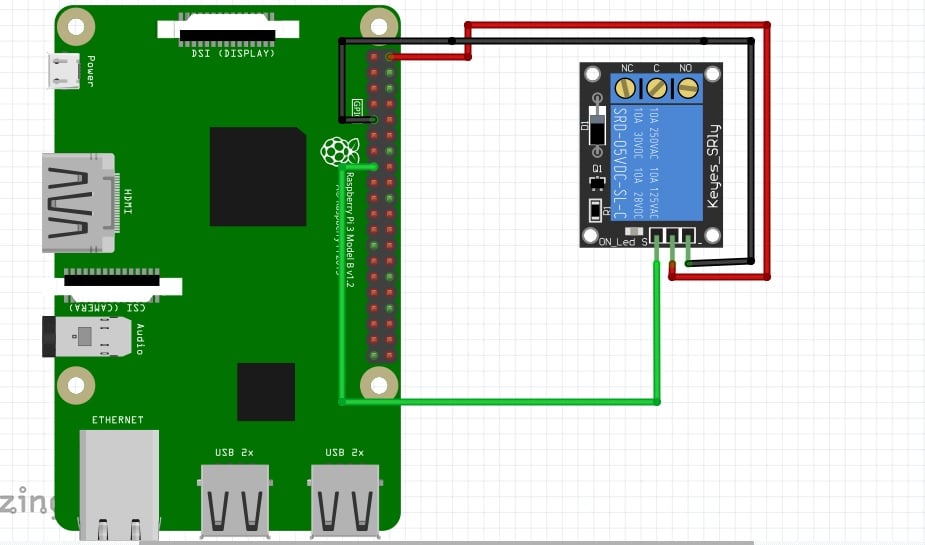
Connection
First connect the relay to the pin number mentioned in code (to control an appliance) and then connect the camera to the Raspberry Pi camera port. Now mount the Raspberry Pi camera to the eyeglass powered by a tiny usb power bank.
Testing

Run the code and move your eyes to look at the appliances that you intend to control. On looking at an appliance for more than five seconds, it will automatically switch on or off.
This project is the first version. A newer version with more cool features and wireless control system is here.

im unable to run the code
when im running it. iam getting the following message
Traceback (most recent call last):
File “/home/pi/eyeiotversion_2.py”, line 2, in
import cv2
File “/usr/local/lib/python3.5/dist-packages/cv2/__init__.py”, line 5, in
from .cv2 import *
ImportError: libcblas.so.3: cannot open shared object file: No such file or directory
First, do checks camera interface is on in RPi settings camera working properly . Now check the open cv is installed properly multiple versions of OpenCV or wrong version of open cv cause problem in importing its module in code.
The source code link is not working anymore.
I have emailed you the Source Code.
pls update a source code download link, because link not working.
The source code is working fine. try downloading from a PC.
No clear explanation and basic knowledge.A Raspberry Pi costs around 4K and here it is given as 400.Code is also not working properly and no clarity in connections.The demo video is also not showing the connections properly.Please explain and show the output properly.
Update the price for the RPI board if you use RPI zero it cost you only 1500 or 1400 while if you use the RPI 4 then it cost you 4000 to 8000 the price varies with the version of Raspberry pi used. The is tested and working properly share what error you got . This is the first version of project the second version of project link is stated below the article , Go through both article you will get to know . https://www.electronicsforu.com/electronics-projects/rpi-pico-iot-on-eye. If you still face any problem let me know.
Yes sir thank you for responding.I have basically 2 errors and doubts.
1.How to run the code in Raspberry Pi pico and main Raspberry Pi at the same time?
2.If possible can you show a small demo or connection diagram to an appliance like laptop or TV as wrong connections may lead to danger.
Expecting your response
Thank you
To run code on raspberry pi pico you need to connect the Raspberry pi pico to Raspberry pi USB and then upload the Micropython firmware from Thony IDE and then select the micropython in thonney ide and copy the micrpython code in thorny and then run the code it ask you to save code or run if you choose the code run on Raspberry pi pico if you select to save the code get saved in raspberry pi pico. It will automatically run whenever you power pico. Now for the raspberry pi code open the code in python IDE and run the code.The connection diagram is attached in the article check that.
Sir can you provide the detail working of the project about the connections and how to run the project
Yes sure connect me on whats app 7061350809
Ok