Until recently, for sending an SMS we had to use third-party services from the Internet. We had to log on to a third-party server, copy and paste the message in the text box, pull up the mobile phone numbers, or copy and paste the group of mobile phone numbers separated by commas and then press send.
In some rare cases, the SMS would not reach the destinations. So the guys at our company decided to buy an SMS server to create own facility for sending mass SMSes.
The proposal was moved and eventually the SMS server was bought and put into operation. But when I heard how much the entire system cost, I was spellbound. That is when I decided to make a cheap and efficient Raspberry Pi based SMS server at a fraction of the cost.
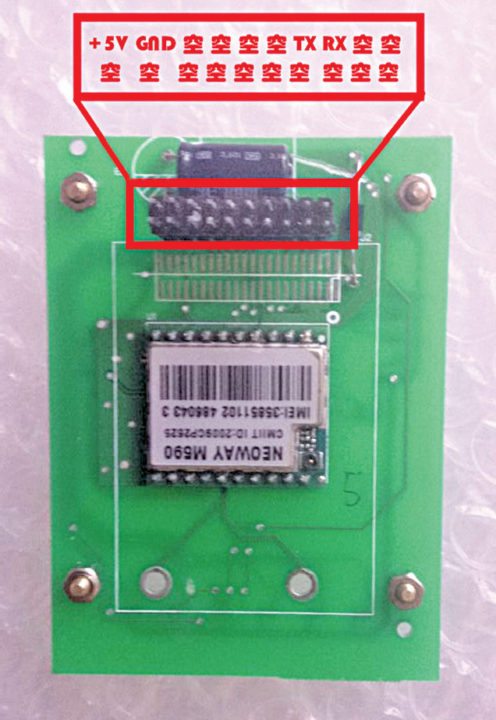
In this article, we will design an Raspberry pi based SMS server using a GPRS shield, pin details of which include +5V, Tx and Rx, as shown in Fig. 1.
You can buy a GPRS shield for US$ 4.7 from AliExpress,however the video instructions provided by the vendor would most likely be in Mandarin. So, in all probability, you would not be able to understand the audio instructions and face problem while soldering the surface-mount diodes LED1 and LED2.
To solve that problem, I have marked the polarity of the diodes as shown in Fig. 2. The positive rail comes from the edge of the PCB, where D1, R1, D4 and R3 have been marked.

All surface-mount resistors (R1, R2 and R3) are 4.7-kilo-ohm each. The diode and capacitor shown in Fig. 2 should be mounted on the other side of the PCB.Fortunately, you can avoid soldering this kit by ordering the assembled kit from here (We recommend users to see the video instructions from here, as it really helps to understand how to use this GPRS shield.) Do clip the antenna on the module.
Getting started with hardware
Following hardware items are required to get started:
1. GPRS shield 900MHz – 1800MHZ
2. USB-to-serial dongle (required as these shields do not work on direct UART connections)
3. Raspi computer (preferable model B2 with 512MB RAM)
4. SIM card ready for sending SMSes
Software
To start with, after logging on, update Raspi using the following commands. This ensures that you have the latest software and drivers installed.
$ sudo apt-get update
$ sudo apt-get upgrade
Now, to send and receive SMSes using a GSM modem on Raspi, install Linux application Gammu and its GTK front-end Wammu.
$ sudo apt-get install gammu wammu
Circuit and working
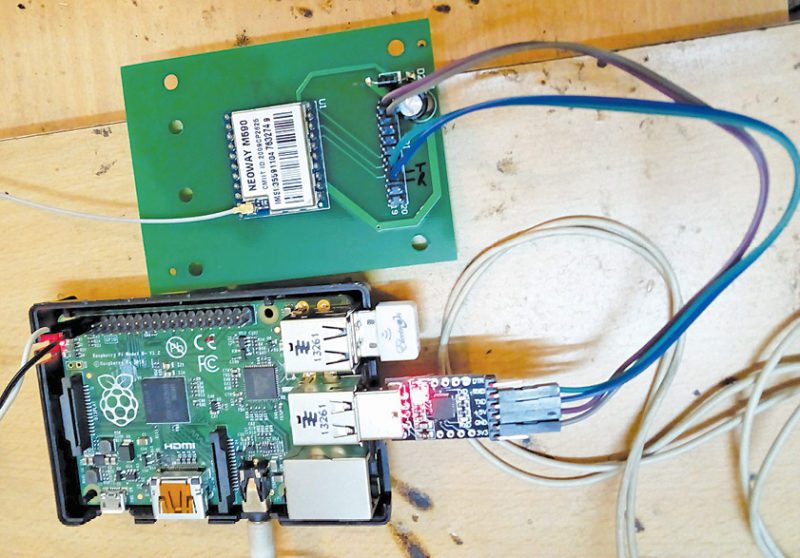
Connect the GPRS shield to Raspi using USB-to-serial dongle/adaptor as shown below and also in Fig. 3.
GPRS shield Dongle pins
Pin-2 : +5V : connect to VCC of
USB-serial dongle
Pin-3 : Ground : connect to GND of
USB-serial dongle
Pin-14 : Tx : connect to Rx of dongle
Pin-16 : Rx : connect to Tx of dongle
Insert the SIM card into the SIM card jacket and connect the GPRS shield. You will find one LED (power LED) is glowing steady while the other LED (signal LED) is blinking steadily. In case there is a signal problem, the signal LED will blink fast.
Enter the following command in the terminal and it will display the output to show the list of active devices where the USB-to-serial dongle/adaptor is mounted:
$ ls /dev/ttyUSB*
The output will look like /dev/ttyUSB0 or /dev/ttyUSB1 or /dev/ttyUSB2.
Remove and re-insert the dongle and check ‘ls /dev/ttyUSB*’ to ensure the location.
To send an SMS via Raspi, install an SMS gateway and configure the configuration file for Gammu known as gammurc file (Gammu library configuration).
Type the following command and start preparing gammurc file as follows:
$sudo nano .gammurc
[gammu]
Now, configure as shown below:
port=/dev/ttyUSB0
connection=at115200
name=gammu
model=
Save by pressing ctrl+o and ctrl+x on the keyboard.
Copy this Gammu configuration file to its default location, which is at /etc/
$sudo cp .gammurc /etc/
Check whether Gammu is ready for work by typing the following command:
$ gammu –identify
Device: /dev/ttyUSB0
Manufacturer: Undefined
Model: Unknown (M590)
Firmware: Undefined
IMEI: 355911047632749
SIM IMSI: 404929508997756
pi@raspi40 /var/www/html $
This shows that Gammu has found M590 GPRS shield and is now ready for heavy work. In case the shield is not found, check the USB port and retry.
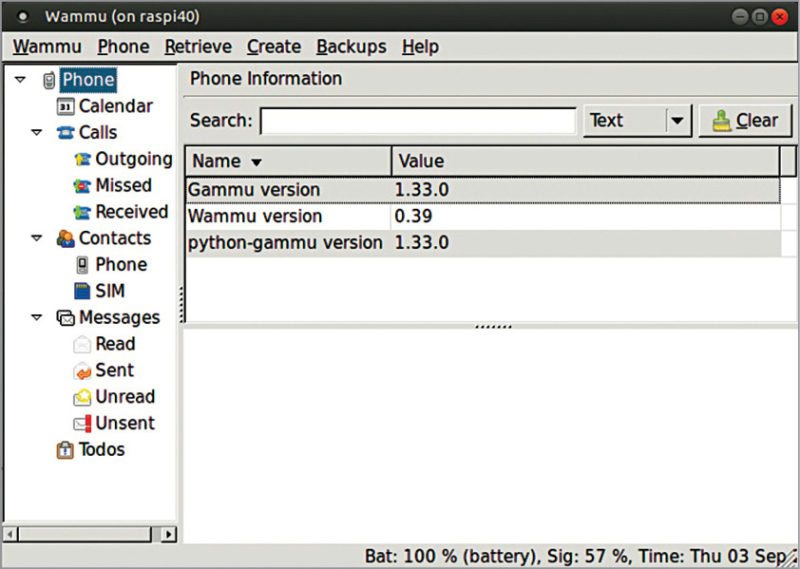
Gammu has a graphical interface known as Wammu, which is a mobile phone manager running on Linux, Windows and possibly on other platforms also, where communication is made using Gammu library. Wammu is a very lightweight program. Screenshot of Wammu is shown in Fig. 4.
Type the following command in the terminal and press Enter.
$wammu
Go to wammu–> settings to select the correct USB port to find the GPRS shield.
Go to Phone –> connect and you are now ready for sending/receiving an SMS on Wammu.
Command line interface
Here is how Gammu works from command line. Once you understand the commands given below, running these in PHP is a child’s play.
$> echo “Hello EFY, how is life?”
| gammu –sendsms text +91xxxxxxxxxx
SMS server design using PHP
In this case, Raspi SMS server is made using PHP script. There are many third-party open source PHP SMS servers like gammu-php, kalkun, etc, but here we have built a simple PHP SMS server.
PHP script
The small script (sms.php) is written in PHP. It will open in the browser window if Apache and PHP are installed on your Raspi.
Set up Apache Web server on Raspi using the following command:
$ sudo apt-get install apache2
php5-dev php5
Copy and paste sms.php program into Apache document root directory of Raspi, which is normally /var/www/html or whatever you have set.
For running Gammu program, www-data needs super user permission for /usr/bin/gammu.
Open sudousers file in /etc/sudousers and add the following line below it. But sudousers is one of the most sensitive and important file in Wheezy Linux. Any unintended error in this file may corrupt your entire system and that is why it is recommended to edit this file as given below:
$ sudo visudo
This command will open sudouser file in nano editor.
Add the following line:
www-data ALL = (ALL) NOPASSWD: /usr
/bin/gammu
Close nano editor by pressing control+x. Save it and relax.
www-data or the browser is now capable to run sms.php program.
Write the message in less than 200 words as shown in Fig. 5.
Copy and paste the mobile phone numbers separated using commas (,), press Send and your SMSes are on their way. Output can be seen on the browser page.

Testing procedure
To test, open a browser window in Raspi and type the following:
http://(ip address of Raspi)/sms.php
The window shown in Fig. 5 will appear.
Insert the message in less than 200 characters and the destination numbers separated by commas. You can copy and paste in this text box as well. Press Send and all SMSes will be sent one by one and delivery reports will appear below the browser window.
The OK in the report shows that the SMS is delivered; if not, look for reasons. However, sometimes even when OK appears, it takes some time for the messages to get delivered.
I have put a delay of six seconds due to my network speed problems. You can change it as per your mobile network conditions.
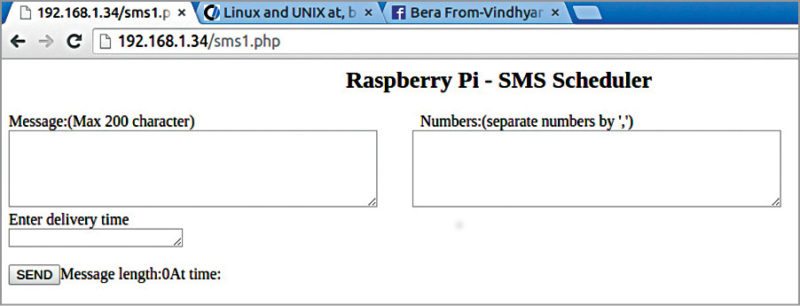
Enter Delivery Time window will ask for delivery time (Fig. 6), which can be entered using following AT commands. If you enter mobile numbers separated by commas, an SMS will be sent to all recipients starting from the time entered with a duration of one minute between each SMS.
$>sudo atq # will show all scheduled tasks with task numbers ready for delivery
$>sudo /var/mail/mail # will show the mail where the last delivery report available.
$>sudo atrm (number) # will delete any scheduled SMSes, so take help from sudo atq
Further application
SMS server with delivery schedule
An SMS server combined with AT command can make the SMS server an SMS scheduler, which can schedule your SMSes to be sent anytime in the future starting from one minute to ten years time frame (Fig. 7).
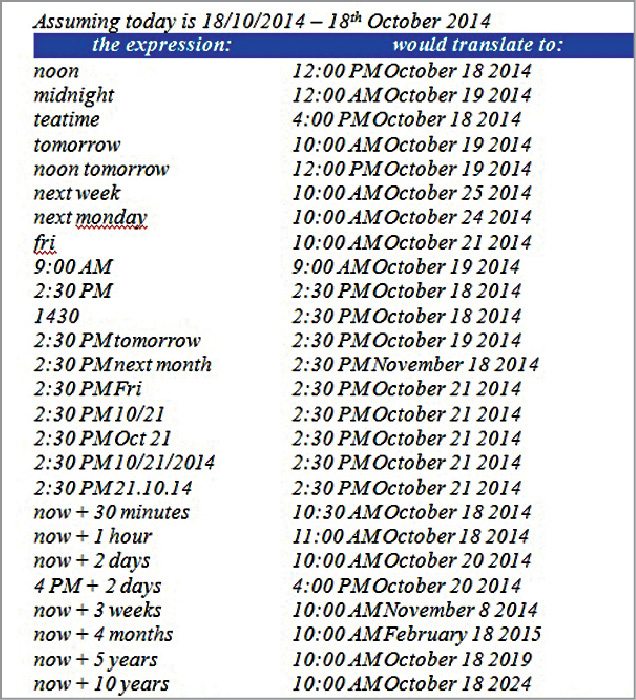
It is simple yet extremely powerful. First, install AT command and then give execution right to www-data.
$> sudo apt-get install at
This will install AT commands on Raspi.
$>sudo visudo
Add the following line:
www-data ALL = (ALL) NOPASSWD: /usr/bin
/gammu, NOPASSWD: /usr/bin/at
This gives permission to www-data as sudo users to run Gammu and AT.
Save visudo by pressing ctrl+o and exit by pressing ctrl+x.
$> sudo gammu –sendsms EMS your number -text “Hello guys from EFY” is a normal SMS command using Gammu.
$> sudo gammu –sendsms EMS your number -text “Hello guys from EFY” | at now+10 minutes will send the SMS in ten minutes from the sent time.
$> sudo gammu –sendsms EMS your number -text “Hello guys from EFY” | at 1430 2>&1 will send an SMS at 2:30 PM. The ‘2>&1’ command at the end will disable writing this command in the log file.
$> sudo gammu –sendsms EMS your number -text “Hello guys from EFY” | at 2:30 PM 10/21/2015 2>&1 SMS will be sent on 10/21/2015 at 2:30 PM.
This can be added very easily in the PHP script (sms1.php).
Copy sms1.php file into your server’s document root directory and then run from a browser window. (http://(your IP address)/sms1.php)
Download Source Code: click here
Somnath Bera is an avid user of open source software. Professionally, he is a thermal power expert and works as additional general manager at NTPC Ltd.


Sir, i loved this project and trying to makebit my final yr project can i have guidlines through email with active conversarion..??
Nice project
is any system other than then 900 mhz frequencies like 457 mhz network
Can this work for 3G of 900 and 2100 Mhz
Here’s the reply from author Somnath Bera “It was a GSM GPRS kit. I tested it on BSNL 2G & Idea 3G SIM Cards.
Its a 900 – 1800 MHz band. Not tested on 2100 MHz SIM Cards.”