


Smart home solutions include IOT powered devices such as lights, fans, water pumping motor, kitchen accessories etc. Smart assistants are voice command based systems which are used to switch on or off the IOT devices. Android app is built with voice command detector which is essentially an AI based system. This voice commands are such as ‘stop’ and ‘go’. These commands are sent to cloud where already these smart home devices subscribed to these commands. So these devices receive these commands and switch on or switch off. This project involves technologies such as AI, Data Science, IOT, Android, Cloud computing etc.
The following development environments are required:
- Arduino for IOT app development running on Node MCU (Arduino Sketch)
- Android Studio for Android app development (Java)
- Google Colab for AI speech detection model development (Python)
- Google Cloud VM for MQTT server (Java Script)
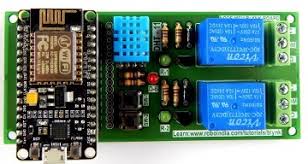
1. Node MCU
Step 1: Install Arduino

Install Arduino arduino-1.8.13-windows.exe from this website.
Step 2: Add NodeMCU (details in References section) support in Arduino
Enter this link “http://arduino.esp8266.com/stable/package_esp8266com_index.json” into the “Additional Board Manager URLs” under preferences as shown below and press “OK“
Tools > Board > Boards Manager -> Search ESP8266 -> Install ->ESP8266 community
Select Tools->Boards->ESP8266->NodeMCU1.0
Step 3: Install PubSub client
Installation steps:
Sketch -> Include Library -> Manage Libraries… -> Type PubSub in Search field
“PubSubClient by Nick O’Leary” Must be installed
Step 4: Install DHT library from Adafruits
Sketch -> Include Library -> Manage Libraries… -> Type dht in Search field
Select Adafruit library
Step 5: Download Arduino sketch from Github
Download Arduino sketch from Github
Flash Arduino sketch into NodeMCU
Note: Change your wifi SSID and password before flashing
Observe: NodeMCU is connecting to internet.
NodeMCU is connecting to MQTT server.
It starts sending temperature and humidity data.
It subscribes to ‘command’ topic.
Note: Use serial monitor to get the logs from NodeMCU.
Step 6: Connection on Relay1
The smart home device (fan) has to be connected to Relay1 terminals namely COM and NO.
Relay1 can be controlled from digital output port namely ‘D1’.
Step 7: The pubsub client has to subscribe to hostname called ‘digitran-mqtt’ and port = 1883.
When it receives the command ‘go’, the relay is switch on
When it receives the command ‘stop’, the relay is switched off
2. Android App Development
Step 1: Download Android app code from Github link.
Step 2: Build Environment
Install Java 8 and configure JAVA_HOME
Install Android SDK 26 and configure ANDROID_HOME
Step 3: Connect Android device in USB port
Enable developer mode in Android device:
Settings->About phone->Build number->Tap 7 times->Now you are a developer
Enable USB debugging under developer options
Step 4: Incorporate AI model
Copy ‘conv_actions_frozen.tflite’ into assets folder
Project directory\app\src\main\assets
Step 5: Incorporate MQTT pubsub
Connect MQTT client to MQTT server as “tcp://digitran-mqtt.tk:1883”
MQTT Client has to publish the selected command only if MQTT server connection is proper:
if(validMQTT==true) {
publish(client, command);
}
Step 6: Launch App
Compile and build the project in Android Studio
Launch App
Open Logcat and check the logs
On successful connection with MQTT server, ‘onSuccess’ message will appear.
In case of failure, ‘onFailure’ message will appear
Step 7: Install Mosquito and OpenSSL for debugging
Install Mosquito mosquitto-2.0.4-install-windows-x64.exe from this link
Then register C:\mos1 in path
Then open cmd and type mosquitto to confirm the installation
Install Win64OpenSSL-1_1_1i.msi from this link
Step 8: Configure Mosquito
1. Open services.msc:
Mosquitto Broker->Start service
2. Firewall settings
control panel->All control panel items -> Windows Defender Firewall
Windows Defender Firewall with Advanced Security
Inbound Rules -> New rule -> TCP/Port->1883->Allow connection->mqtt/mqtt-broker
Outbound Rules -> New rule -> TCP/Port->1883->Allow connection->mqtt/mqtt-broker
Step 9: Test Android App using Mosquito
Launch App
Give command ‘stop’ and ‘go’
Observe the command is recognized by the app
Subscribe Mosquito to the topic – ‘command’ by typing the following in the command line:
mosquitto_sub -h digitran-mqtt.tk -t command -p 1883
Observe stop and go are appearing in command line window
3. Re-train Speech command AI model using Google Colab
Step 1: Download AI model (speech_commands.ipynb) from Github this link
Download supporting files from this link.
Step 2: Upload notebook to Google Colab
Upload ipynb and other supporting files to Google Colab
Step 3: Execute speech_commands.ipynb in colab
After 25 epochs, model file is saved as speech_commands.hdf5
At the end, the model file – speech_commands.hdf5 is converted from keras format to tflite format
The final model file is saved as model.tflite
This tflite file has to be copied to Android app assets folder after re-naming to ‘conv_actions_frozen.tflite’:
Assets folder path: Project directory\app\src\main\assets
4. Create GCP VM for MQTT Server
Step 1: Create VM instance in Google Cloud Platform (GCP)
Region: US-West1/US-West1-b
Series-E2
machine type: e2-small (2 vCPUs, 2 GB memory)
boot disk-ubuntu 20 LTS (100GB standard persistent disk)
Firewall-Allow HTTP/HTTPS
Click on Create button
A VM is created
Step 2: Get domain name
goto http://www.dot.tk/
get domain name ‘digitran-mqtt.tk’
Step 3: Get DNS name
GCP->Top left corner->Navigation menu->Network services->Cloud DNS (Enable is required)
Create Zone
Zone type->Public
Zone name->digitran-mqtt
DNS name->digitran-mqtt.tk
DNSSEC->off
Click Create button
It creates the following record sets
digitran-mqtt.tk. SOA 21600
ns-cloud-b1.googledomains.com. cloud-dns-hostmaster.google.com. 1 21600 3600 259200 300
digitran-mqtt.tk. NS 21600
ns-cloud-b1.googledomains.com.
ns-cloud-b2.googledomains.com.
ns-cloud-b3.googledomains.com.
ns-cloud-b4.googledomains.com.
Create some more records by clicking ‘Add record set’
A is already displayed under resource record type
Add IP address->xx.yy.zz.aa
Click Create button
It creates A record:
digitran-mqtt.tk. A 300 xx.yy.zz.aa
Add another record:
DNS name-> Add -> www
resource record type->select->CNAME
canonical name->digitran-mqtt.tk
Click Create button
Step 4: Domain name linking
Goto freenom website
https://my.freenom.com/clientarea.php
Services->mydomain->Check domain appears
(It will take 2hrs minimum)
Services->mydomain->Manage domain
Choose Management tools->Nameservers
Select Use custom nameservers (enter below)
Add the following:
ns-cloud-b1.googledomains.com
ns-cloud-b2.googledomains.com
ns-cloud-b3.googledomains.com
ns-cloud-b4.googledomains.com
Click on ‘change Nameservers’ button
Type digitran-mqtt.tk in browser
The webapp launches
Step 5: Add SSH key
Open GCP->Navigation menu -> Compute Engine -> Metadata
Click on SSH keys
Add item->Paste SSH public key from clipboard -> save
Goto VMinstance->open newly created VM instance (instance-1)
Goto SSH keys section->Add item->Paste SSH public key from clipboard -> save
Step 6: Prepare Ubuntu PC
sudo apt-get update
sudo apt-get upgrade
sudo apt-get install nodejs
sudo apt-get install npm
npm –version
node –version
sudo apt-get install git-core
git –version
Step 7: Download MQTT Server code from Github:
cd /var/www
copy MQTT Server code from this link.
sudo chown -R $USER /var/www/MQTTServer
cd MQTTServer
npm install
Step 8: Execute app.js
node app.js
observe: express server listening on port 3000
Mosca server is up and running on port : 1883
Step 9: Create firewall rule
Create firewall rule
name: express
tag: express
source ip: 0.0.0.0/0
tcp port=3000
Create rule
Create firewall rule
name: mqtt
tag: mqtt
source ip: 0.0.0.0/0
tcp port=1883
Create rule
Add this tag in VM
VM->instance-1->Edit->nic->Network tags-> add express-> save
VM->instance-1->Edit->nic->Network tags-> add mqtt-> save
Step 10: Restart VM
SSH window:
cd /var/www/MQTTServer
node app.js
Type in browser: digitran-mqtt.tk:3000/test
Observe: {“data”:”success”}
Step 11: Test with Mosquitto (running on Windows 10)
Open two command windows one for subscribe and another for publish
In subscribe window, type:
mosquitto_sub -h digitran-mqtt.tk -t iotapp8266 -p 1883
In publish window, type:
mosquitto_pub -h digitran-mqtt.tk -t iotapp8266 -p 1883 -m on
Observe: In Subscribe window, ‘on’ is displayed
Step 12: Install nginx server
sudo apt-get update
sudo apt-get install -y build-essential openssl libssl-dev pkg-config
sudo apt-get install nginx git –y
Step 13: Configure nginx server
cd /etc/nginx/sites-available
sudo nano mqtt-webapp
————-mqtt-webapp——————
server {
listen 80;
server_name digitran-mqtt.tk;
location / {
proxy_pass http://private-ip:port;
proxy_http_version 1.1;
proxy_set_header Upgrade $http_upgrade;
proxy_set_header Connection ‘upgrade’;
proxy_set_header Host $host;
proxy_cache_bypass $http_upgrade;
}
}
—————–end mqtt-webapp———
sudo rm default
Create Symbolic link:
sudo ln -s /etc/nginx/sites-available/mqtt-webapp /etc/nginx/sites-enabled/mqtt-webapp
sudo rm /etc/nginx/sites-enabled/default
sudo service nginx stop && sudo service nginx start
Step 14: Run forever configuration
cd /var/www/MQTTServer
sudo chmod +x app.js
sudo nano app.service
——————-app.service——————–
[Unit]
Description=My app
[Service]
ExecStart=/var/www/MQTTServer/app.js
Restart=always
User=nobody
# Note Debian/Ubuntu uses ‘nogroup’, RHEL/Fedora uses ‘nobody’
Group=nogroup
Environment=PATH=/usr/bin:/usr/local/bin
Environment=NODE_ENV=production
WorkingDirectory=/var/www/MQTTServer
[Install]
WantedBy=multi-user.target
—————————-end———–
sudo systemctl start app
sudo systemctl enable app
sudo journalctl -u app
sudo systemctl status app.service
5. Demo
The demo of this project is given in the link:
References
2. Using the Arduino PubSub MQTT Client
3. Real Time Data Transfer for IoT with MQTT , Android and NodeMCU | by Ravindu Rashmin | Coinmonks | Medium
4. Let your IOT Devices talk — MQTT server on Google Cloud VM
Dr. Anbunathan R is the founder & CEO of a startup company called ‘DigiTran Solutions’ and providing ‘Digital Transformation’ based solutions.
