


 As water consumption and wastage increases day by day, water scarcity has become a growing concern around the globe. While some irresponsible people are overusing water and wasting it daily, a large population remain deprived of safe drinking water. This problem is caused by the irregular distribution of water.
To deal with this, we need a solution that gives data about daily and monthly water consumption of each area and home to the government to enable proper water distribution. Good news is we have the solution now.
In this IoT project, we are going to make a smart Wireless water meter that measures our daily water usage and provides live data on our phone that is connected to a database, which can be accessed by the government.

Components Required:
- Water flow meter(Recommended FS400).
- Arduino pro mini(5V and 16 MHz)
- Bluetooth HC 05
- Programmer (Arduino UNO/FTDI programmer )
- OLED SSD 1306
- Water Pipe(according to your sensor inlet diameter)
- Water to tap connector
Once we have collected these components, we can start our project.
Setting Arduino IDE
Download the flow meter library and paste it in the libraries folder of Arduino
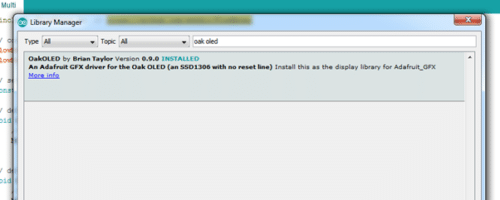
After that open Arduino and click on manage library and search Oak SSD 1306 OLED library as in the pic below (Fig.1).
Now our Arduino IDE is ready. Let us start coding part.
Coding:
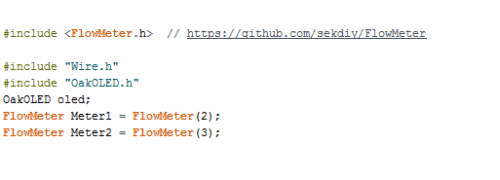
Open flow meter multi example code and add some of these parts.
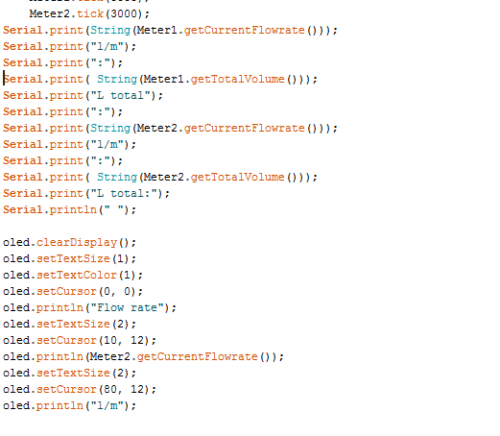
First, we include libraries of flow meter and OLED display as in (Fig. 2).
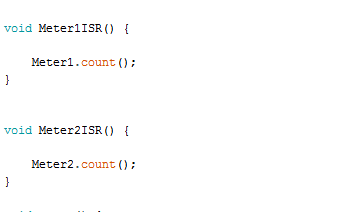
After this, we create the interrupt handler for the sensor as in (Fig. 3).
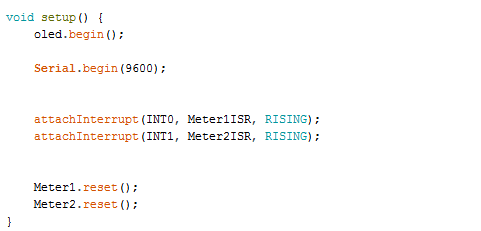
Here, we set up the Bluetooth with Baudrate 9600. If it doesn’t work, try default Baudrate 34800.
Finally, we set the data output that will send to Bluetooth with Serial.print(data to send).
Then set OLED display function to display data on OLED screen with oled.println(data to send) refer (Fig 5)
As we are now done with the coding part, next is app making:
App Making
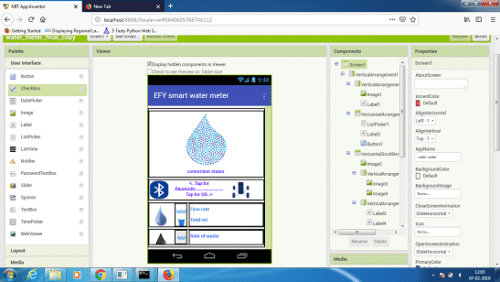
Open MIT App Inventor, make a layout and add the components as in Fig 6.
Main Components we added in the layout are:
- 1 Buttons one for DB.
- 5 Text view for Bluetooth connection status, Water flow rate of inlet, Total volume of water consumed, the flow rate of wastewater and total volume of water waste.
- Tiny web DB
- List picker for Bluetooth
- Bluetooth client
- Timer clock
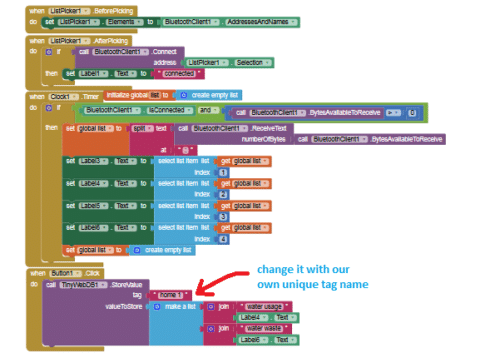
Now go to MIT Code block and set the code as in Fig 7.
You can download the whole code and app from link below with .aia file.
Download Source Code For Smart Water Meter
We have made APP and we have finished the code. What we need now is to upload the code to Arduino.
NOTE: I have used Arduino pro mini to make the project small and easy, you can also use Arduino UNO for this project. Code and connection remain same for both, it’s all about your choice.
Uploading Code To Arduino Pro Mini:
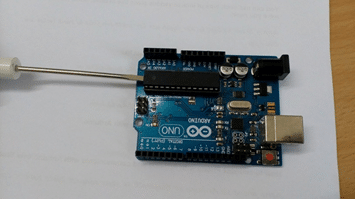
First remove Arduino UNO IC as in (Fig. 8).
Now connect Arduino Pro Mini as follow:-
| Arduino Uno |
Arduino Pro Mini
|
| Rx | Rx1 |
| Tx | Tx0 |
| Gnd | Gnd |
| 5V | VCC |
| Reset | Reset |
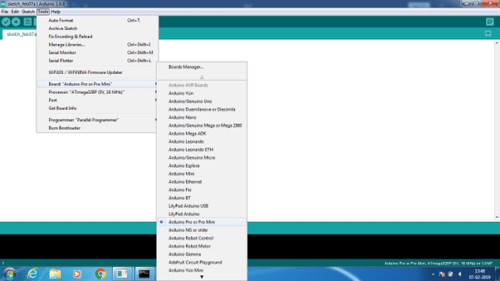
Now go to Tools and select Board Arduino pro mini and upload the code to Arduino pro mini refer Fig 9.
Now we need to connect the components
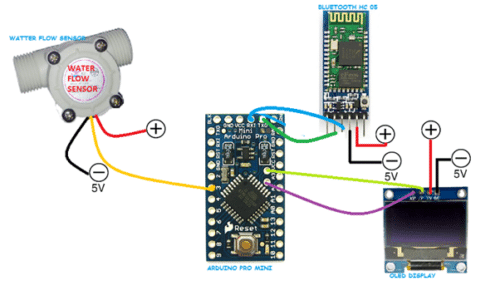
Connections
| Arduino Pro Mini Pins | Components Pins |
| 5V | VCC of Bluetooth |
| GND | GND of Bluetooth |
| RXI | TX of Bluetooth |
| TX0 | RX of Bluetooth |
| VCC | OLED VCC |
| GND | OLED GND |
| A4(SDA) | OLED SDA |
| A5(SCL) | OLED SCL |
Refer Fig. 10 for connections
Do cross check all the connections, if you don’t want to end up frying your Arduino with wrong connection.
First make sure each of the connections are ok and then power the Arduino with 5V DC power supply.
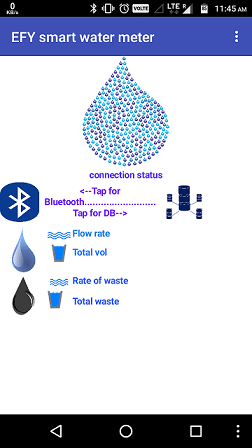
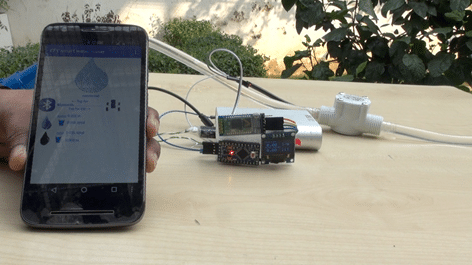
Connect the water sensor pipe to the tap or water inlet of your water tank. By doing so, you can see the total volume of water and water flow rate on OLED display. Now, open Android app and press the Bluetooth icon where you will see a list of Bluetooth devices available. Pair with Bluetooth HC 05. After connecting you will get the water flow rate and water volume consumed in the app as in Fig 11.
You can tap on DB icon to upload our water usage data to the web server that can be seen from anywhere using the internet.
NOTE: Your internet connectivity must be turned on to upload data to the server.
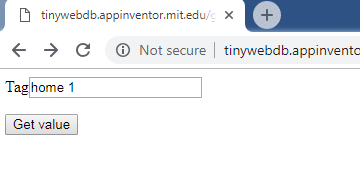
To fetch data, click on the link given below and type your house name, that you have given in the app. I have used home 1. Click on search, You will get the details of water usage data. Refer Fig. 12.
Cheers! We have made an amazing solution that can help manage water consumption at home.
NOTE: You can also add the extra sensor to pin 2 for water wastage data. I have included code and app compatible with that. Only add a sensor to it and enjoy your project.
Troubleshooting:-
Prob. (Problem): I don’t find the accurate data from the sensor.
Sol. (Solution): Follow the library link for calibration tutorial.
Prob:- I get the “too large index”, “end app” during running.
Sol:- This happens because some data might be missed by Bluetooth during reading, tap out on screen or reconnect the Bluetooth of the phone.
Prob:- Can I set it up and supply power through a socket?
Sol:- Use adaptor with 5V D.C for it.
Prob:- I can’t find enough VCC pin to connect OLED, Bluetooth and sensor and as well as to power Arduino.
Sol:- Solder the extra wire to VCC and ground pins and make connections.
Prob:- I can’t see Bluetooth HC 05 in the list.
Sol:- First pair the Bluetooth HC 05 with android, go on Bluetooth setting and tap on HC 05 to pair, and it will ask for the pairing code, default code for paring is 1234 0r might be 0000 or 1111.
Prob:- Error in Bluetooth communication and program uploading to Arduino.
Sol:- Try interchanging the connections between Rx and Tx.
If you found this IoT project useful then you may also like Top 30+ IoT Projects | IoT Project Ideas for Enthusiasts.
Hi, I get this:
Sketch uses 14,992 bytes (48%) of program storage space. Maximum is 30,720 bytes.
Global variables use 1,750 bytes (85%) of dynamic memory, leaving 298 bytes for local variables. Maximum is 2,048 bytes.
Low memory available, stability problems may occur.
An error occurred while uploading the sketch
Try updating the Arduino IDE also check that your Arduino pro mini is Atmega328p based
Hello sir/madam,
This project to great. I hope this gets implemented. I would like to know where this idea is implemented / going to be implemented. My students will be amazed to see this in action. Do keep me posted.
how can i contact you sir i pay for this project
This project is open to use and share. You need not to pay and you are free to make and use this project. This project is fully open and give you permission to use share , modify and improve.
Please how can I connect sim900 to this project for remote monitoring
Good day please how do I add sim900 to this project for SMS alert
Hi. Thanks for sharing the good work.. Can the flow sensor detect leakages as in very low flow? If not do you know of any flow sensor which detect low flow leakages?
Dear Sir,
Is it possible for u to email me the coding for the bluetooth and oled. I have some difficulties in doing it. Really appreciate your help.
Can you elaborate what difficulty are you facing .The code is attached in the article.
Hi, is it possible to send the entire coding of the project to [email protected]? Thanks a lot.
Hi, need ur help in coding. Thanks
Plz send the coding of flow meter project on [email protected]…Thanking u sir
Code is already attached in article click on download option to download code with app and its other file
Thanks madam…
You welcome.
Dear Sir/Mam
Great Projet U did ,Really Apprciation from my Heart,Becoz People are Takeing Monry to do This Type of Projects ,You did it with out Money,Please provide me Your cont Details I need More Help from you.
Regards,
D.Prasanna Raju
Thanks all,For more help and details either you can ask me on comments, chat head or send your question.
I write these code. for first time it works fine. After few no of iterations. it calculates false volume of data. The serial monitor data continuous to go high even after i stop the water collection. Its calculates volume even in ideal state. Please help me.
Hi
What is the size you used for pipe and water meter
can i know the scehmatic diagran
Hello.
I am trying to upload to a NodeMCU (ESP8266-12E Board) and it gives me error on line 30 and 31.
‘INT0’ was not declared in this scope
‘INT1’ was not declared in this scope
What can i do?
Thanks
Sir I need this project.how can I buy it and please provide full detail of this project.
I want this project and pdf
The article consists of full project-making process and code included as well.
Thanks for sharing such useful project but i was looking for water level and automatic pump on/off project to implement at my home.
so can u make one?
i have some suggestions for that project;
1. Project should be divided in two parts, transmitter and receiver, both should be connected via 433mhz rf modules as they are very cheap and will cover up to 100 meters of range, so we can place transmitter in water tank at 3rd or 4th floor and receiver at ground floor.
2. Water pump should be connected via relay, when water level is at predefined lowest level then motor should be turned on and when its full then pump should be off, again when water level is lowest then it should turn on motor and so on.
3. There should be a manual switch/button to turn on/off motor at any time.
4. Water level should be shown as 10 different leds each representing 10% of water level or via 7 segment display or via lcd display.
5. Both circuits working voltage should be 12v as we can power them from our solar batteries.
Ok, Sure I will try to make such and publish as possible. Thanks for the sweet suggestion. Keep learning, keep making.
NOTE: You can also add the extra sensor to pin 2 for water wastage data. I have included code and app compatible with that. Only add a sensor to it and enjoy your project.
.
.
Please teach how to add sensor to use water waste . Please urgent , i need to complete my final year project !
we need wi-fi water flow meter 40mm pipe please send quotation
[email protected]
can I use Bluetooth HC 06 instead of Bluetooth HC 05 ?
Yes, If USART
Thanks
In my oled there is SCK instead of SCL, is it ok ?
i can work with same code ?
yes
Hi Ashwini,
Can I maybe email you with specific questions please?
My email christowentzel at gmail dot com.
Rgds, Christo
yes , contact me at [email protected]
Ashwani plz give me your contact number
You can whats app me at 7061350809
can i get more specific connections video sir … pleaseee?