


Introduction: The Need or Necessity
Amidst Covid-19 and lock down we were conducting online exams for students through LMS (Learning Management System) – Moodle. Being a part of the Computer Science and Engineering Department we were asked to tackle the problem of detecting multiple logins by a given user. This information can be manually extracted from the log file, but it is a very tedious and time-consuming operation. Performing it manually on a daily basis will take a heavy toll on the human resource. Hence, we thought of writing a GUI based python program to detect the multiple logins. The log file is a excel file with nine fields: Time, User full name, affected user, Event Context, Component, Event Name, Tell me about yourself, Origin and IP Address.
| Sl. No. | Field Name | Description |
| 1 | Time | Date and Time of the event. Eg: 6/06/20, 14:03 |
| 2 | User full name | Name of the user |
| 3 | Affected user | Which user gets affected by this task |
| 4 | Event Context | Under which item the event was performed, Eg: Course Name |
| 5 | Component | Name of the component, Eg: Quiz, Test |
| 6 | Event Name | Action/event performed by the user. |
| 7 | Tell me about yourself | More details about the action/event performed |
| 8 | Origin | Origin of the event Eg: Web |
| 9 | IP Address | From which IP address the event is generated. |
Table 1: Log File fields and Descriptions
The various fields and its description of the log file is shown in the above table (Table 1). The screenshot of the logfile is shown below in Figure 1.


Overview of the Model
The program when executed will open a graphical user interface (GUI) window, where the user can select the log file through the file dialog. The log file in E: drive as “logs.xlsx”. Th the user should then choose the starting time: hours and minutes and ending time: hours and minutes. The starting time and ending time represent that the end user is interested in multiple logins only during that particular time. After selecting all these parameters, the user may press the button to detect the multiple logins. A dialog box will popup which displays the multiple login details and also the full multiple login details will be stored in the file ‘output_test.xls’. By default, ‘output_test.xls’ will be stored in the E: drive.
Methodology: Logic / Algorithm:
- Define an empty array Time, User, affUser, EvCont, Comp, EvName, TellMe, Origin and IPaddress
- For every row in the Log file fetch the IPaddress as ‘ipaddress’and perform the following:
2.1. if ‘ipaddress’ is not already inserted in IPaddress, then insert it and perform the following:
2.1.1 Insert Date and Time to Time, name to UserFullName to user, affected user
to affUser, Event Context to EvCont, Component to Comp, EventName to EvName, Tellabouturself to TellMe and origin to origin. - Create an output file “output_test.xls”
- For every element in the array ‘user’ perform the following:
4.1 Check if there is duplicate entry for ‘user’ is found, if so, then add all the respective array entries to the file “output_test.xls”. - The details of the user who attempted for multiple logins can be retrieved from the file “output_test.xls”
The Program: Code
This program was written in python 3.7. It was tested with Spyder (Python 3.7) running on Windows 10 operating system. This section will explain the code snippets used in this program.
- import xlrd
- import xlwt
- from tkinter import *
- from tkinter import ttk
- from tkinter import filedialog
- from tkinter import messagebox as mb
Line 1, imports the package ‘xlrd’ which is used to read excel file. If the package is not installed, it can be installed using the statement: pip install xlrd from python command prompt or from jupyter notebook. Line 2, imports the package ‘xlwt’, which is used to write to a excel file. If the package is not installed, it can be installed using the statement: pip install xlwt from python command prompt or from the jupyter notebook. The package Tkinter is used to create graphical windows and it contains several classes to create window elements.
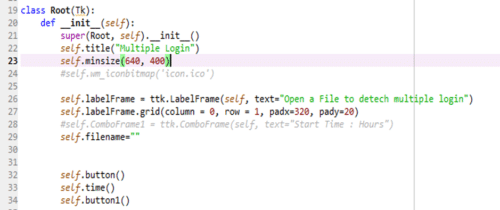
The above code (Figure 2) creates a class Root and defines its constructor. The constructor includes the code to create a window of size 640×400 (Lines 19 to 23). A Label box is created with the text – “Open file to detect multiple login” and is placed on the window (Lines 26, 27). It also creates a variable filename with empty string (Line 29). It further calls the functions button(), time() and button1() (Lines 32 to 34).
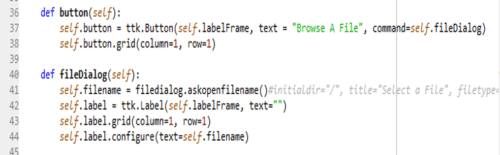
The above code (Figure 3) has two functions, button and fileDialog. The function ‘button’ creates a button with the text “Browse a File”, and the button is placed on the main window (Lines 36 to 38). The function ‘fileDialog’ includes the code to create a file dialog and to create a label box to display the path and name of the selected file (Lines 40 to 44).
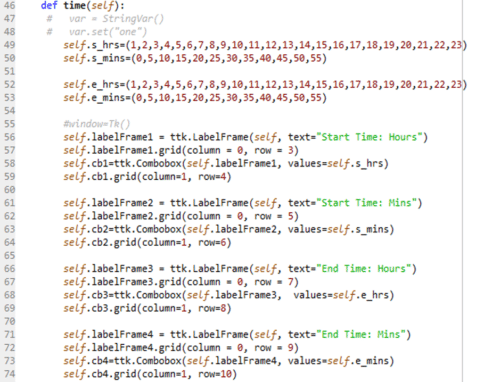
The above code (Figure 4) holds the function ‘time’. The tuples s_hrs, s_mins, e_hrs and e_mins are used to store the starting hour, starting minute, ending hour and ending minutes. (Lines 49 to 53). The function also includes the code to display the label box and combo box for start time: hours, start time: mins, end time: hours and end time: mins. (Lines 56 to 74).

The above code (Figure 5) has the function ‘button’ which creates a label box with text “Check – Multiple Login” and button, with text “Detect Multiple Login” (Lines 76 to 81).
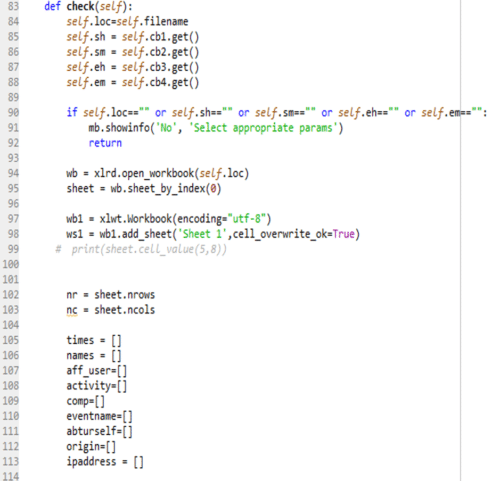
The above code (Figure 6) holds the function ‘check’ which reads the input log filename, starting time hours, mins and ending time hours and mins, in the variables loc, sh, sm, eh and em respectively. (Lines 84 to 88). It checks whether any of this variable is empty, then it quits with the message, “select appropriate params”. The input log file selected by the user will be referred using the pointer ‘wb’. The output file will be referred using the pointer ‘wb1’. (Lines 94 to 98). The number rows in the input log file will be stored in the variable ‘nr’ and the number of columns will be stored in the variable ‘nc’. (Lines 102, 103). Nine empty arrays are defined to store the values corresponding to the unique IP addresses. (Lines 105 to 113).
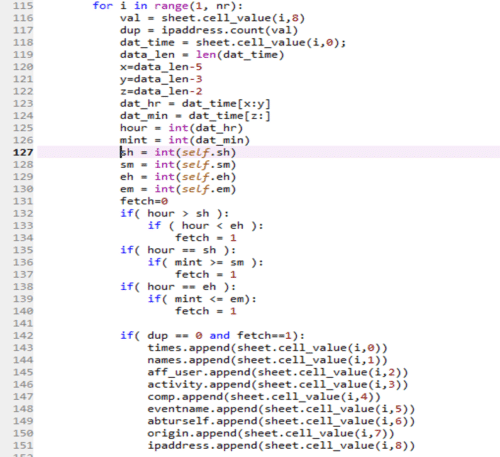
The above code (Figure 7) includes a for loop. This code is the continuation of the function ‘check’. It ensures that all field values corresponding to the unique IP addresses will be stored in the respective nine arrays. For every row of the log file (logs.xlsx), it reads the IP Address from the log file and stores it in the variable ‘val’. (Line 116). It checks whether the IP Address in ‘val’ is already available in the array ‘ipaddress’ (Line 117). If the current IP Address is already in the array ‘ipaddress’, then the variable ‘dup’ will have a value greater than 0 (normally 1), otherwise it will be 0. The code also extracts the hour and minute from the log file and stores it in the variable ‘hour’ and ‘mint’ (Lines 119 to 126). The time duration (start hour, start minutes, end hours and end minutes) during which the user wants to find the duplicate logins are read as input from the user and stored in the variables ‘sh’, ‘sm’, ‘eh’ and ‘em’ (Lines 127 to 130). A variable ‘fetch’ is created and initialized to 0 (Line 131). The variable ‘fetch’ will be updated with 1 if the hour and minute read from the log file falls in between the time duration (start hour, start minutes, end hours and end minutes) received from the user input. (Lines 132 to 140).
If the variable ‘dup’ is 0 (the IP Address is not yet available in the array ‘ipaddress’) and if the variable ‘fetch’ is 1 (the time is within the range of user interest) then the respective values from all the cells of the particular row are fetched from the log file (‘logs.xlsx’) and stored in the nine appropriate arrays.
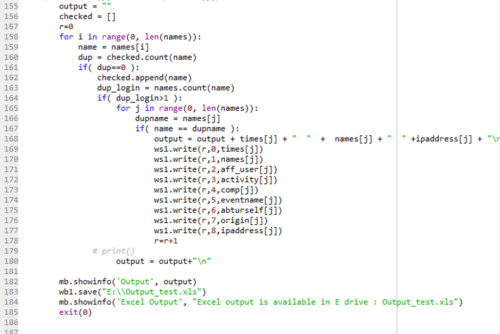
The above code (Figure 8), is a part of the function ‘check’ and continuation of the code shown in Figure 7. It includes the core logic to extract the duplicate names and the respective values of the other 8 fields. We have nine arrays which holds the values of all fields corresponding to the unique IP addresses. One of these arrays is ‘names’. The array ‘names’ may have duplicate entries (with different IP Addresses) if a user logs in multiple times or through multiple devices. This code identifies such duplicate names from the ‘names’ array and the respective values of other fields including the IP Address are fetched from the 8 remaining arrays and they are stored in the file ‘output_test.xls”. This file is stored in E: drive by default.
An empty array ‘checked’ is created (Line 156). Iteratively, the names from the array ‘names’ are fetched and stored in the variable ‘name’ and it checks whether the name is added to the array ‘checked’ or not (Lines 158 to 160). If ‘dup’ is 0 ( ‘name’ is not added to the array ‘checked’), then the name is added to the ‘checked’ array (Line 162). The code counts the number of times the user name specified in the variable ‘name’ occurred in the array ‘names’ and store it in the variable ‘dup_login’. If ‘dup_login’ is greater than 1, then the user name in the variable ‘name’ has attempted multiple logins (Lines 163, 164). Check for every entry in the array ‘names’ with the user name stored in the variable ‘name’, if it matches, write all the respective values from the 9 different arrays to the output file (‘output_test.xls’). Now, the user can check the duplicate login details from the file ‘output_test.xls’, which is stored in E: drive.

The above code (Figure 9) includes the code from where the program execution begins (Line 189). It creates the object for the class Root (Line 190) and loops it continuously.
Outputs and Screenshots
When the above code is executed, the following window will appear (Figure 10).
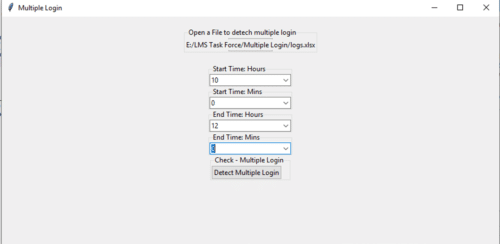
Using the above window (Figure 10), select the input log file and select the time duration and click on the button ‘Detect Multiple Login’. Once the user clicks on ‘Detect Multiple Login’, an information dialog box will appear as shown below (Figure 11), with the limited details (time, name and IP address) of multiple logins.
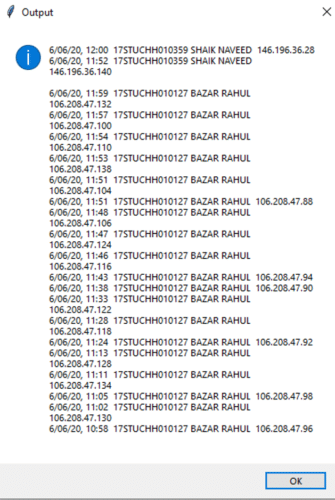
Once the user clicks the ‘OK’ button on the above window (Figure 11), the following popup window will appear (Figure 12).
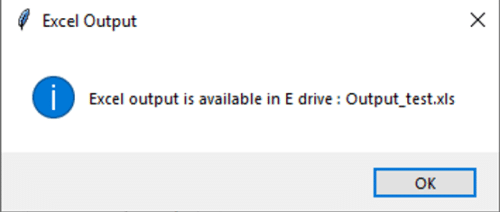
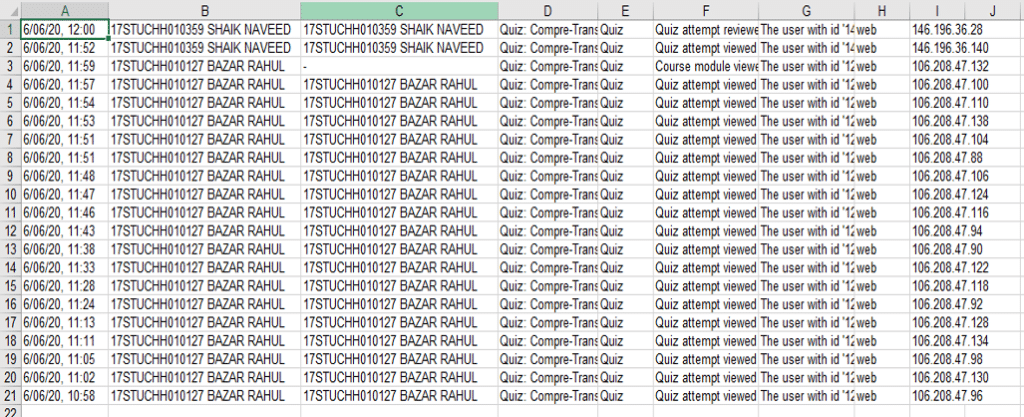
Now, the user may click on the ‘OK’ button on the above window (Figure 10) and close the application (Figure 10) and open the file ‘output_test.xls’. (Output file may get corrupted if the application is not closed). The excel output of multiple login detection is shown below (Figure 13).
Conclusion
This application was created based on a specific requirement while conducting online exams during the lockdown period. Hope it will be useful for the readers. The application can be modified slightly to suit various other needs.
Dr. R. Balamurali is working as an Assistant Professor and Coordinator of the Department of Computer Science and Engineering at IcfaiTech, The ICFAI Foundation for Higher Education, Hyderabad and Mr. P. Mahesh is working as a System Administrator at IcfaiTech, Hyderabad.
can we detect students logging in from the same device with multiple tabs