


 There are areas where we need small computing machines that can work collectively like a supercomputer. Let us see here how it can be done.
Most supercomputers have interconnected CPUs with a master node CPU that divides a large computing task into smaller tasks. These smaller tasks are assigned to the interconnected CPUs, which work together to finish the task in much lesser time.
POC Video Tutorial In English:
POC Video Tutorial In Hindi:
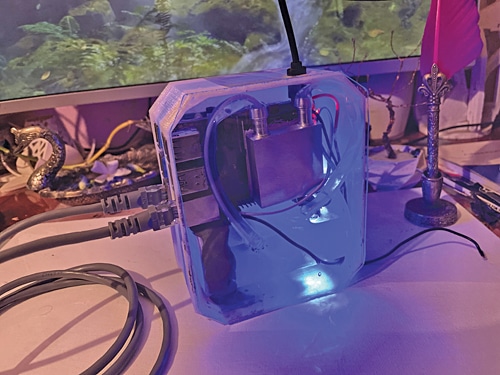
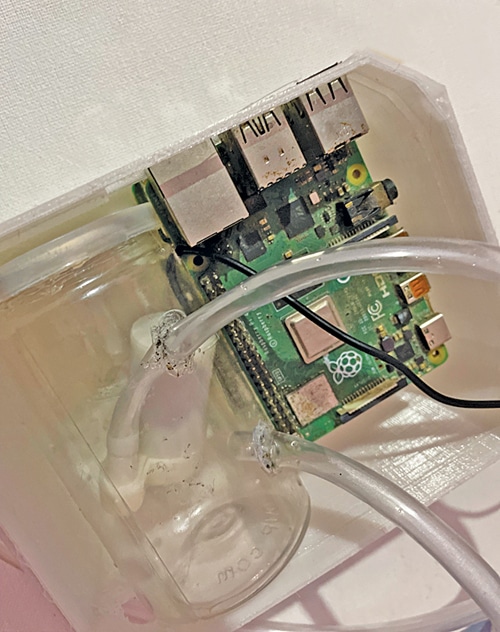
The components required for this project are listed under the Bill of Material table. The author’s prototype is shown in Fig. 1.
Each node of the cluster for our supercomputer would need the components mentioned under the Bill of Material. To make a cluster supercomputer of 100 RPI, you would need the 100 sets of the above.
| Bill of Material | ||
| Components | Quantity | Description |
| Raspberry Pi 4GB | Min 2 nodes | Supercomputer nodes |
| Power adaptor | Min 2 per node | 2A |
| Water-cooled aluminum block | Min 2 per node | 40mm×40mm×12mm |
| SD card 16GB/SSD 120GB to 500GB | SD card min 2 / 1 SSD | 100MB/s R/W speed |
| Thermoelectric cooler | Min 2 per node | 40mm×40mm×12mm |
| 7mm dia pipe | Min 4 per node | 7mm 5mm orifice |
| Water or cooling liquid | 200ml | Water/Cooling fluid |
| Water reservoir | 200ml | Cylinderical air-tight container |
| Micro water pump | 1 per node | 3-5 5V 3mm orifice |
| Ethernet cable | 2 per node | 15cm Ethernet cable |
| 3D printed case | 1 per node | PLA/ABS 3D printed |
| Ethernet splitter | 1 | 2 or more ports |
Hardware Designing
You can design either a simple rack based system or design a block of each node and connect the blocks to make a large cluster for personal use. Let us see how you can make a block based cluster supercomputer, where each block has two CPUs with their own separate pre-configured power management and cooling systems. This design gives you the flexibility to add as many individual cluster blocks as required. You can achieve even one terabytes of computing power by adding enough of these single node blocks.
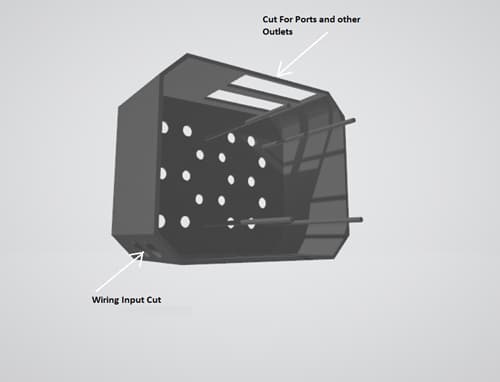
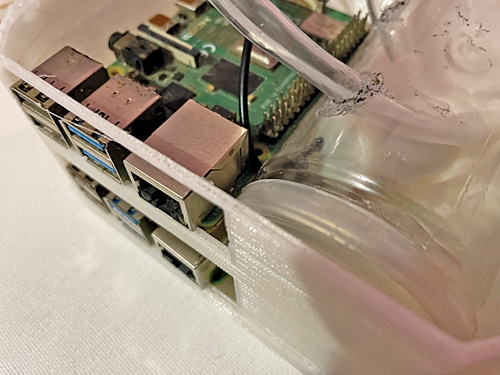
Let us design the single block casing that can hold two RPi single-board computers and the cylindrical water cooling reservoir. In the case design keep two cuts on front side to expose the USB and Ethernet ports of RPi. Keep two holes at the bottom to pass the wires and connectors of power supply (see Fig. 2). Also make some vent holes for air circulation to keep the system cool.
After designing the hardware casing as described above, 3D print it. You can make your own custom design if you like, or even go for a rack-based system and set up the cooling system and CPUs in the rack setup.
Cooling System
A good cooling system for the supercomputer is necessary as the CPUs would be doing complex tasks and could get heated up quickly. A dual cooling system using first thermoelectric and then water cooling is recommended. For better results, a liquid coolant can be used in place of water.
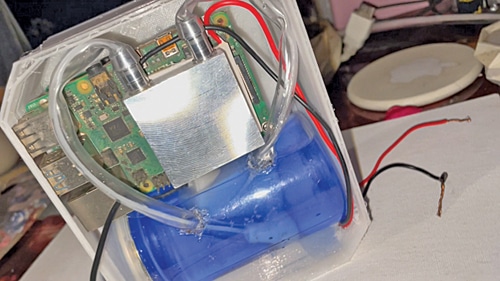
For the water/coolant reservoir, you can use an air-tight transparent cylindrical container made of glass or plastic, which fits inside the case designed earlier. The reservoir must be leak-proof to avoid any damage to the nearby electronic components or cause a short circuit.
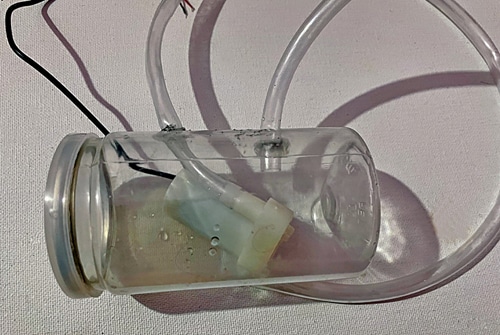
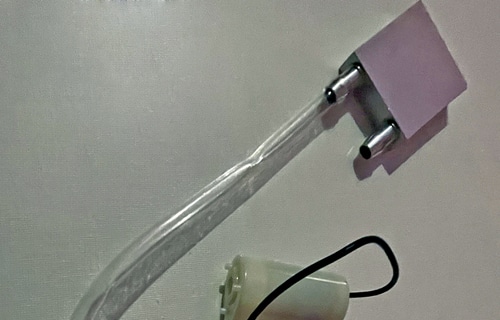
As shown in Fig. 3, make holes for the water inlet and outlet pipes in the reservoir and another hole for the wiring of the immersive water pump. Connect the water pipes and the wires and seal the holes with rubber based glue to ensure there is no water leakage from the reservoir. Refer Fig. 4, Fig. 5, and Fig. 6 for details.
[signinlocker id=”87626″]
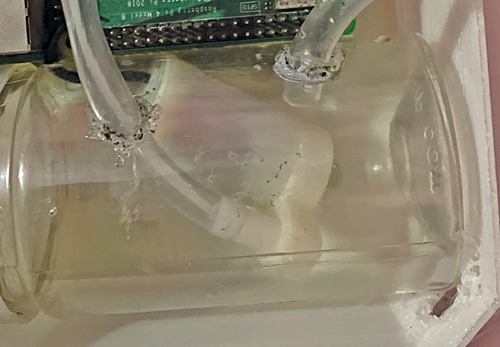

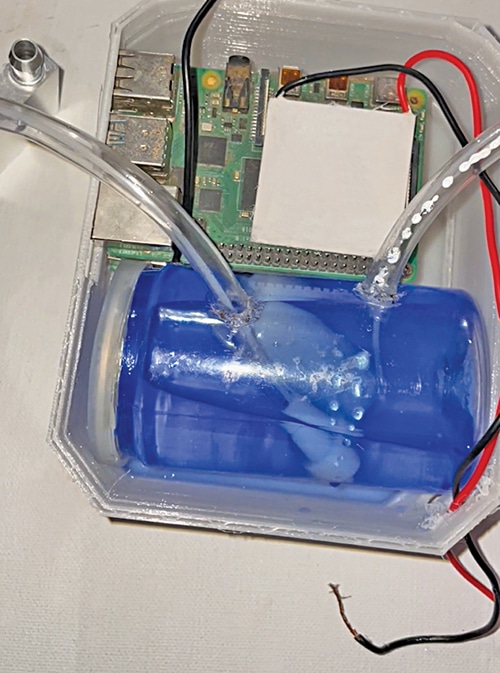
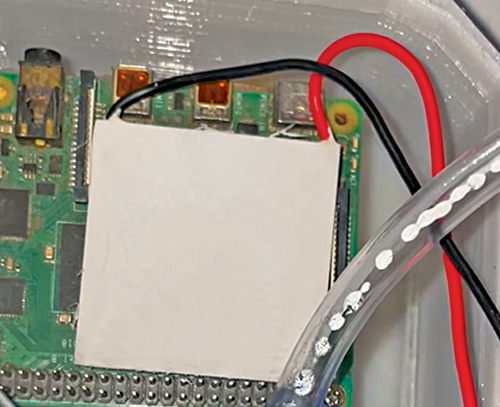
Cover the electronic components in the reservoir with a plastic sheet or cello tape to prevent any water drops formed due to humidity inside do not create any problem. Put the inlet and the outlet pipes inside the aluminium water cooling block (see Fig. 7 and Fig. 8) and connect the water pump and thermoelectric wires to a 5V DC power supply.
Assembly
With the cooling water pump reservoir and the whole cooling system ready to mount, you can now assemble the components and start making a block of the supercomputer. First fix the RPi single-board computer inside the case you have designed, as shown in Fig. 9, and mount the first cooling block on that. Next, mount the second RPi inside the case, making sure the ports are exposed and accessible through the cuts in the case that were made for that purpose.

Fix the second RPi with a screw and then fix the thermoelectric and cooling block on that as well. Then cover the top side of the case. To make it look cool and to see the water flowing, use a transparent acrylic sheet to close the case. The details can be seen in Fig. 10 through Fig. 12.
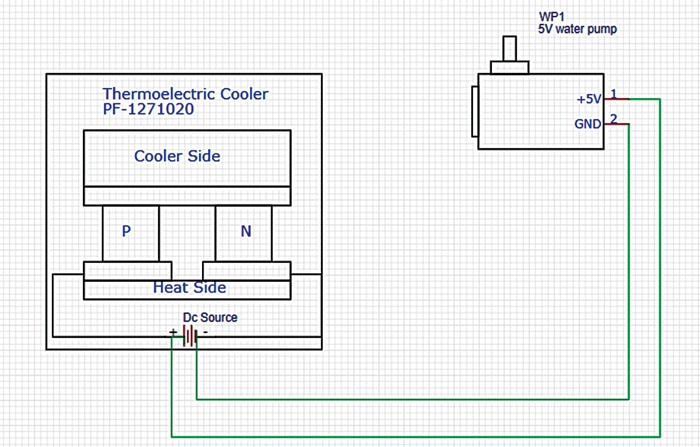
Refer to the connection diagram shown in Fig. 13 and accordingly connect the water pump and thermoelectric cooler to 5-12V, 2A DC power supply and power the RPi with 2A, 5V DC power supply.
Software
Install the latest Raspbeian OS in the RPi. Create a master unit that will divide the complex task to all its constituent nodes and control them for processing and calculations, like a supercomputer. To do that, open the Linux terminal and set up the MPI. Install MiPIH and prepare the master node that divides and controls the task among the cluster of computers.
sudo apt-get update
Change the ‘pi’ user password.
Under ‘Networking,’ change the hostname to nodeX, replacing X with a unique number (node1, node2, etc). Node1 will be our master unit.
Setup Ethernet:
sudo nano /etc/dhcpcd.conf
Go to the end of file and add the following:
interface eth0
static ip_address=10.0.0.1/24
Then create a unique identity:
ssh-keygen -t rsa
Setup master node
ssh-copy-id 10.0.0.1
Now the master node is ready. Open the terminal of the second node and connect Ethernet to both the RPi with Ethernet connector and repeat the above steps in that as well. For adding more nodes (which can be in thousands) create the bootable image of the above RPi setup and prepare the SD card of all those nodes with the same image.
Connect all of them with an Ethernet connector and boot all of them and set them as nodes of the master using the following commands and configurations. Open the terminal and run the following on each node of the supercomputer:
sudo apt install mpich
python3-mpi4py
Once complete, test MPI is working on each node:
mpiexec -n 1 hostname
From node1 (10.0.0.1), run the following command:
mpiexec -n 4 –hosts 10.0.0.1,10.0.0.2,
10.0.0.2,10.0.0.4 hostname
After every setup has gone well, you can test the system. Connect each node and power them all.
To test the supercomputer, download the code from Github.
Open the terminal of the master node and run the following in Linux terminal:
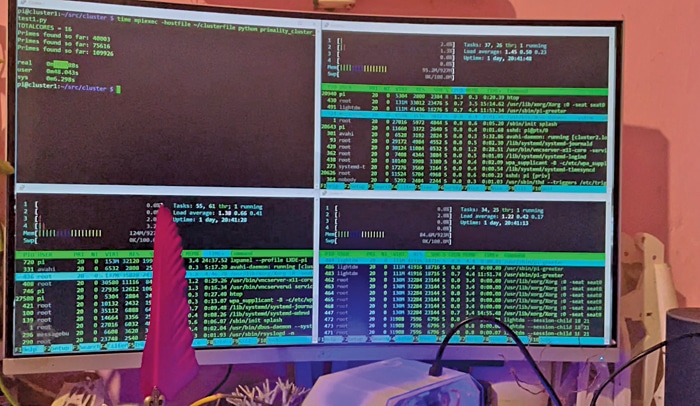
mpiexec -n 1 python3 prime.py 1000
When you run the above code, the complex task of finding the prime number up to 1,000, or 4,000, or even 100,000, is divided among all the nodes in the system and the nodes process together and calculate to give you the output. Fig. 14 shows how the program runs.
Download Source code
Ashwini Kumar Sinha is an IoT and AI enthusiast tech journalist at EFY
[/signinlocker]
