 The wearable AC cum Heater was already published in EFY. In the wearable AC cum heater, the fan will rotate and cool the body based on the temperature and vice versa.
We proposed some of the additional features for this product which are discussed below.
In this IoT project, we additionally proposed a portable Wearable IoT Health Monitoring System using a Heart rate and temperature sensor. The data will be sent to the ThingSpeak cloud using ESP8266 Node MCU which is also being used in this IoT Wi-Fi Temperature-Logging System. In this project, we have used the ESP8266 NODE MCU, Temperature sensor, Heart rate sensor, and OLED display.
This proposed online health monitoring system is used to measure body temperature and pulse rate without any human intervention, and the data is sent to the cloud and mobile widget for doctor’s diagnosis purposes. It is beneficial during the Covid pandemic situation.
An IoT technology has been used in this project for sharing the patient temperature and heart rate data to the doctor’s mobile phone for taking immediate care. These data are stored in the cloud and it can be used as a data set. In future, by using this data set the cardiovascular risk can be predicted by using the machine learning algorithm
Components Used:
- ESP 8266 NODE MCU
- Temperature Sensor (LM23)
- Heart rate Sensor (KY039)
- OLED Display (128×64)
Circuit Diagram:

Design Procedure:
- The sensor pins are connected to the corresponding pins of ESP8266 NODE MCU as per the circit diagram.
- USB mini adapter cable used to power up the ESP8266 Module.
- Create the channel in the ThingSpeak app and channel API key copied in the program.
- Set WiFi connection to the NODE MCU type SSID and Password in the program.
- The analog voltage received from the temperature sensor and converted into temperature in degree Celsius by using the ADC with the following conversion formula.
LM35_TempC_Sensor1 = Voltage / 10;
LM35_TempF_Sensor1 = (LM35_TempC_Sensor1 * 1.8) + 32;
- Similarly the digital heart rate value received from the heartbeat sensor.
- Both the values send to OLED display through SDL and SCL pins.
- Also the measures values send to Thingspeak cloud.
Device Working:
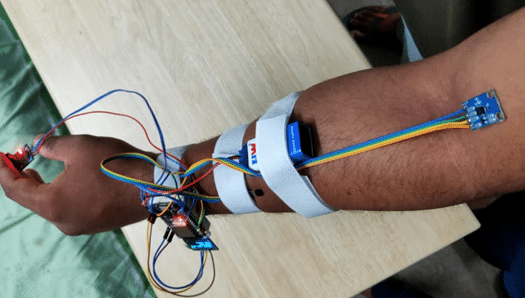
Device connected to Hand:

Temperature and Heart Rate values send to Mobile widget:

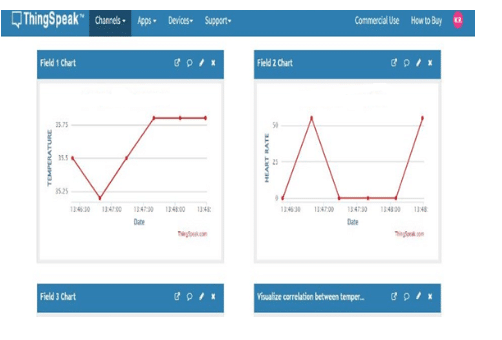
Temperature and Heart Rate values send to ThingSpeak Cloud:

Prototype Working Video Link.
Code:
#include <Wire.h>

#include <SPI.h>

#include <Adafruit_GFX.h>

#include <Adafruit_SSD1306.h>

#include <WiFi.h>

#include "ThingSpeak.h"

#define SCREEN_WIDTH 128    // OLED display width, in pixels

#define SCREEN_HEIGHT 64    // OLED display height, in pixels

#define OLED_RESET -1       // Reset pin # (or -1 if sharing Arduino reset pin)

Adafruit_SSD1306 display(SCREEN_WIDTH, SCREEN_HEIGHT, &Wire, OLED_RESET);

const char* ssid = "HeartStrokeDetector";   // your network SSID (name)

const char* password = "Indianss@12";   // your network password

int correlation;

WiFiClient  client;

unsigned long myChannelNumber = 1700318;

const char * myWriteAPIKey = "8SBFEZ26FALQC4CA";

#include "esp_adc_cal.h"

 unsigned long lastTime = 0;

unsigned long timerDelay = 30000;

#define LM35_Sensor1    39

int xpin=34;

int ypin=35;

int LM35_Raw_Sensor1 = 0;

float LM35_TempC_Sensor1 = 0.0;

float LM35_TempF_Sensor1 = 0.0;

float Voltage = 0.0;

int datapin=36;

int count=0;

unsigned long temp=0;

int fallflag;

void setup()

{

  Serial.begin(9600);

  WiFi.mode(WIFI_STA);

  ThingSpeak.begin(client);  // Initialize ThingSpeak

  if(WiFi.status() != WL_CONNECTED){

      Serial.print("Attempting to connect");

      while(WiFi.status() != WL_CONNECTED){

        WiFi.begin(ssid, password);

        delay(5000);

      }

  }

  if (!display.begin(SSD1306_SWITCHCAPVCC, 0x3C))

  {

    Serial.println(F("SSD1306 allocation failed"));

    for (;;); // Don't proceed, loop forever

  }

  display.display();

  delay(100);

  display.clearDisplay();

}


void loop()

{

  LM35_Raw_Sensor1 = analogRead(LM35_Sensor1);

  // Calibrate ADC & Get Voltage (in mV)

  Voltage = readADC_Cal(LM35_Raw_Sensor1);

  // TempC = Voltage(mV) / 10

  LM35_TempC_Sensor1 = Voltage / 10;

  LM35_TempF_Sensor1 = (LM35_TempC_Sensor1 * 1.8) + 32;

int x = analogRead(xpin); //read from xpin

delay(1); //

int y = analogRead(ypin); //read from ypin

delay(1);

   temp=millis();

   while(millis()<(temp+10000))

   {

      if(analogRead(datapin)<100)

        {

         count=count+1;

         while(analogRead(datapin)<100);

        }

   }

   count=count*6;

   display.clearDisplay();

  display.setTextSize(2);

  display.setTextColor(WHITE);

  if(count==0)

   {

  display.setCursor(0, 30);

  display.print("HB:");

  display.print(count);

   }

   else

   {

 count = map(count, 60, 120, 68, 84);

// count = constrain(sensorValue,68, 84);

   display.setCursor(0, 30);

  display.print("HB:");

  display.print(count);

   }

  display.setCursor(0, 10);

  display.print("TEMP:");

//  display.setCursor(6, 10);

  display.print(LM35_TempC_Sensor1);

  if((x>1500)&&(x<1800))

  {

    display.setTextSize(1);

  display.setCursor(0, 50);

  display.print("FALL:");

  display.print("FORWARD");

  fallflag=1;

  }

  else if((x>2100)&&(x<2300))

  {

    display.setTextSize(1);

  display.setCursor(0, 50);

  display.print("FALL:");

  display.print("BACKWARD");

  fallflag=2;

  }

  else if((y>1500)&&(y<1800))

  {

    display.setTextSize(1);

  display.setCursor(0, 50);

  display.print("FALL:");

  display.print("LEFT");

  fallflag=3;

  }

  else if((y>2100)&&(y<2300))

  {

    display.setTextSize(1);

  display.setCursor(0, 50);

  display.print("FALL:");

  display.print("RIGHT");

  fallflag=4;

  }

  else  {

    display.setTextSize(1);

  display.setCursor(0, 50);

  display.print("FALL:");

  display.print("NORMAL");

  fallflag=0;

  }

  display.display();

  correlation=count+LM35_TempC_Sensor1;

  ThingSpeak.setField(1, LM35_TempC_Sensor1);

    //ThingSpeak.setField(1, temperatureF);

    ThingSpeak.setField(2, count);

    ThingSpeak.setField(3, fallflag);

    ThingSpeak.setField(4, correlation);

    // Write to ThingSpeak. There are up to 8 fields in a channel, allowing you to store up to 8 different

    // pieces of information in a channel.  Here, we write to field 1.

    int m = ThingSpeak.writeFields(myChannelNumber, myWriteAPIKey);

    lastTime = millis();

 temp=0;

 count=0;

 correlation=0;

 delay(1000);

}

 uint32_t readADC_Cal(int ADC_Raw)

{

  esp_adc_cal_characteristics_t adc_chars;

  esp_adc_cal_characterize(ADC_UNIT_1, ADC_ATTEN_DB_11, ADC_WIDTH_BIT_12, 1100, &adc_chars);

  return(esp_adc_cal_raw_to_voltage(ADC_Raw, &adc_chars));}}
We have another healthcare electronics project, which is the wrong posture and muscle strain detector.


How can I contact you bro???..me and my team having some doubts on your project.please reply as soon as possible
Kindly share your full query on [email protected].