


 We have seen different types of Human Interface Devices (HIDs), for example mouse and keyboard. In older versions of computer mouse, optical sensors were used to detect movement relative to a surface, thus they require smooth surface to function properly. These mice can work with only two coordinates. With advancements in technology, we are now talking about 3D user interfaces ((3DUIs). So, we must start developing a 3D HID device which have the capability to work with all coordinates.
In this project we are going to make 3D wireless HID device that will give you a whole new experience of using computers and playing online games. With this device, you will be able to control computers and smartphones by just moving your hand in air.
This device can be very helpful in making 3D UI based systems. We can use this device in 3D designing as well. For instance, you can draw any design by moving your hand in the air. Further we can develop such device for 3D holographic display and in VR that gives us a 3D UI.

Best application of this device is that it will enable differently abled people to use computers and smartphones. People who don’t have hands to operate computer or phones can now do so with the help of this device. They can wear this device on their head and operate gadgets by moving their head.
Now, let’s start our Interesting project. First, we need to gather the following components –
Components:3d Mouse
- Arduino Pro Mini 5V 16-Mhz
- 2 Bluetooth HC 05
- Mpu 6050 Sensor
- Arduino Leonardo Micro (At mega 32u)
- Jumper wires
- Micro USB Cable
- 4 Push Switch
Bill of material
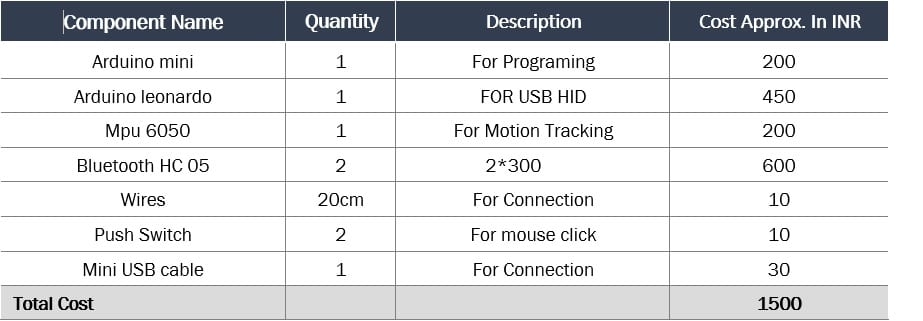
You also need a either FTDI Module or Arduino Uno to upload code on pro mini.
Coding
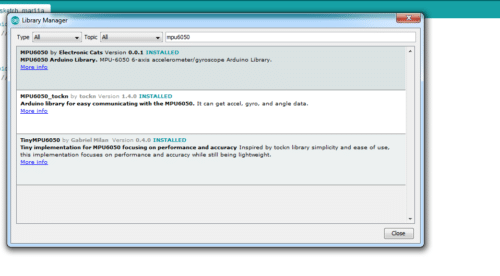
First of all, we need to install an MPU 6050 library. Open library manager of Arduino IDE and search for MPU6050, then install the library – refer (Fig. 1). After this, we will set one Bluetooth as slave and another as master – follow the Bluetooth instruction on the internet to do this.
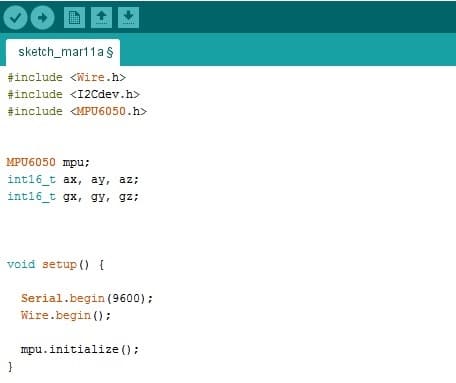
As we have installed the library, now we can start the coding part. In the first part of coding, we will include the library for MPU6050 and set the variables for storing values of mpu6050 sensor. After that we can set up sensor and Bluetooth in set up function – for this refer (Fig. 2). I have used Baudrate 9600 in this code.
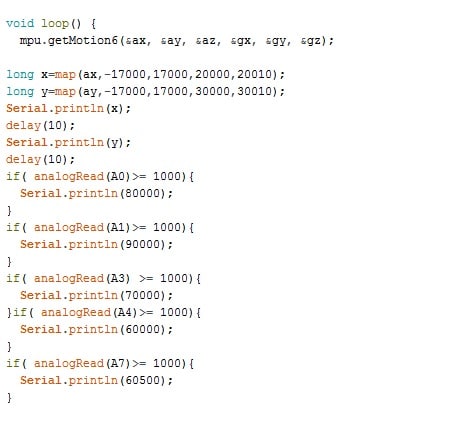
In the second part of coding, we will send the buttons and sensors data to another Arduino over bluetooth as in pic, refer (Fig 3).
Our Arduino mini code is ready now. So, let’s start coding for Arduino pro micro.
First, we will create variables to store values, then set up Bluetooth to read serial data of sensor – refer (Fig. 4).

In the third part of our coding process, we will create a loop function and get the serial data from Bluetooth. Here in this code, I have used software serial for Bluetooth connection with baudrate of 9600.
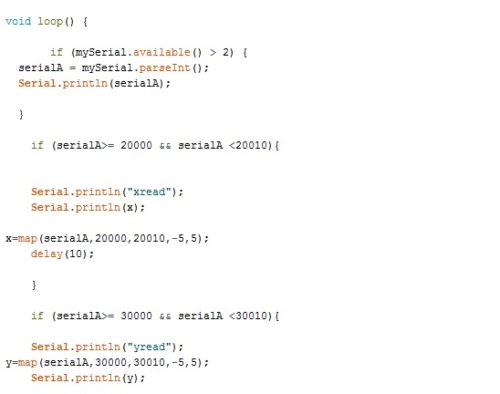
After this, check the range value of serial data and assign its value for mouse movement as in Fig. 5.
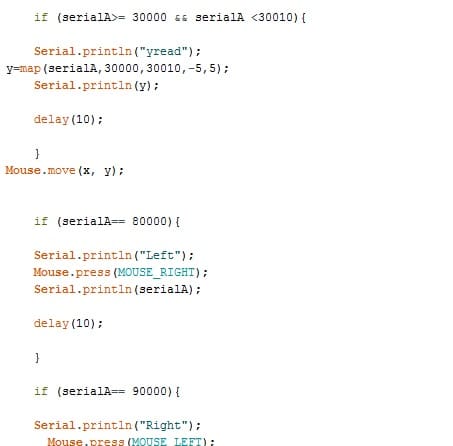
Next, we will create if () condition to check how the mouse button functions – you can refer (Fig. 6) for this. We can also add extra Keyboard shortcuts and other functions to it as per your desire. Here in this code, I have added button shortcut for copy and paste function. You can create your own custom function according to your use cases.
As we have completed the coding part, we need to connect the components.
Connections:
| Arduino Mini Pin |
Components Pin
|
|
| Arduino Mini SCL | MPU 6050 SCl | |
| Arduino Mini SDA | MPU 6050 SDA | |
| Arduino Mini VCC | MPU 6050 VCC | |
| Arduino Mini GND | MPU 6050 GND | |
| Arduino Mini TX |
Bluetooth HC 05 RX
|
|
| Arduino Mini RX |
Bluetooth HC 05 TX
|
|
| Arduino Mini VCC |
Bluetooth HC 05 +Ve
|
|
| Arduino Mini VCC |
Push Switch Pins
|
|
| Arduino Mini (A3,A0,A2,A1 ) |
Push switch(1, 2,3,4)
|
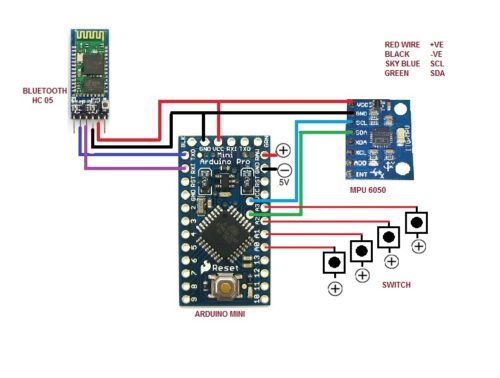
Refer Fig. 7 for connection and schematic.
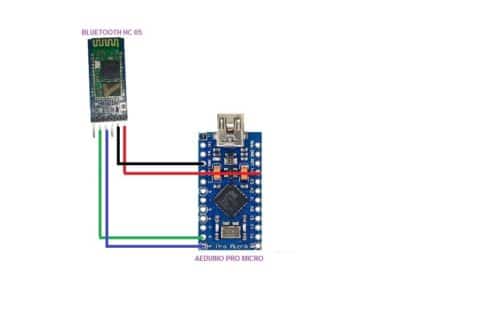
Now, we will connect Arduino Pro Micro with Bluetooth – refer (Fig . 8)
| Arduino |
Bluetooth HC 05
|
| VCC | +VE |
| GND | -VE |
| Pin 9 | TX |
| Pin 8 | RX |
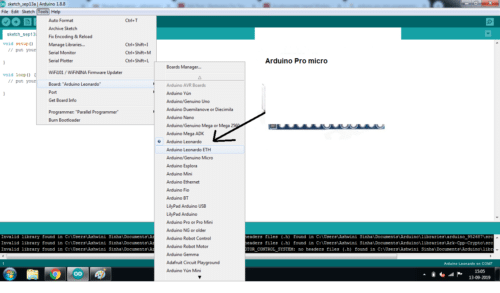
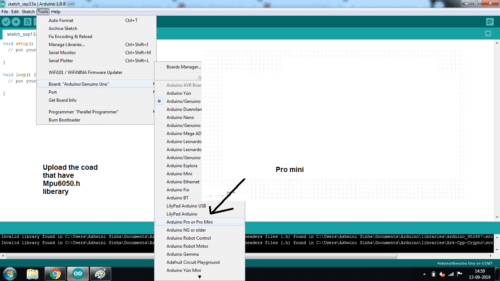
Now to upload the code to Pro Mico select the board and port and and press ctrl+ U(Refer fig 9).Now upload the code to Pro mini using the board option (Refer Fig 10). Follow the instructions online to upload the code on Pro Mini. Search How to upload code on pro mini.
Congrats! The wireless HID mouse is ready for use. You can do some awesome tricks with it – you can attach it on your hand or any toy gun and enjoy the real shooting game experience. Attach the device on the tip of a plastic knife and you can play vegetable cutting game with it.
Note:- In the code, I have mentioned A7 pin in Arduino for a keyboard button function but not used it in connection and schematics because some Arduino mini version don’t have this pin. If you have extra A7, A8 pins you can add more switch to it and set keyboard shortcut function according to your choice.

how to download that mpu 6050 library cqan u pprovide a link for it it may be easy to us
Open Arduino IDE then
go to sketch–>include library–>manage libraries
search for MPU 6050 in the search box and install all the three shown there.
Hope this helps you..!!!
What is the power supply you have used for the pro mini?
Is it a 9v battery with 7805 regulator or Li-Po battery of 12v?
Note Raw pin of Aruino Pro mini is capable of regulating unregulated power supply upto 9v or 12v so you can use any battery having 5v to 9V powerbut must go through the raw pin not any other VCC pin
Hi Ashwini Sinha.
would it work with a 3,7V Battery ?
Bluetooth need 5v
I connected everything perfectly as shown, the circuit powers up and the lights are blinking but the cursor doesn’t move any help appreciated.
i uploaded the code as above mentioned but its does not compile and showing a error of mouse Arduino: 1.8.9 (Windows Store 1.8.21.0) (Windows 10), Board: “Arduino/Genuino Uno”
In file included from C:\Users\DELL\AppData\Local\Temp\Rar$DIa3592.43265\Final_HID\Final_HID.ino:2:0:
C:\Program Files\WindowsApps\ArduinoLLC.ArduinoIDE_1.8.21.0_x86__mdqgnx93n4wtt\libraries\Mouse\src/Mouse.h:29:2: warning: #warning “Using legacy HID core (non pluggable)” [-Wcpp]
#warning “Using legacy HID core (non pluggable)”
^
In file included from C:\Users\DELL\AppData\Local\Temp\Rar$DIa3592.43265\Final_HID\Final_HID.ino:3:0:
C:\Program Files\WindowsApps\ArduinoLLC.ArduinoIDE_1.8.21.0_x86__mdqgnx93n4wtt\libraries\Keyboard\src/Keyboard.h:29:2: warning: #warning “Using legacy HID core (non pluggable)” [-Wcpp]
#warning “Using legacy HID core (non pluggable)”
^
C:\Users\DELL\AppData\Local\Temp\Rar$DIa3592.43265\Final_HID\Final_HID.ino: In function ‘void setup()’:
Final_HID:15:3: error: ‘Mouse’ not found. Does your sketch include the line ‘#include ‘?
Mouse .begin(48);
^
Final_HID:16:3: error: ‘Keyboard’ not found. Does your sketch include the line ‘#include ‘?
Keyboard.begin();
^
C:\Users\DELL\AppData\Local\Temp\Rar$DIa3592.43265\Final_HID\Final_HID.ino: At global scope:
Final_HID:19:10: error: variable or field ‘loop’ declared void
void loop({
^
Final_HID:21:8: error: expected primary-expression before ‘if’
if (mySerial.available() > 2) {
^
Final_HID:21:8: error: expected ‘}’ before ‘if’
Final_HID:21:8: error: expected ‘)’ before ‘if’
Final_HID:50:5: error: expected unqualified-id before ‘if’
if (serialA== 80000){
^
Final_HID:60:5: error: expected unqualified-id before ‘if’
if (serialA== 90000){
^
Final_HID:69:6: error: expected unqualified-id before ‘if’
if (serialA== 70000){
^
Final_HID:77:6: error: expected unqualified-id before ‘if’
if (serialA== 60500){
^
Final_HID:86:6: error: expected unqualified-id before ‘if’
if (serialA== 60000){
^
Final_HID:93:6: error: expected unqualified-id before ‘else’
}else{
^
Final_HID:100:1: error: expected declaration before ‘}’ token
}
^
exit status 1
‘Mouse’ not found. Does your sketch include the line ‘#include ‘?
This report would have more information with
“Show verbose output during compilation”
option enabled in File -> Preferences.
kindly give instruction through which i can upload it succesfully
Hello, I hope you are doing well, I know your problem answer and that is you can’t compile and upload that code which is for “micro/Leonardo/mini/mega” to “UNO/NANO,etc..” Arduinos. Briefly you can upload this code just on Arduino which has a (for example: Atmega32U4). Go to IDE and change your board.
***I have some problem with that first code for mini, when I compile it I saw this error, do you have as same as my problem?
#include
#include
#include
MPU6050 mpu;
int16_t ax, ay, az;
int16_t gx, gy, gz;
void setup() {
Serial.begin(9600);
Wire.begin();
mpu.initialize();
}
void loop() {
mpu.getMotion6(&ax, &ay, &az, &gx, &gy, &gz);
long x=map(ax,-17000,17000,20000,20008);
long y=map(ay,-17000,17000,30000,30008);
Serial.println(x);
delay(10);
Serial.println(y);
delay(10);
if( analogRead(A0)>= 1000){
Serial.println(80000);
}
if( analogRead(A1)>= 1000){
Serial.println(90000);
}
if( analogRead(A2) >= 1000){
Serial.println(70000);
}if( analogRead(A3)>= 1000){
Serial.println(60000);
}
if( analogRead(A4)>= 1000){
Serial.println(60500);
}
}
error:
exit status 1
Error compiling for board Arduino Uno.
Tested this code and works fine and compile a well. You might have not installed the MPU6050 library as stated in article. Install and then use this code.
#include
MPU6050 mpu;
int16_t ax, ay, az;
int16_t gx, gy, gz;
void setup() {
Serial.begin(9600);
Wire.begin();
mpu.initialize();
}
void loop() {
mpu.getMotion6(&ax, &ay, &az, &gx, &gy, &gz);
long x=map(ax,-17000,17000,20000,20008);
long y=map(ay,-17000,17000,30000,30008);
Serial.println(x);
delay(10);
Serial.println(y);
delay(10);
if( analogRead(A0)>= 1000){
Serial.println(80000);
}
if( analogRead(A1)>= 1000){
Serial.println(90000);
}
if( analogRead(A2) >= 1000){
Serial.println(70000);
}if( analogRead(A3)>= 1000){
Serial.println(60000);
}
if( analogRead(A4)>= 1000){
Serial.println(60500);
}
}
Hello, thank you so much for your replay. I solved my problem that night, I didn’t know if I install and copy one library two times I will had problem with it.!!! I go to my installed path (library folder) and delete one of them and everything worked well. #New_experience
You welcome. You can try out our other projects also.
how you get these values?….where can i get this values? cause i use arduino joystick for the movement and button for they any funtion for the keyboard…i dont know which value should i use for my x and y joystick…and values for my button…note..i use A0 and A1 for joystick and for the button i use 1,2,3,4..,5,6..etc…please help me
f( analogRead(A0)>= 1000){
Serial.println(80000);
}
if( analogRead(A1)>= 1000){
Serial.println(90000);
}
if( analogRead(A2) >= 1000){
Serial.println(70000);
}if( analogRead(A3)>= 1000){
Serial.println(60000);
}
if( analogRead(A4)>= 1000){
Serial.println(60500);
My project and code is for MPU based and with 4 buttons attached for analog button input. If you want to make this with joystick please give me the details for your joystick model and its data sheet because it may vary according to the joy stick you are using.
if( analogRead(A0)>= 1000){
Serial.println(80000);
}
how to know this value?
if( analogRead(A1)>= 1000){
Serial.println(90000);
}
if( analogRead(A2) >= 1000){
Serial.println(70000);
}if( analogRead(A3)>= 1000){
Serial.println(60000);
I use arduino leonardo as main board..i use pin 4 to 13 for the button press and add A2 for one more button press..i use Dual-Axis XY Thumb stick gane controller arduino pic..+ the mpu6050..everything work..only that i want to connect it to the hc-05 bluetooth..please help me
This is my code:
#include
#include
#include
#include
#include
#include
const uint8_t Pin_XAxis = A0; // Pin for joy horizontal axis
const uint8_t Pin_YAxis = A1; // Pin for joy vertical axis
const int JoyCenter = 1023 / 2; // max value for 10-bit ADC / 2
const int JoyDeadzone = 50; // +/- area around the center to ignore
KeyboardButton moveForward(‘w’);
KeyboardButton moveLeft(‘a’);
KeyboardButton moveBackward(‘s’);
KeyboardButton moveRight(‘d’);
MPU6050 mpu;
int16_t ax, ay, az, gx, gy, gz;
int vx, vy;
void setup() {
pinMode(4, INPUT_PULLUP);
pinMode(5, INPUT_PULLUP);
pinMode(6, INPUT_PULLUP);
pinMode(7, INPUT_PULLUP);
pinMode(8, INPUT_PULLUP);
pinMode(9, INPUT_PULLUP);
pinMode(10, INPUT_PULLUP);
pinMode(11, INPUT_PULLUP);
pinMode(12, INPUT_PULLUP);
pinMode(13, INPUT_PULLUP);
pinMode(A2, INPUT_PULLUP);
Keyboard.begin();
Serial.begin(9600);
Wire.begin();
mpu.initialize();
if (!mpu.testConnection()) {
while (1);
}
}
void loop() {
mpu.getMotion6(&ax, &ay, &az, &gx, &gy, &gz);
vx = (gx+1)/200; // “+300” because the x axis of gyroscope give values about -350 while it’s not moving. Change this value if you get something different using the TEST code, chacking if there are values far from zero.
vy = -(gz-1)/200; // same here about “-100”
Mouse.move(vx, vy);
delay(20);
//if the button is pressed
if (digitalRead(12) == LOW) {
//Send an ASCII ‘L’,
Keyboard.write(76);
}
if (digitalRead(13) == LOW) {
//Send an ASCII ‘B’,
Keyboard.write(66);
}
if (digitalRead(4) == LOW) {
//Send an ASCII ‘R’,
Keyboard.write(82);
}
if (digitalRead(5) == LOW) {
//Send an ASCII ‘M’,
Keyboard.write(77);
}
if (digitalRead(6) == LOW) {
//Send an ASCII ‘E’,
Keyboard.write(69);
}
if (digitalRead(7) == LOW) {
//Send an ASCII ‘F’,
Keyboard.write(70);
}
if (digitalRead(8) == LOW) {
//Send an ASCII ‘G’,
Keyboard.write(71);
}
if (digitalRead(9) == LOW) {
//Send an ASCII ‘H’,
Keyboard.write(72);
}
if (digitalRead(10) == LOW) {
//Send an ASCII ‘I’,
Keyboard.write(73);
}
if (digitalRead(11) == LOW) {
//Send an ASCII ‘J’,
Keyboard.write(74);
}
if (digitalRead(A2) == LOW) {
//Send an ASCII ‘K’,
Keyboard.write(75);
}
int x = analogRead(Pin_XAxis); // Read X axis
int y = analogRead(Pin_YAxis); // Read Y axis
moveLeft.set(x JoyCenter + JoyDeadzone);
moveForward.set(y JoyCenter + JoyDeadzone);
}
SOS!!!
Hello again, I hope you are doing well, I stuck in your codes, I wanna edit your codes but I didn’t know how to change it. my purpose is edit your code to has two button (just right click and left click) like a real mouse, I don’t know how to change your transmitter and receiver codes.
please guide or send me those codes. ([email protected])
Thank you so much for your supporting.
sorry I forget to say I used Arduino lilypad as transmitter and pro micro for connect to laptop.
and used lilypad A4 @ A5 pins for MPU6050 and A3 @ A4 pins for my buttons.
I put everything right puts me up and I do not get anything on the serial monitor that can happen?
Kindly elaborate your query.
Change the baud rate of serial monitor. the baud rate of Bluetooth and serial monitor must match.
hey, i am using arduino due and arduino pro micro. code was uploaded perfectly but the main concern is bluetooth i have done the master slave in the bluetooth but the communication between two is happening.
please help me out.
I uploaded the code through usb.
Check the the Arduino Due Serial ports and pin number because Arduino Due have different serial periphera. It has serial1 on pin 19 and 18
serial2 on 17,16 serial3 on 15,14 and serial 0 1 pin for USE so use its serial accordingly like if using serial1 then use Serial1.begin(9600).The baudrate of both bluetooth should be same
Thanks.But i tried to upload the code on both the Arduino’s that I am using.The code gets uploaded on the Arduino Micro but doesn’t uploads on Arduino Due it shows this type of error :
Arduino: 1.8.12 (Windows Store 1.8.33.0) (Windows 10), Board: “Arduino Due (Programming Port)”
C:\Users\NP\Documents\Arduino\libraries\SoftwareSerial-master\SoftwareSerial.cpp:285:2: error: #error This version of SoftwareSerial supports only 20, 16 and 8MHz processors
#error This version of SoftwareSerial supports only 20, 16 and 8MHz processors
^
C:\Users\NP\Documents\Arduino\libraries\SoftwareSerial-master\SoftwareSerial.cpp: In member function ‘bool SoftwareSerial::listen()’:
C:\Users\NP\Documents\Arduino\libraries\SoftwareSerial-master\SoftwareSerial.cpp:341:23: error: ‘SREG’ was not declared in this scope
uint8_t oldSREG = SREG;
^
C:\Users\NP\Documents\Arduino\libraries\SoftwareSerial-master\SoftwareSerial.cpp:342:9: error: ‘cli’ was not declared in this scope
cli();
^
In file included from C:\Users\NP\Documents\ArduinoData\packages\arduino\hardware\sam\1.6.12\cores\arduino/Arduino.h:201:0,
from C:\Users\NP\Documents\Arduino\libraries\SoftwareSerial-master\SoftwareSerial.cpp:43:
C:\Users\NP\Documents\Arduino\libraries\SoftwareSerial-master\SoftwareSerial.cpp: In member function ‘void SoftwareSerial::setTX(uint8_t)’:
C:\Users\NP\Documents\ArduinoData\packages\arduino\hardware\sam\1.6.12\variants\arduino_due_x/variant.h:63:65: error: invalid conversion from ‘Pio*’ to ‘uint8_t {aka unsigned char}’ [-fpermissive]
#define digitalPinToPort(P) ( g_APinDescription[P].pPort )
^
C:\Users\NP\Documents\Arduino\libraries\SoftwareSerial-master\SoftwareSerial.cpp:517:18: note: in expansion of macro ‘digitalPinToPort’
uint8_t port = digitalPinToPort(tx);
^
C:\Users\NP\Documents\ArduinoData\packages\arduino\hardware\sam\1.6.12\variants\arduino_due_x/variant.h:66:44: error: base operand of ‘->’ is not a pointer
#define portOutputRegister(port) ( &(port->PIO_ODSR) )
^
C:\Users\NP\Documents\Arduino\libraries\SoftwareSerial-master\SoftwareSerial.cpp:518:27: note: in expansion of macro ‘portOutputRegister’
_transmitPortRegister = portOutputRegister(port);
^
C:\Users\NP\Documents\Arduino\libraries\SoftwareSerial-master\SoftwareSerial.cpp: In member function ‘void SoftwareSerial::setRX(uint8_t)’:
C:\Users\NP\Documents\ArduinoData\packages\arduino\hardware\sam\1.6.12\variants\arduino_due_x/variant.h:63:65: error: invalid conversion from ‘Pio*’ to ‘uint8_t {aka unsigned char}’ [-fpermissive]
#define digitalPinToPort(P) ( g_APinDescription[P].pPort )
^
C:\Users\NP\Documents\Arduino\libraries\SoftwareSerial-master\SoftwareSerial.cpp:528:18: note: in expansion of macro ‘digitalPinToPort’
uint8_t port = digitalPinToPort(rx);
^
C:\Users\NP\Documents\ArduinoData\packages\arduino\hardware\sam\1.6.12\variants\arduino_due_x/variant.h:67:44: error: base operand of ‘->’ is not a pointer
#define portInputRegister(port) ( &(port->PIO_PDSR) )
^
C:\Users\NP\Documents\Arduino\libraries\SoftwareSerial-master\SoftwareSerial.cpp:529:26: note: in expansion of macro ‘portInputRegister’
_receivePortRegister = portInputRegister(port);
^
C:\Users\NP\Documents\Arduino\libraries\SoftwareSerial-master\SoftwareSerial.cpp: In member function ‘void SoftwareSerial::begin(long int)’:
C:\Users\NP\Documents\Arduino\libraries\SoftwareSerial-master\SoftwareSerial.cpp:540:31: error: ‘table’ was not declared in this scope
for (unsigned i=0; i Preferences.
So What should i do next.And Also explain me the steps how to make it wireless i did not understand about how to make it wireless.
Thanks.But I am stuck I have done the connections as per the instructions and uploaded the code on the Arduino micro.But when i try to upload the code on Arduino Due it shows this type of error :
Arduino: 1.8.12 (Windows Store 1.8.33.0) (Windows 10), Board: “Arduino Due (Programming Port)”
C:\Users\NP\Documents\Arduino\libraries\SoftwareSerial-master\SoftwareSerial.cpp:285:2: error: #error This version of SoftwareSerial supports only 20, 16 and 8MHz processors
#error This version of SoftwareSerial supports only 20, 16 and 8MHz processors
^
C:\Users\NP\Documents\Arduino\libraries\SoftwareSerial-master\SoftwareSerial.cpp: In member function ‘bool SoftwareSerial::listen()’:
C:\Users\NP\Documents\Arduino\libraries\SoftwareSerial-master\SoftwareSerial.cpp:341:23: error: ‘SREG’ was not declared in this scope
uint8_t oldSREG = SREG;
^
C:\Users\NP\Documents\Arduino\libraries\SoftwareSerial-master\SoftwareSerial.cpp:342:9: error: ‘cli’ was not declared in this scope
cli();
^
In file included from C:\Users\NP\Documents\ArduinoData\packages\arduino\hardware\sam\1.6.12\cores\arduino/Arduino.h:201:0,
from C:\Users\NP\Documents\Arduino\libraries\SoftwareSerial-master\SoftwareSerial.cpp:43:
C:\Users\NP\Documents\Arduino\libraries\SoftwareSerial-master\SoftwareSerial.cpp: In member function ‘void SoftwareSerial::setTX(uint8_t)’:
C:\Users\NP\Documents\ArduinoData\packages\arduino\hardware\sam\1.6.12\variants\arduino_due_x/variant.h:63:65: error: invalid conversion from ‘Pio*’ to ‘uint8_t {aka unsigned char}’ [-fpermissive]
#define digitalPinToPort(P) ( g_APinDescription[P].pPort )
^
C:\Users\NP\Documents\Arduino\libraries\SoftwareSerial-master\SoftwareSerial.cpp:517:18: note: in expansion of macro ‘digitalPinToPort’
uint8_t port = digitalPinToPort(tx);
^
C:\Users\NP\Documents\ArduinoData\packages\arduino\hardware\sam\1.6.12\variants\arduino_due_x/variant.h:66:44: error: base operand of ‘->’ is not a pointer
#define portOutputRegister(port) ( &(port->PIO_ODSR) )
^
C:\Users\NP\Documents\Arduino\libraries\SoftwareSerial-master\SoftwareSerial.cpp:518:27: note: in expansion of macro ‘portOutputRegister’
_transmitPortRegister = portOutputRegister(port);
^
C:\Users\NP\Documents\Arduino\libraries\SoftwareSerial-master\SoftwareSerial.cpp: In member function ‘void SoftwareSerial::setRX(uint8_t)’:
C:\Users\NP\Documents\ArduinoData\packages\arduino\hardware\sam\1.6.12\variants\arduino_due_x/variant.h:63:65: error: invalid conversion from ‘Pio*’ to ‘uint8_t {aka unsigned char}’ [-fpermissive]
#define digitalPinToPort(P) ( g_APinDescription[P].pPort )
^
C:\Users\NP\Documents\Arduino\libraries\SoftwareSerial-master\SoftwareSerial.cpp:528:18: note: in expansion of macro ‘digitalPinToPort’
uint8_t port = digitalPinToPort(rx);
^
C:\Users\NP\Documents\ArduinoData\packages\arduino\hardware\sam\1.6.12\variants\arduino_due_x/variant.h:67:44: error: base operand of ‘->’ is not a pointer
#define portInputRegister(port) ( &(port->PIO_PDSR) )
^
C:\Users\NP\Documents\Arduino\libraries\SoftwareSerial-master\SoftwareSerial.cpp:529:26: note: in expansion of macro ‘portInputRegister’
_receivePortRegister = portInputRegister(port);
^
C:\Users\NP\Documents\Arduino\libraries\SoftwareSerial-master\SoftwareSerial.cpp: In member function ‘void SoftwareSerial::begin(long int)’:
C:\Users\NP\Documents\Arduino\libraries\SoftwareSerial-master\SoftwareSerial.cpp:540:31: error: ‘table’ was not declared in this scope
for (unsigned i=0; i Preferences.
So I don’t know what to do next help me out.And also please explain the steps of how to make it wireless.
I have used Arduino PRO MICRO for this For Arduino DUe you have to change the code and use the Hardware Serial. Check the Pinouts for Hardware Serial of Arduino DUE and use as Serial1,, Serial2 , Serial3, Serial4 according to pin outs
Can I use arduino nano along with Arduino Pro Micro?
yes, Why not but you must use the Arduino PRO MICRO , Leonardo for HID(as usb mouse/keyboard input)
I have uploaded one of the code in Arduino nano and one of the code in arduino pro micro but their is no response please help me with the proper steps need to submit the project asap. 🙁
What problem are you facing plug your board and then open the serial monitor in ARDUINO IDE with right baud rate and then tell me what it is showing in serial monitor
Hey.Their is no Progress Till now.I’ll tell what have i done exactly.I have used 2 Arduino Boards Arduino Due and Arduino Pro Micro.I have connected Arduino Due with MPU9250 and HC-05(slave) and Arduino Pro Micro with HC-05(master).I have connected Arduino Due on Serial 1 pin i.e (19,18) to Hc-05 (slave) Rx and Tx pin.And also made changes in the code respectively on both Arduino Due and Arduino Pro micro code(Serial1.begin(9600)).Now uploaded the code with usb cable on both the boards.And have Arduino Due an external power supply and Arduinpo Micro connected to pc through usb cable.Both the bluetooth gets connected with each other but their is no response.Opening Serial Monitor doesn’t response with anything.Hc-05 has the baud rate of 115200.So I request you to guide me 🙁
Hc 05 default baudrate is 9600 so both HC 05 baud rate should be 9600.
Here you have to do some check:-
first test your MPU Sensor and see its in serial monitor on Arduino. You can use the library example for that.
If the sensor is ok and you are seeing the readings from Serial monitor then go for next test.
Now connect the Bluetooth HC 05 to your DUE with Right serial port and do same with Arduino Pro Micro.
Next in code send any string to both Bluetooth For example:
If you are using Arduini DUE Serial1 then in loop should be like this
void loop (){
Serial1.println(“this is test”);
if (Seial1.available()!=0){
Serial.println(Serial.read());///this should be the serial of your due usb check which serial is your due usb
}
}
For pro micro
Loop should be same as above but change the name of serial you are using also in setup use same serial name to start like Serial.begin(9600); Serial1.begin(9600);
now see in serial monitor is the communication is happening between Bluetooth modules if yes then with right serial port name.
if no then
inter change the RX -TX connection pins of Bluetooth of one side if still no then
change in the other side
if still no the change back to the first side .
Hope this help you
Hi, could you help me with this project? I am using the arduino leonardo and the mpu6050 and the hc 05 and I am not able to communicate bluetooth with PC. I don’t know how to put the data to the bluetooth reads and send it to the PC
#include
#include
#include
#include
#define LBUT 4
#define RBUT 5
#include
SoftwareSerial mySerial(9, 8);// bluetooth TX,RX
MPU6050 mpu;
int16_t ax, ay, az, gx, gy, gz;
int vx, vy, vx_prec, vy_prec;
int count=0;
int angleToDistance(int a) {
if (a < -80) {
return -40;
}
else if (a < -65) {
return -20;
}
else if (a < -50) {
return -10;
}
else if (a < -15) {
return -5;
}
else if (a 80) {
return 40;
}
else if (a > 65) {
return 20;
}
else if (a > 15) {
return 10;
}
else if (a > 5) {
return 1;
}
else {
return 0;
}
}
void setup() {
Serial.begin(9600); //Iniciamos comunicacion Serial
mySerial.begin(9600); //Iniciamos comunicacion serial con muSerial
pinMode(LBUT, INPUT);
digitalWrite(LBUT, HIGH);
pinMode(RBUT, INPUT);
digitalWrite(RBUT, HIGH);
Wire.begin();
Mouse.begin();
mpu.initialize();
if (!mpu.testConnection()) {
while (1);
}
}
void loop() {
mpu.getMotion6(&ax, &ay, &az, &gx, &gy, &gz);
int vx = map(ax, -16000, 16000, 90, -90);
int vy = map(ay, -16000, 16000, 90, -90);
Mouse.move(angleToDistance(vx), angleToDistance(vy));
if ( (vx_prec-5)<=vx && vx<=vx_prec+5 && (vy_prec-5)<=vy && vy<=vy_prec+5) { // checking the pointer doesn't move too much from its actual position: (in this case a 10 pixel square)
count++;
if(count == 100){ // the click will happen after 2 seconds the pointer has stopped in the 10px square: 20ms of delay 100 times it's 2000ms = 2s
if (!Mouse.isPressed(MOUSE_LEFT)) {
Mouse.press(MOUSE_LEFT);
count = 0;
}
}
else {
if (Mouse.isPressed(MOUSE_LEFT)) {
Mouse.release(MOUSE_LEFT);
}
}
}
else {
vx_prec = vx; // updating values to check the position of the pointer and allow the click
vy_prec = vy;
count = 0;
}
delay(20);
}
I hi, could you help me with this project? I am using the arduino leonardo and the mpu6050 and the hc 05 and I am not able to communicate bluetooth with PC. I don’t know how to put the data to the bluetooth reads and send it to the PC
#include
#include
#include
#include
#define LBUT 4
#define RBUT 5
#include
SoftwareSerial mySerial(9, 8);// bluetooth TX,RX
MPU6050 mpu;
int16_t ax, ay, az, gx, gy, gz;
int vx, vy, vx_prec, vy_prec;
int count=0;
int angleToDistance(int a) {
if (a < -80) {
return -40;
}
else if (a < -65) {
return -20;
}
else if (a < -50) {
return -10;
}
else if (a < -15) {
return -5;
}
else if (a 80) {
return 40;
}
else if (a > 65) {
return 20;
}
else if (a > 15) {
return 10;
}
else if (a > 5) {
return 1;
}
else {
return 0;
}
}
void setup() {
Serial.begin(9600); //Iniciamos comunicacion Serial
mySerial.begin(9600); //Iniciamos comunicacion serial con muSerial
pinMode(LBUT, INPUT);
digitalWrite(LBUT, HIGH);
pinMode(RBUT, INPUT);
digitalWrite(RBUT, HIGH);
Wire.begin();
Mouse.begin();
mpu.initialize();
if (!mpu.testConnection()) {
while (1);
}
}
void loop() {
mpu.getMotion6(&ax, &ay, &az, &gx, &gy, &gz);
int vx = map(ax, -16000, 16000, 90, -90);
int vy = map(ay, -16000, 16000, 90, -90);
Mouse.move(angleToDistance(vx), angleToDistance(vy));
if ( (vx_prec-5)<=vx && vx<=vx_prec+5 && (vy_prec-5)<=vy && vy<=vy_prec+5) { // checking the pointer doesn't move too much from its actual position: (in this case a 10 pixel square)
count++;
if(count == 100){ // the click will happen after 2 seconds the pointer has stopped in the 10px square: 20ms of delay 100 times it's 2000ms = 2s
if (!Mouse.isPressed(MOUSE_LEFT)) {
Mouse.press(MOUSE_LEFT);
count = 0;
}
}
else {
if (Mouse.isPressed(MOUSE_LEFT)) {
Mouse.release(MOUSE_LEFT);
}
}
}
else {
vx_prec = vx; // updating values to check the position of the pointer and allow the click
vy_prec = vy;
count = 0;
}
delay(20);
}
Here in this project, There is two-part one is a transmitter and another one is the receiver, THe Bluetooth HC 05 will pair with other Bluetooth HC 05 you pc need not connect to Bluetooth HC 05
another question how do i use the hc 05 to control the computer mouse using this code? where do i have to change? could you please help?
Here you need Two Bluetooth HC 05 and Pair them with each other. Now First part of code is for the transmitter for Arduino Nano/ micro and another part of code is for Arduino Leonardo acts as a receiver and control pc using its HID capability.
hi could i help?
I am using the arduino leornado, mpu6050 and hc 05. I would like to control the computer mouse via bluetooth using hc 05. I am using this programming but I cannot make it work. Could you tell me where I’m going wrong with this schedule? please.
#include
#include
#include
#include
#define LBUT 4
#define RBUT 5
MPU6050 mpu;
int16_t ax, ay, az, gx, gy, gz;
int vx, vy, vx_prec, vy_prec;
int count=0;
int angleToDistance(int a) {
if (a < -80) {
return -40;
}
else if (a < -65) {
return -20;
}
else if (a < -50) {
return -10;
}
else if (a < -15) {
return -5;
}
else if (a 80) {
return 40;
}
else if (a > 65) {
return 20;
}
else if (a > 15) {
return 10;
}
else if (a > 5) {
return 1;
}
else {
return 0;
}
}
void setup() {
pinMode(LBUT, INPUT);
digitalWrite(LBUT, HIGH);
pinMode(RBUT, INPUT);
digitalWrite(RBUT, HIGH);
Wire.begin();
mpu.initialize();
if (!mpu.testConnection()) {
while (1);
}
}
void loop() {
mpu.getMotion6(&ax, &ay, &az, &gx, &gy, &gz);
int vx = map(ax, -16000, 16000, 90, -90);
int vy = map(ay, -16000, 16000, 90, -90);
Mouse.move(angleToDistance(vx), angleToDistance(vy));
if ( (vx_prec-5)<=vx && vx<=vx_prec+5 && (vy_prec-5)<=vy && vy<=vy_prec+5) { // checking the pointer doesn't move too much from its actual position: (in this case a 10 pixel square)
count++;
if(count == 100){ // the click will happen after 2 seconds the pointer has stopped in the 10px square: 20ms of delay 100 times it's 2000ms = 2s
if (!Mouse.isPressed(MOUSE_LEFT)) {
Mouse.press(MOUSE_LEFT);
count = 0;
}
}
else {
if (Mouse.isPressed(MOUSE_LEFT)) {
Mouse.release(MOUSE_LEFT);
}
}
}
else {
vx_prec = vx; // updating values to check the position of the pointer and allow the click
vy_prec = vy;
count = 0;
}
delay(20);
}
Hi, This is a very interesting project. I would like to build a wireless mouse using analog joystick. can I replace the MPU6050 with an analog joystick to emulate mouse movement? Thanks.
yes, You can, Replace the MPU part of code with joystick code and map the value of the joystick for Arduino Leonardo Mouse movement.
In fig.7 and fig.8 , are they two diff bluetooth module ?
I see the required components but am I able to make same thing with only Arduino Nano, MPU 9091 and 1 Bluetooth HC-05 , is it enough for making this type of moue device ?
I’m currently working on this project and its half done but I’m having mouse movement and clicking problems. Can anyone send the code for solving that problem.
You need 2 Bluetooth HC 05 to make it work wireless.1 Arduino Pro micro/ or Lernardo
You need 2 Bluetooth HC 05 to make it work wireless.1 Arduino Pro micro/ or Leonardo
Hi,
I really like the project.
I need some clarification on this project (pardon my basic understanding)
1. Why use arduino for this? Is it just to make it wireless and bluetooth compatible?
2. I observed some lag in the mouse movement and gesture in the videos. Is it because of bluetooth or due to processing issue?
Please advise
looking forward to hear from you asap.
thanks
1. Two Arduino used for making it wireless, One Arduino transfer the hand movement data to other Arduino connected to pc and the other Arduino at pc do the HID job.
2. Yes, Need to calibrate the mouse movement speed in pc setting and in code delay.
I need your help, when I try to upload to my pro mini, it gives an error
Arduino: 1.8.12 (Windows 10), Board: “Arduino Pro or Pro Mini, ATmega328P (5V, 16 MHz)”
C:\Users\Home\Documents\Arduino\micro_3d_mouse\micro_3d_mouse.ino: In function ‘void setup()’:
micro_3d_mouse:16:3: error: ‘Mouse’ not found. Does your sketch include the line ‘#include ‘?
Mouse.begin();
^~~~~
micro_3d_mouse:17:3: error: ‘Keyboard’ not found. Does your sketch include the line ‘#include ‘?
Keyboard.begin();
^~~~~~~~
C:\Users\Home\Documents\Arduino\micro_3d_mouse\micro_3d_mouse.ino: In function ‘void loop()’:
micro_3d_mouse:49:1: error: ‘Mouse’ not found. Does your sketch include the line ‘#include ‘?
Mouse.move(x, y);
^~~~~
micro_3d_mouse:55:17: error: ‘MOUSE_RIGHT’ was not declared in this scope
Mouse.press(MOUSE_RIGHT);
^~~~~~~~~~~
C:\Users\Home\Documents\Arduino\micro_3d_mouse\micro_3d_mouse.ino:55:17: note: suggested alternative: ‘MOUSE_h’
Mouse.press(MOUSE_RIGHT);
^~~~~~~~~~~
MOUSE_h
micro_3d_mouse:65:19: error: ‘MOUSE_LEFT’ was not declared in this scope
Mouse.press(MOUSE_LEFT);
^~~~~~~~~~
C:\Users\Home\Documents\Arduino\micro_3d_mouse\micro_3d_mouse.ino:65:19: note: suggested alternative: ‘MOUSE_h’
Mouse.press(MOUSE_LEFT);
^~~~~~~~~~
MOUSE_h
micro_3d_mouse:73:5: error: ‘Keyboard’ not found. Does your sketch include the line ‘#include ‘?
Keyboard.press(KEY_LEFT_CTRL);
^~~~~~~~
micro_3d_mouse:73:20: error: ‘KEY_LEFT_CTRL’ was not declared in this scope
Keyboard.press(KEY_LEFT_CTRL);
^~~~~~~~~~~~~
micro_3d_mouse:81:6: error: ‘Keyboard’ not found. Does your sketch include the line ‘#include ‘?
Keyboard.press(KEY_LEFT_CTRL);
^~~~~~~~
micro_3d_mouse:81:21: error: ‘KEY_LEFT_CTRL’ was not declared in this scope
Keyboard.press(KEY_LEFT_CTRL);
^~~~~~~~~~~~~
micro_3d_mouse:88:16: error: ‘MOUSE_LEFT’ was not declared in this scope
Mouse.release(MOUSE_LEFT);
^~~~~~~~~~
C:\Users\Home\Documents\Arduino\micro_3d_mouse\micro_3d_mouse.ino:88:16: note: suggested alternative: ‘MOUSE_h’
Mouse.release(MOUSE_LEFT);
^~~~~~~~~~
MOUSE_h
micro_3d_mouse:89:17: error: ‘MOUSE_RIGHT’ was not declared in this scope
Mouse.release(MOUSE_RIGHT);
^~~~~~~~~~~
C:\Users\Home\Documents\Arduino\micro_3d_mouse\micro_3d_mouse.ino:89:17: note: suggested alternative: ‘MOUSE_h’
Mouse.release(MOUSE_RIGHT);
^~~~~~~~~~~
MOUSE_h
exit status 1
‘Mouse’ not found. Does your sketch include the line ‘#include ‘?
This report would have more information with
“Show verbose output during compilation”
option enabled in File -> Preferences.
Use Arduino Leonardo or Arduino Pro Micro for Hid that needs to connect with PC using USB. Also on Board select the Arduino Leonardo because Arduino Leonardo and Pro micro have the same bootloader and ATML chip. When you select the Arduino Leonardo and upload the code compiled successfully and get uploaded in Arduino Pro Micro.
Next, use Arduino Pro Mini or Arduino Mini or Arduino nano anyone for transmitting the hand gesture data with second code that is made for the transmitter
I’m getting the error while trying to upload the said pro mini code to the mini(5V, 16Mhz).
K, Sorry, was using code from wrong article.
Hello there, great project!
I am trying to make a wireless mouse Bluetooth control with only one Arduino board and MPU6050. I would like to connect and receive date through the built in Bluetooth of the PC.
Would really appreciate if you can guide me hoe to code.
Thanks a lot.
The Bluetooth HC 05 works on USART and Bluetooth serial bridge so it’s hard to use Bluetooth HC 05 directly use as Bluetooth HID input for PC Bluetooth . You need either to change Bluetooth HC 05 with another that is capable of connecting PClike HID input or you need a python code on PC that receives the serial data feom dvice then use that data to controlthe mouse poiter using input , autopy,Mouse or other python modules
Love your project but have a couple of question.
I have set up the Arduino’s exactly as per your diagrams.
I have made the HC-05 Master / Slave at 38400 which is their default speed.
When I run the code , nothing happens.
My question is : Why is there no softwareSerial.h loaded in the Master of sending unit? In other projects I’ve had to install in both the sending and receiving arduinos. Do I need it?
I’m a bit new to arduino so any help would be appreciated. I’m trying to use your project on a flight Sim.
Thanks for your help,
Leo
Default baud rate of HC 05 is 9600 use this baudrate .
Great Project. Any way to speed up response. I have upped the baud rate to 38400 , will check if this helps. any other tips?
Is this work on table tennis racket for vr gaming?