




An open-source replica recreates the Apollo astronauts’ keypad and display using a Raspberry Pi, microcontrollers and 3D-printed parts, running original Apollo flight software through an emulator.
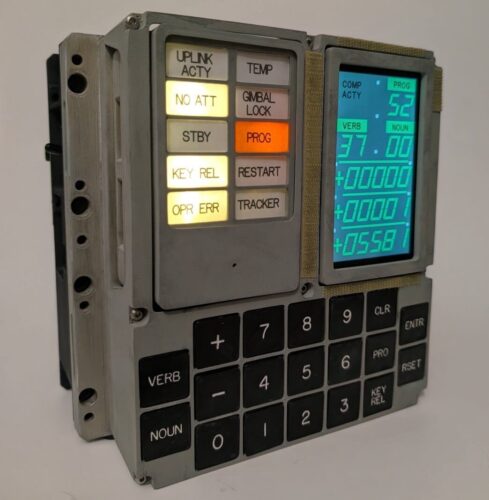
The Recreate Apollo project recreates the display and keyboard (DSKY) interface used by astronauts to interact with the Apollo Guidance Computer (AGC). Built by Michael Newton, a commercial aircraft avionics engineer based in Calgary, Canada, the project combines 3D-printed components, microcontrollers and a Raspberry Pi to reproduce the interface at full scale. It runs Apollo flight software through the Virtual AGC emulation project, allowing users to explore how astronauts entered commands during lunar missions.
The original DSKY allowed astronauts to communicate with the guidance computer using numerical codes called verbs and nouns. Verbs specified an operation, while nouns identified the data or system involved. The replica recreates the keypad, display and warning-light panel using modern components, with mechanical drawings informed by archived NASA and MIT engineering documentation.
The Raspberry Pi handles the software side of the project, communicating with microcontrollers over USB. These controllers interface with the physical keypad, display and warning lights, while a Python script connects the hardware to the emulator. According to the project documentation, the build includes 3D-printable files, electronics designs, software and a detailed build guide.
The hardware includes a Raspberry Pi, microcontroller boards, a display, mechanical key switches, LEDs and a 3D-printed enclosure. The exact Raspberry Pi model and display used in the Recreate Apollo build should be confirmed against its documentation before selecting components. The related MKme AGC DSKY Replica provides another implementation reference, but its component choices and wiring should not automatically be assumed to match Newton’s design.
Builders can print the enclosure, keypad frame and keycaps using the supplied STL files, then assemble the switches, display and warning lights. The microcontrollers must be programmed with the project’s firmware before connecting them to the Raspberry Pi.
On the software side, the system uses the Virtual AGC project, which includes the yaAGC emulator. Builders can obtain the source code from GitHub and follow the repository instructions to compile and configure the software. The DSKY interface script then connects the emulator to the physical controls and display. The process requires familiarity with Linux, command-line tools, microcontroller programming and basic electronics assembly.
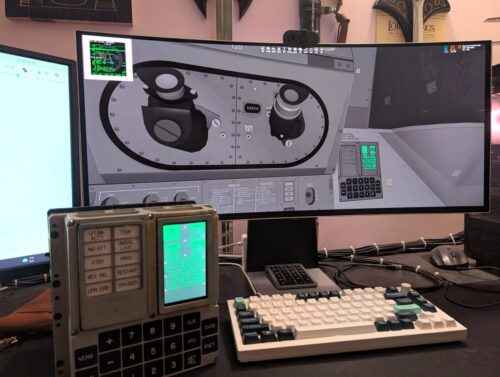
The project also supports a peripheral mode for use with Project Apollo – NASSP, an Apollo simulation add-on for the Orbiter spaceflight simulator. This allows the physical interface to be used to enter commands during simulated missions.
The Recreate Apollo DSKY repository provides the project’s design and software files under the GPL-3.0 licence. The related MKme AGC_DSKY_Replica repository is also GPL-3.0 licensed, while Virtual AGC provides the emulation software. These resources allow developers and electronics enthusiasts to examine the implementation, modify the design and build their own versions.
The project is more involved than a simple Raspberry Pi installation. It requires 3D printing, wiring, soldering and software configuration, and the finished replica uses modern components rather than reproducing every detail of the original interface. Builders should consult the primary build guide for the exact parts list, board assignments, firmware instructions and assembly sequence.
For students and makers in India, the project offers a practical way to explore embedded systems, computer emulation and spacecraft interfaces. Engineering clubs and educational laboratories with access to 3D printers and microcontroller development boards could adapt the design for demonstrations of how astronauts interacted with early onboard computers, using Raspberry Pi space technology projects.
For more information, click here.