 Municipal corporations in many cities supply water during early morning hours. So, you have to wake up early, just to switch on your motor pump and wait till your water tank is filled up. Further, there is no control for overflow of the tank. Many times you come to know of your overflowing tank only when your neighbor informs you. This water pump motor controller can come in handy in these cases.
Here is a low-cost and simple automatic water pump motor controller circuit (Fig. 1) to avoid the aforesaid problem. You just have to set your quartz alarm clock (connected to this system) at the appropriate time of water supply. Keep the clock nearby your sleeping bed and switch on the circuit before going to sleep. In the morning, as the alarm rings, you can switch off the alarm and, if you like, go to sleep again. The controller system will automatically switch on the pump motor immediately at the predetermined time. When the overhead tank is full, the pump motor will get switched off automatically, preventing overflow of the tank. The controller system works with a water-level sensor assembly. The sensor assembly has to be fixed up properly inside your overhead water tank.
Water pump motor controller circuit assembly

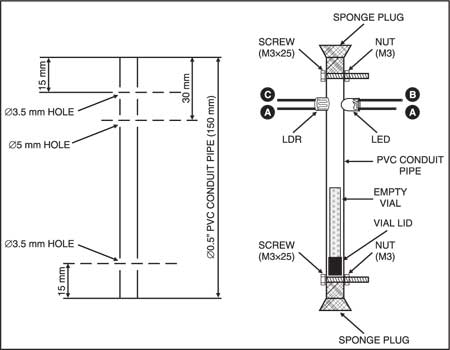
You can assemble a simple water-level sensor (Fig. 2) at home. Take an empty cylindrical plastic vial having outer diameter smaller than 1.3 cm (0.5 inch), which is commonly used for dispensing medicines. Make it opaque by pasting a piece of black paper or PVC tape on its inner side. Fix up the vial’s lid firmly with a suitable material to make it airtight.
Now take a 15.2cm (6-inch) piece of opaque PVC conduit pipe having inner diameter of 1.3 cm (0.5 inch). Ensure that the vial can freely slide along the axis inside the conduit pipe; else use a PVC pipe having larger inner diameter. Drill two through-holes (of diameter 3.5 mm) along the diameter of the PVC pipe, at least 15 mm away from each end. Also drill two 5mm dia. through-holes along the diameter of the PVC pipe, 25-30 mm away from one end.
Insert the airtight plastic vial inside the PVC pipe and fix up two screws (M3x25mm) through 3.5mm dia. holes with suitable M3 nuts near the ends. These screws will restrict sliding of the vial within the PVC pipe.
Then fix up a 5mm red LED perpendicular to 5mm dia. hole, on the outer surface of PVC pipe, using suitable adhesive like M-seal. Also, opposite to this, fix up a light-dependent resistor (LDR) in similar way as shown in Fig. 1.
Points to consider
Ensure that both the LDR and the LED are firmly placed outside the PVC pipe and they don’t interrupt movement of the vial inside the PVC pipe.
Also ensure that the maximum light produced by the LED falls on the surface of the LDR through 5mm dia holes along the diameter of the PVC pipe. Then plug the open ends of PVC pipe with dark-coloured (preferably black) sponge pieces, to avoid ambient light entering inside the pipe.

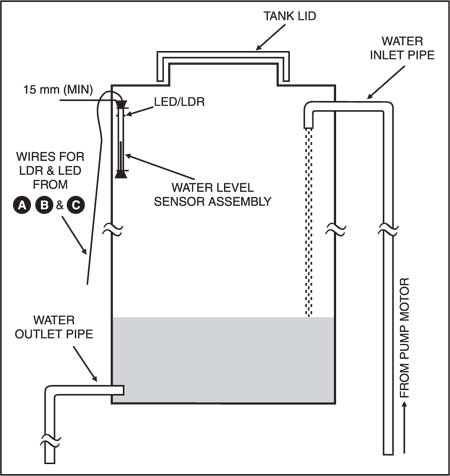
Solder the leads of LDR and LED with connecting wires of required length, according to the location of your overhead water tank. Then fix up this water-level sensor assembly vertically at a suitable height along the inner wall of the overhead water tank, as shown in Fig. 3.
Remove 1.5V (AA size) battery from the quartz alarm clock. Carefully open the back lid of the clock using a small screwdriver. Solder a braided pick-up wire parallel to the connected points of your alarm buzzer (clock). Make a small hole on the back lid of the clock and pull out free ends of the pick-up wire through this hole.
Then, carefully fix up the back lid in proper position, without disturbing any mechanical part of the clock. Solder the free ends of pick-up wire on the PCB at input terminals. This pick-up wire will provide trigger pulses from the alarm clock to water pump motor controller system. Then set the time and place the battery in alarm clock.
Circuit operation
As the alarm rings, trigger pulses appear at the input of the water pump motor controller circuit shown in Fig. 1. A low-pass filter is connected at the input to avoid false triggering of the circuit due to excessive EMI produced by the pump motor and the relay contacts. Timer LM555 (IC1) is configured as a monostable multivibrator. The voltage at its output (at pin 3) goes high immediately after receiving trigger pulses (at pin 2), and it remains in this state for about five seconds, as set by the values of R3 (47k) and C3 (100µ, 25V). Diode D1 gets forward biased and sufficient base current flows through R4 and R5 to drive transistor T3 into saturation. A free wheeling diode (D2) is used to protect transistor T3 from the reverse current caused by self-induction of the relay coil (RL1).
Transistor T3 immediately switches on the relay. This, in turn, switches on the pump motor by the relay and at the same time the LED is turned on. The water is pumped by the motor and starts filling up the overhead water tank from the underground reservoir.
The light produced by LED continuously falls upon the LDR. This causes a decrease in the resistance value of the LDR and the base of transistor T2 (BC547) gets a high voltage (about 10V DC), which results in conduction of transistor T2. Since transistor T2 is biased as an emitter follower, the emitter voltage also becomes high. Due to this voltage feed, transistor T3 (SL100) remains in saturation.

Motor controller in action
Thus, once the circuit is triggered from the output of IC1, it will stay continuously on even when the input is withdrawn. As such, the pump motor will continuously remain on through the relay contact. (Note. Reflection of light from any moving/still object near the LDR affects the proper functioning (latching) of the circuit. The value of VR1 (20k) has to be chosen for proper functioning of the circuit and according to the amount of light received in your circuit from the surroundings.)
As the water level in the overhead tank rises, the empty vial floating along the water level inside the PVC pipe also goes up. When the water level reaches the desired level, the floating vial interrupts the path of light falling on the surface of LDR. Thus, the resistance of LDR increases sharply, resulting in voltage reduction at the base of transistor T2. Hence voltage at the emitter of T2 also goes low, which reduces the base current of transistor T3. This pulls T3 into cut-off region and both the LED and the relay are switched off. Ultimately, the AC supply via the relay to the pump motor is also cut off and the motor stops.
The circuit (excluding pump motor, alarm clock, and sensor assembly) costs around Rs 80.
Related Projects
- Automatic Water Pump Controller
- Motion Activated Tap Water Flow Circuit
- Automatic Water level controller


My relay is getting stuck at on position even when the supply (12v) is off.
Sir,
I am badly in need of this , can you provide me one , I am ready to pay the price, you may kindly let me know the same.
Mukund Kini
9820474475
Mumbai
I need this automatic water pump control
I have made a new circuit , auto on off, when the tank is empty the motor will start once it is full, will turn off itself without overflowing. i need an investor, i want my project to release in the market. All kind of pumps. my email [email protected]
give me the detail about the automatic water pump motor controller.
is there any programming language is used for these??
specification and requirement of controller
I want when pipe line supply comes motor on & when water gone then motor off. Can this system work
Ing this process
Hi Satish I am also looking out for same solution?
Hi, my floor has no water tank storage but we have to wake up early morning to fill individual water tanks in each house. Is there any way to control water supply on/off switch. Any individual has to wake up early to switch on/off the motor which supplies water to all.
You may add another circuit to this circuit such as the one given here: https://www.electronicsforu.com/electronics-projects/water-pump-dry-run-guard
This will ensure that when water is available from municipal corporation, your circuit will get started automatically.