


 This article describes how to decode a remote controller and use it for home automation, along with Arduino. An infrared (IR) remote controller used in TVs, music players and the like uses IR rays for sending information or data signals to the device. That is, the remote controller sends information in the form of IR pulses to the TV, for example, whenever a button is pressed on it.
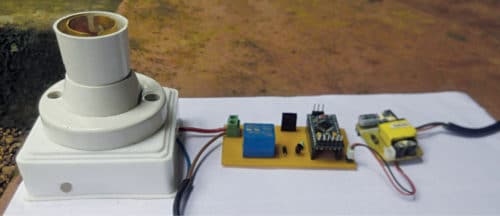
Each button is encoded with a unique code. So, by decoding and understanding the code associated with each button, any remote controller can be used for controlling other devices or home appliances. The author’s prototype is shown in Fig. 1.
Circuit and working
The project has three parts: decoding IR remote controller, programming, and making home automation circuit.

For decoding, use any TV/DVD IR remote controller. The circuit diagram for the decoding circuit is shown in Fig. 2. It is built around Arduino Uno board (Board1) along with IR sensor TSOP 1738 wired on a breadboard. Pinout of TSOP 1738 is shown in Fig. 3.

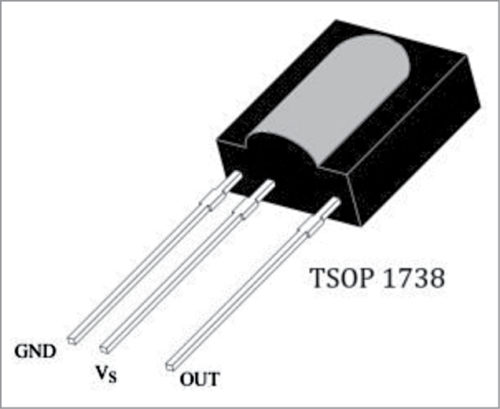
VCC, GND and OUT pins of TSOP 1738 are connected to 5V, GND and pin No. 11 of Arduino, respectively. After completing the connections, open Arduino IDE and upload the decoding code (Decode_IR.ino) to the Arduino Uno board. The code consists of a dedicated library for IR operations. Unzip IR+library+for+Arduino.zip folder and place it under Arduino/Libraries folder in Windows computer.
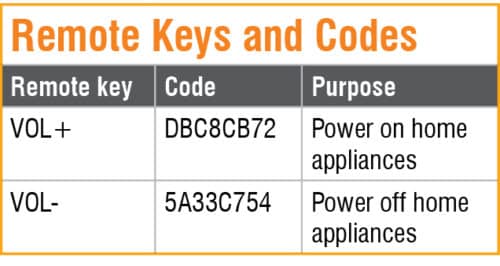
Point IR remote towards TSOP 1738 and press a button on the remote. Open the serial monitor to see the code of each button. The corresponding code will be displayed on the serial monitor whenever a button is pressed. Note down the code and corresponding button name for further use in home automation. Here, we used two keys for switching on and off the appliance, as shown in the table.
Programming circuit
Arduino Pro Mini board is used for home automation. Upload home_auto.ino code to Arduino Pro Mini using Arduino Uno. The programming circuit is shown in Fig. 4.
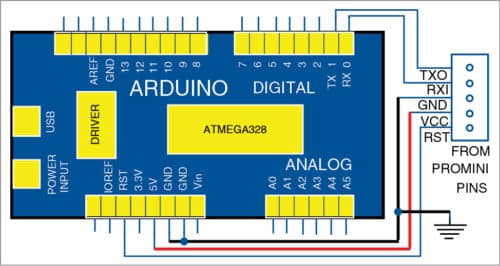
To program, remove ATmega328 microcontroller (MCU) from Arduino Uno. After setting up the connections as shown in Fig. 4, open Arduino IDE, choose Tools->Boards->Arduino Pro Mini and upload home_auto.ino code to Pro Mini board.
In home_auto.ino code, pin 13 of Arduino is declared as output. Codes DBC8CB72 and 5A33C754 are included in this source code. The two keys, Vol+ and Vol-, of the remote controller are used for turning on and turning off output pin 13 of Arduino, respectively. That is, if the code received is DBC8CB72, pin 13 will turn on; if the code received is 5A33C754, pin 13 will turn off.

Home automation circuit
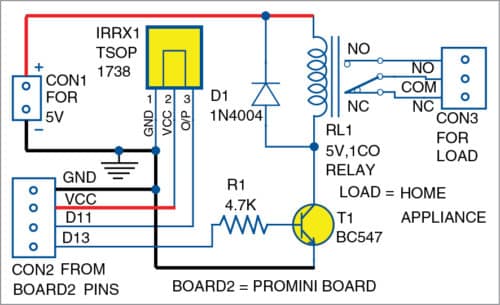
The circuit diagram for home automation is shown in Fig. 5. It is built around Arduino Pro Mini (Board2), IR sensor TSOP1738, NPN transistor BC547 (T1), 5V, single-changeover relay (RL1) and a few other components.
Download source folder: click here
After uploading home_auto.ino code to Arduino Pro Mini, connect it to 5V DC power source at connector CON1.
Connect output of TSOP1738 to pin 11 of Pro Mini (Board2). Pin 13 is used as the output pin to turn on and turn off the appliance by pressing Vol+ and Vol- buttons of the remote controller, respectively. So, connect pin 13 to the base of transistor BC547, which energises 5V relay (RL1).
Employ 1N4004 diode to protect the transistor from back emf flow from the relay coil. A three-pin connector (CON3) may be used across relay contacts for connecting AC/DC loads or such appliances as lights and fans.
Working of the circuit is simple. After powering on the circuit, press Vol+ button on the remote controller to switch on the home appliance. Press Vol- button on the remote to switch off the home appliance connected to CON3.
Shamsudheen Marakkar is pursuing M.Tech in robotics and intelligent systems
can we use 10 channel relay with this?
The project is designed for single relay. Using 10-channel relay will be different