 You might have come across several types of adjustable dancing lights (flickering LEDs). Most of them use presets (variable resistors) to adjust the rate of switching. Being a mechanical component, the preset easily wear out with use and also introduces noise in the circuit. The adjustable dancing lights circuit presented here selects different values of resistors to control the frequency of an astable multivibrator using timer IC 555.
Adjustable Dancing Lights Circuit
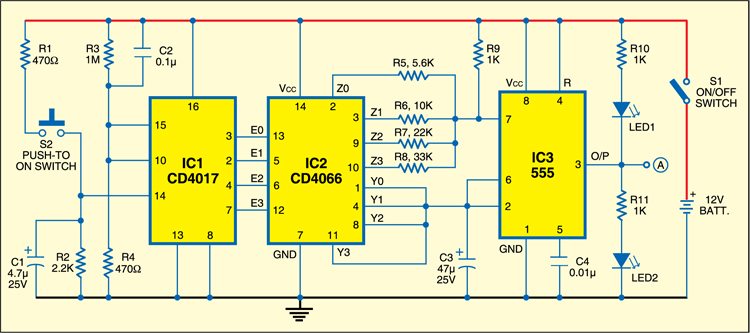
The circuit is built around decade counter IC 4017, a quad bilateral switch IC 4066 (to select the desired resistance) and timer 555. The decade counter output selects one of the resistors at the output of IC 4066. The selected resistor changes the time period of the 555 timer circuit, whose ‘on’ and ‘off’ timings are given by:
- ton = 0.693(R9+Rx)C3
- toff = 0.693RxC3

In the present design, R9 = 1 kilo-ohm, C3 = 47 µF and Rx varies according to the output of IC1 (CD4017), which changes by pressing the switch S2 one by one.
When
 Rx=R5=5.6 kilo-ohms, ton=0.214969 second, toff=0.182398 second
 Rx=R6=10 kilo-ohms, ton=0.358281 second, toff=0.325710 second
 Rx=R7=22 kilo-ohms, ton=0.749133 second, toff =0.716562 second
 Rx=R8=33 kilo-ohms, ton=1.107414 second, toff=1.074843 second

Whenever you momentarily press switch S2, the output of the decade counter advances to select a higher value of resistor Rx in IC 4066, which changes the switching time of the astable multivibrator. LED1 and LED2 indicate switching ‘off’ and ‘on,’ respectively, of the multivibrator.
Construction & testing
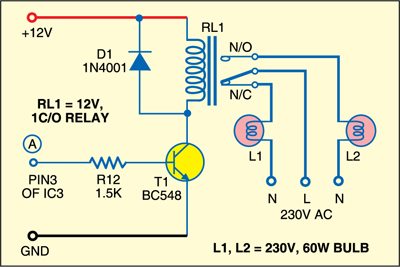
Assemble the circuit on a general-purpose PCB and enclose in a suitable case. Fix LEDs and switches on the front panel. Connect the optional circuit (above) if a higher intensity of light is needed.
The project was first published in April 2009 and has recently been updated.


