


 The previously designed Smart Google Glass is configured with a transparent OLED display that provides various information in front of the eye as an overlay.
Now, enhancing this Smart Google Glass with a built-in phone will enable us to talk and read messages and notifications while driving and doing any work, hence does not require the phone in hand.
So let us design our own smart glasses using Raspberry Pi and other components.

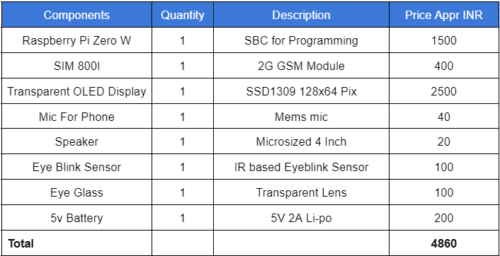
Bill of Materials
DIY Smart Google Glasses Setup
Initially, prepare Raspberry Pi and SD card with OD.
As done previously, install the python modules and enable interfacing of the transparent OLED display with Raspberry pi.

As informed this is the second version of the project ‘DIY Smart Glasses’, hence we are configuring a built-in phone system for which we need to do a basic setup and install the module according to our first design of eyeglasses.
You can check the step-by-step guide to set up smart glasses or simply watch the below video to understand the whole process.
Open the lines terminal and install the gsm module library using the following command-
sudo pip3 install gsmHat
Then open the raspberry pi configuration and enable the hardware serial.
Programming Smart Glasses
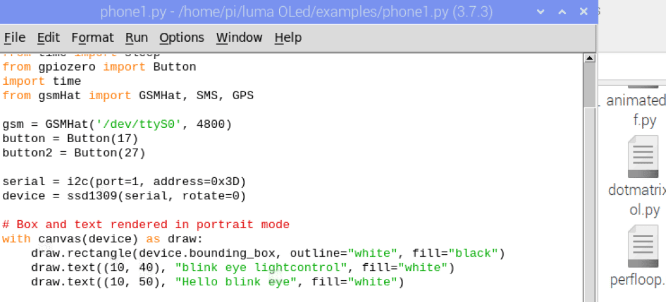
First, import the library OLED similar to the previous version of google design, further also import and add the gsm hat python module if you are willing to use the GPS and have a GPS module in your GSM hat.
You can also add the GPS but in this version of Google Glass, we are only using the GSM module while in the code we have imported both the gsm GPS and SMS python module from the gsm hat library.
Further, set the serial port name and then the baud rate of the SIM800l module; the default baud rate is 4800 hence set the same in the code.
Create a few buttons to receive input from the eye blink sensor for interfacing the google glass and attend and decline the calls with eye blinks.
Now we add another button to get the input from the ring pin of the sim800l module so that when someone calls us, we can check it.
It also displays the same on a transparent OLED display to notify us.
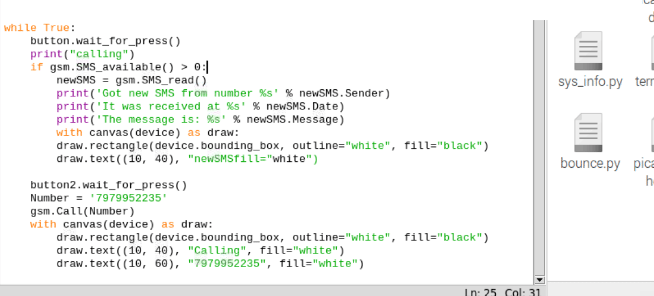
In the next part of the code, we create a loop function; we create a while loop and then we keep checking incoming calls and messages from SIM800l.
Further, we set the function to set the eyeblink sensor to do the function to attend calls or reject the calls and make the calls.
Then we create a UI page for an OLED display and display the same on an OLED display and make the code according to UI to display on transparent OLED.
DIY Smart Glasses Circuit
Now we connect the eye blink sensor output to Raspberry Pi pin 17, then connect all the components as in the circuit diagram.
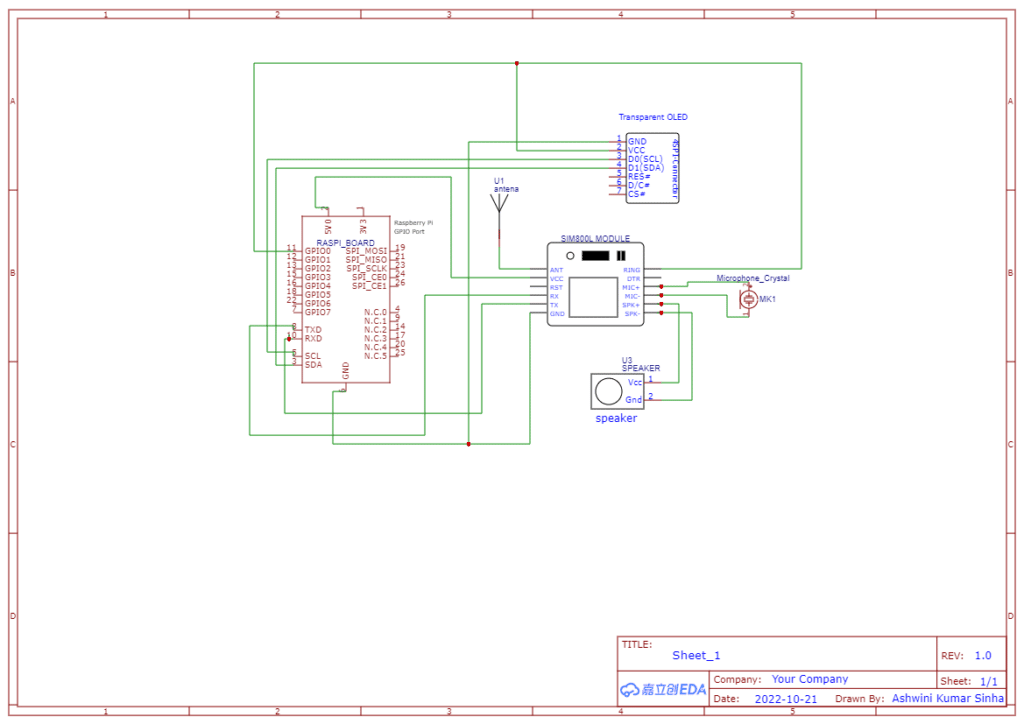
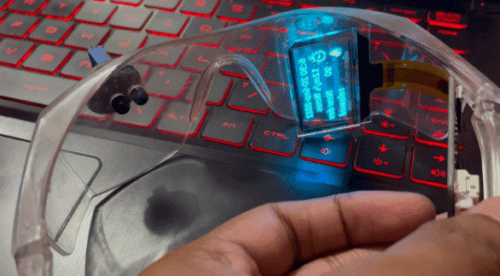
Now we fit all the components on one eyeglass as in the picture below
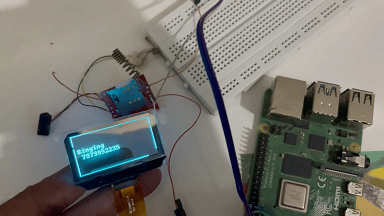
Now power the smart Glass with 5V, run the code, insert the 2G SIM card into the GSM module and wait for a few minutes to get it connected to the network.
Keep one eye on the eye blink sensor to make a call and send a message to your phone.
After receiving the message, it will be displayed on the transparent OLED display. Then make a call to a SIM that is inserted into the GSM module.
When it receives a call, it shows the ring message. Now you can attend or reject that call using an eye blink.
Note:-This is the second version of google glass. We will do more development and research and design on it and come soon with more exciting features.
Till then….check out our other interesting DIY Electronics Projects.
And if you face any issues or have any questions, please feel to ask in the comments below.

Sir ,
I am A Student
I have a Query, : Sir We can’t Download the Source Code Because the Zip File is Empty
Thanks for your feedback, we have updated the article with the source code.