 Presented here is an Arduino based audio meter that uses a liquid crystal display (LCD). A VU meter or standard volume indicator (SVI) is a device that displays a representation of signal level in audio equipment. In this project, the intensity of left-channel and right-channel audio signals provided as input to Arduino UNO board is displayed as bars on the 16×2 LCD. In this circuit, analogue input pins of Arduino UNO board are used for measurement of audio-signal levels.
Audio-signal inputs are provided at analogue input pins A2 and A4 of Arduino UNO board. These can be in the form of voice coming from a microphone through an amplifier or as direct output from a music player.
Arduino based audio meter circuit

Audio signals at pins A2 and A4 are processed by ATmega328 microcontroller (MCU) on Arduino UNO board and, after comparing the signals, calculations are done.
Finally, corresponding values are provided by ATmega328 to a 16×2 LCD for displaying audio intensity bars.
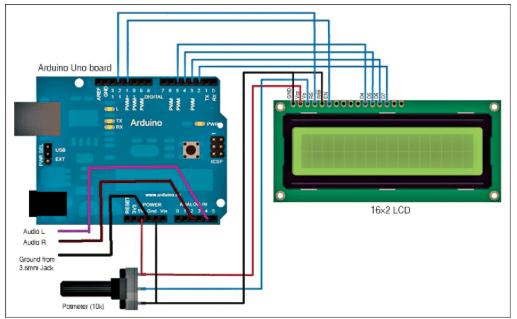
The Arduino based audio meter, as shown in Fig. 1, is built around Arduino UNO board, 16×2 LCD and 10-kilo-ohm potentiometer (or potmeter).
Arduino UNO board
Arduino UNO is an open source electronics prototyping platform based on flexible, easy-to-use hardware and software. Arduino UNO board is based on ATmega328 MCU. It has 14 digital input/output (I/O) pins of which six can be used as pulse width modulated (PWM) outputs, six analogue inputs, 16MHz ceramic resonator, USB connection, power jack, reset button and an ICSP header. It contains everything needed to support the MCU; simply connect it to a computer using a USB cable, or power it with an AC-to-DC adaptor or a battery to get started.
Pins 11 and 12 of Arduino UNO board are connected to pins EN and RS of the LCD, while pins 2 through 5 are connected to data pins D7, D6, D5 and D4 of the 16×2 LCD.
LCD 16×2
LCD JHD162A is a display module with a 4-bit interface, which is used here to display the bars corresponding to the applied input signal level. Only four data pins of the LCD module are being used in this circuit. A potmeter of 10-kilo-ohm is used to control the contrast of the LCD screen display.

Analogue audio signals (left-channel and right-channel) are provided at analogue input pins A4 and A2 of Arduino UNO board. The signals are processed by ATmega328 MCU on Arduino UNO board and, after performing some comparisons, data is sent to the LCD screen to display the corresponding signal level bars.
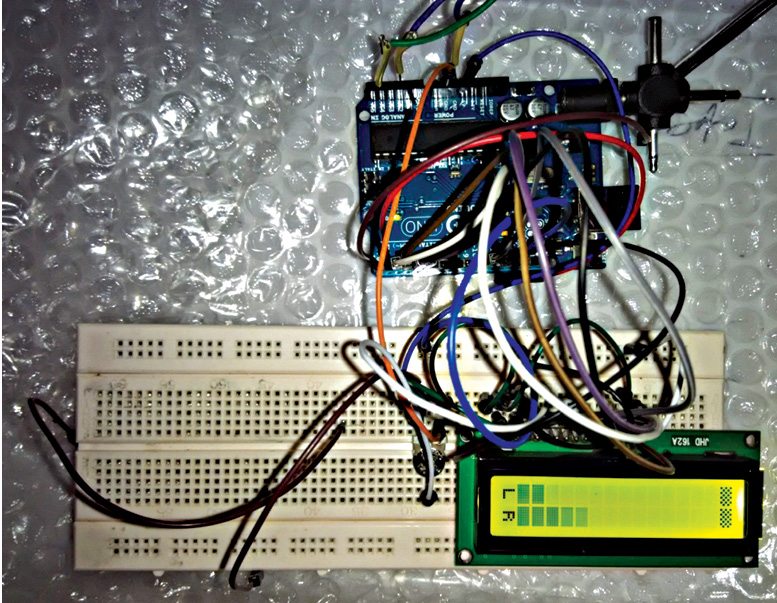
Height of the bars will change as per voltage of the audio-input signal at pins A2 and A4 of Arduino UNO board as shown in Fig. 2. L is displayed on the LCD for left channel and, similarly, R is displayed for right channel. Connections of pins A2 and A4 of Arduino UNO board must be done carefully so that proper channel audio input is provided to the circuit.
To display bars on the LCD screen, custom characters are created for the 16×2 LCD, which is explained in the programming section. The potmeter is used for controlling the contrast of the display and, so, can be varied as per requirement.
Software program
The program for this circuit performs the following functions:
1. Initialising the circuit and LCD
2. Displaying the welcome message on the LCD
3. Generating custom characters
4. Performing various comparisons with input signal voltage at analogue input pins
5. Displaying bars and changing their respective heights on the LCD according to the input signals
The program uses special characters for bar-height display on both rows of the LCD using arrays p3, p4, p5, p6 and p7, and arrays L[8] and R[8] for displaying letters L and R on the 16×2 LCD’s starting columns of both rows, respectively.
Similarly, array K[8] is used for displaying special characters at the end of both rows, and LEEG[8] is used to display special characters for bar shapes.
LiquidCrystal lcd(12, 11, 5, 4, 3, 2) function is used for LCD configuration.
Download source code: click here
void setup()function is used to configure the pins of ATmega328 MCU on Arduino UNO board.
Serial.begin(9600) function is used to configure for serial communication with Arduino board at a baud rate of 9600.
lcd.begin(16, 2) function is used to indicate the size of the LCD.
lcd.createChar(1, p3) function is used to define custom characters for further calling in the program by number only.
lcd.print(“VU METER”) function is used to display the VU meter as a welcome message.
void loop() function is used to perform the task for infinite time.
analogRead(inputPin) function is used for reading the analogue-input value.
Simple calculations are performed to get the values for displaying the bar heights as per audio-input signals.
Construction and testing
A USB A-B cable is used to upload the compiled sketch (software) from the PC to the MCU through Arduino IDE.The operation is as follows:
1. Power on Arduino UNO board using a USB A-B cable. As soon as you power on the LCD, it displays VU meter on the first row and bars on the second row of the LCD.
2. 10k potmeter VR1 can be used to adjust the contrast of the LCD.
3. If we connect the input from a music player to analogue input pins A2 and A4 of Arduino board through two wires, we can easily see the changes in the bars and letters L and R on both rows of the LCD, simultaneously, as shown in Fig. 2.
The article was originally published on January 27, 2016. It has been updated recently.
Feel interested? Check out other arduino projects.


Can I get high resolution image of Figure 1 circuit? Without it, this project is useless.