 A global positioning system (GPS) module is a device used to determine its location on earth in terms of latitude and longitude. Since Raspberry Pi is a complete computer in itself with a stable operating system therefore connecting a GPS device to it is just like connecting it to any other computer. But getting it to work, then pulling out your chosen GPS-related data in python and performing some predefined tasks with the GPS data is something very different and interesting.
Circuit and working
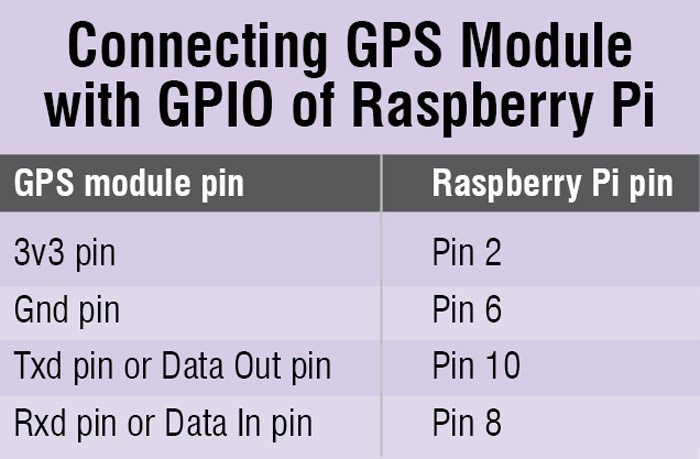
There are a variety of GPS modules available in the market but the one with a built-in patch antenna on top (POT) gives the advantage of data reception even indoors. For GPS module to work outdoors, you may have to find a clear sky to receive data. The module can either be connected with the USB cable or with just four wires connected directly to the GPIO of Raspberry Pi as shown in the table.
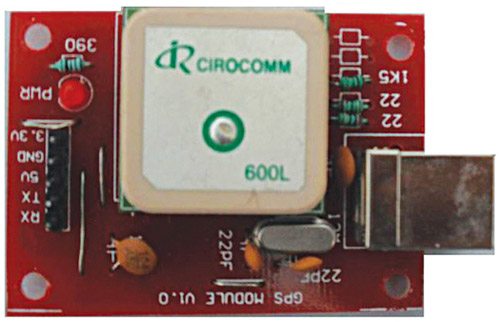

For simplicity, here we are using the USB cable (refer Fig. 1). After inserting the USB cable look in the /dev/ttyUSB* directory to see which device gets recognised. Most of the times, it becomes /dev/ttyUSB0 but in case we connect it with the GPIO pins, it becomes /dev/ttyAMA0.
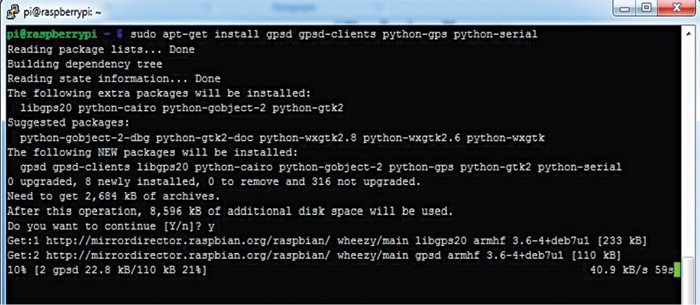
Update and install the GPS libraries using below-given commands, also shown in Fig. 2.
[stextbox id=”grey”]$ apt-get update
$ apt-get install
gpsd gpsd-clients
python-gps
python-serial[/stextbox]
Now load the gps device with the command below, also shown in Fig. 3.
gpsd /dev/ttyUSB0
-F /var/run/gpsd.sock
Write below command and all the GPS data will start pouring in as shown in Fig. 4. If data does not appear, take the GPS module near the window and try again.
$ cat /dev/ttyUSB0
Or you can also use the command below for the same.
$ cgps -s
The ‘gpsd’ also has a beautiful graphics data output with all the satellite connections as shown in Fig. 5.
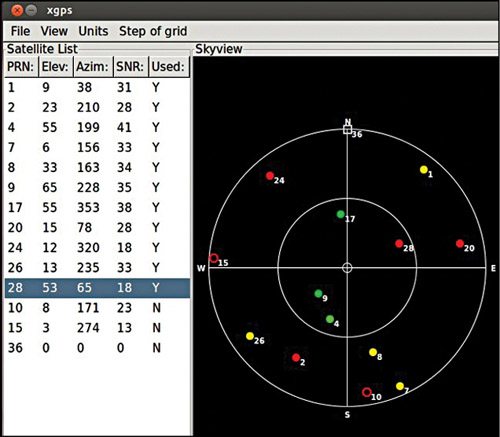
Write below-mentioned command for the graphic data output:
$ xgps
Screenshot of GPS data is shown in Fig. 6.
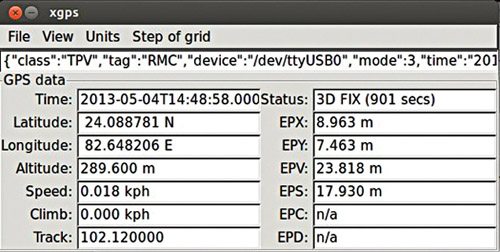
Square icon in Fig. 5 indicates the WAAS/EGNOS satellite, circles indicate ordinary GPS satellites. Filled icons were used in the last fix of locations.
GPS data takes some time to get synchronised. Therefore wait for some time and if nothing appears, try the steps below:
$ sudo killall gpsd
$sudo gpsd /dev/ttyUSB0 -F /var/run/
gpsd.sock
$ cat /dev/ttyUSB0
The ‘gpsd’ even has a built-in self telnet daemon at port 2947 with JSON. To use it, first install it in Raspberry Pi using:
$ sudo apt-get install telnet
Now telnet to local host at port 2947 using below-mentioned command:
$ telnet localhost 2947
Trying ::1…
Trying 127.0.0.1…
Connected to localhost.
Escape character is ‘^]’.
{“class”:”VERSION”,”release”:”2.96~
dev”,”rev”:”2011-03-
15T03:05:33″,”proto_major”:3,”proto_
minor”:4}
Now to see data from the receiver, enter the command:
?WATCH={“enable”:true,”json”:true}
The data appears like this:
{“class”:”TPV”,”tag”:”RMC”,”device”:”/dev/ttyUSB0″,”mode”:3,”time”:”2013-05-07T17: 10:16.000Z”,”ept”:0.005,”lat”:24.088710000,”lon”:82.648190000,”alt”:302.200,”epx”:2.054,”epy”:3.105,”epv”:7.705,”track”:344.0400,”speed”:0.010,”climb”:-0.100,”eps”:6.21}
{“class”:”TPV”,”tag”:”RMC”,”device”:”/dev/ttyUSB0″,”mode”:3,”time”:”2013-05-07T17: 10:17.000Z”,”ept”:0.005,”lat”:24.088710000,”lon”:82.648186667,”alt”:302.300,”epx”:2.054,”epy”:3.105,”epv”:7.705,”track”:344.0400,”speed”:0.005,”climb”:0.100,”eps”:6.21}
Now here is a Python script which exploits every GPS data in your own way. The script has some issue related to the absolute path. Therefore open it in /usr/sbin directory of your Raspberry Pi where the ‘gpsd’ program file is located.
Create the file:
$ sudo nano gpsdata.py
Paste the code below in that file:
import os
from gps import *
from time import *
import time
import threading
gpsd = None #seting the global
variable
os.system(‘clear’) #clear the
terminal (optional)
class GpsPoller(threading.Thread):
def __init__(self):
threading.Thread.__init__(self)
global gpsd #bring it in scope
gpsd = gps(mode=WATCH_ENABLE)
#starting the stream of info
self.current_value = None
self.running = True #setting the
thread running to true
def run(self):
global gpsd
while gpsp.running:
gpsd.next() #this will continue
to loop and grab EACH set of gpsd
info to clear the buffer
if __name__ == ‘__main__’:
gpsp = GpsPoller() # create the
thread
try:
gpsp.start() # start it up
while True:
#It may take a second or two to
get good data
#print gpsd.fix.latitude,’,
‘,gpsd.fix.longitude,’ Time: ‘,gpsd.
utc
os.system(‘clear’)
print ‘Raspberry Pi GPS reading’
print ‘————————-’
print ‘latitude‘ , gpsd.fix.latitude
print ‘longitude‘ , gpsd.fix.longitude
print ‘time utc‘ , gpsd.utc,’ + ‘,
gpsd.fix.time
print ‘altitude (m)’ , gpsd.fix.
altitude
print ‘eps ‘ , gpsd.fix.eps
print ‘epx ‘ , gpsd.fix.epx
print ‘epv ‘ , gpsd.fix.epv
print ‘ept ‘ , gpsd.fix.ept
print ‘speed (m/s) ‘ , gpsd.fix.speed
print ‘climb ‘ , gpsd.fix.climb
print ‘track ‘ , gpsd.fix.track
print ‘mode ‘ , gpsd.fix.mode
print
print ‘sats ‘ , gpsd.satellites
time.sleep(5) #set to whatever
except (KeyboardInterrupt,
SystemExit): #when you press ctrl+c
print “\nKilling Thread…”
gpsp.running = False
gpsp.join() # wait for the thread
to finish what it’s doing
print “Done.\nExiting.”
Please take care that the indentations of the pasted code are the same as mentioned above as Python is sensitive to it.
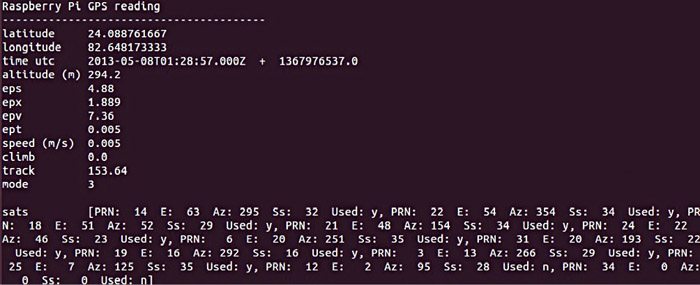
Download Source Code: Click Here
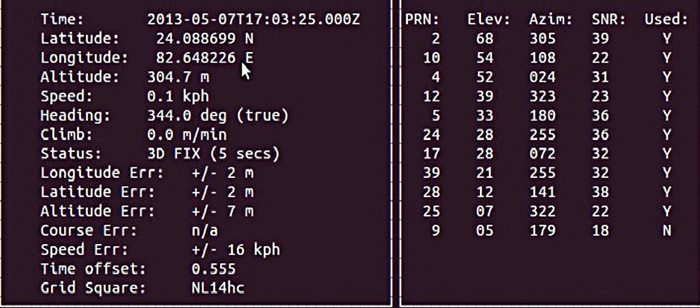
Now run the code by using the command below and the GPS data appears as shown in Fig. 7.
$ python gpsdata.py
To set our Raspberry Pi time synchronised with GPS time NMEA satellite protocol, we can install ‘ntp’ program as:
$sudo apt-get install ntp
Now run the command below and the time of the Raspberry Pi will now be synchronised with Pacific Time standard.
$sudo service ntp
restart
The author is an avid user of open source software. Professionally, he is a thermal power expert and works as an additional general manager at NTPC Limited


can you provide a link for buying this gps module ? Thank you.
will this python script work for Ublox NEO-6M GPS Module ?