

MAX30100 issues: Pandemic period and the whole world is working towards its remedy & precautionary measures. The hobby electronics world is no exception for that matter.
Earlier it was the hands-free utility devices and then suddenly the word – oximeter came into being! Even some big companies provided individual pulse oximeter free to their employees for a free check-up at home for blood oxygen level. I also purchased one button cell operated pulse oximeter for a hefty INR:2000. Then suddenly the electronic markets got flooded with the pulse oximeter probe MAX30100 for as low as INR:250 to USD2 a piece. I purchased a few from Indian online stores but I could not set the probes into work. Even after sensing the probe successfully the readings were awfully wrong!
After having read the datasheet of MAX30100 and a handful of reports from the Internet, I came to know that these flooded Chinese oximeters have two issues – 1.8 volt regulator issues & the I2C pull-down resistance connection issue. This is an I2C infrared measuring device. Ideally, the board should have an operating voltage of 3.3V for the infrared LED driver and 1.8V for the control & measurement circuitry but that does not solve all the problems. The I2C & the Interrupter pin need to be pulled up through 4.7K resistor to the 3.3 volt instead of 1.8 volts, otherwise they will not work with the I2C bus of Arduino or the ESP32 MCUs.
The MAX30100 has a temperature sensing provision inside, for oxygen correction but it cannot be taken out for measurement purposes and the sensor has a power-down sleep state which is not used by the popular hobby electronics world – why?
Rigging the MAX30100
With a multimeter if you measure the voltage on either side of the 3 legs [65K9] regulator, you will get 3.3 volts and 1.8 volts. So far so good. The three resistors 4.7K [472] are from SCL, SDA & INT to the positive bus [1.8 volts] , this actually prevents to get the correct measurements for this device, even though it shows “successfully initialized oximeter”.

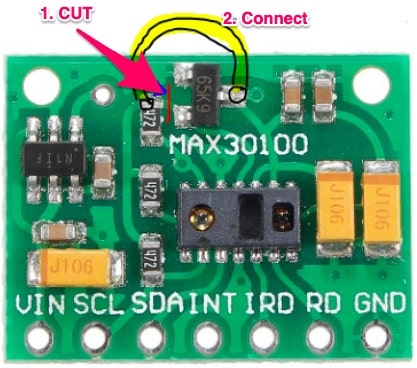
What we have to do is remove these resistors and get them one-end connected to 3.3 volts instead of 1.8 volts. For achieving that feat see on the board carefully. Cut the small track between the point marked [1] and then join a jumper wire between the middle leg and the top of the last resistor. Use small single strand good quality wire. Since this place will be in touch of the body parts, they need to be of good quality and smooth wire.

Operation
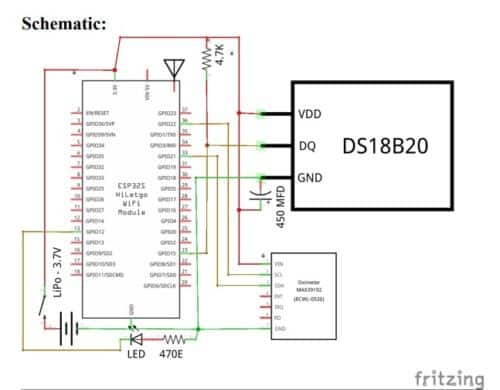
The MCU we used is ESP32. The Oximeter MAX30100 is connected on the I2C port of the ESP32 and the DS18B20 which is a digital temperature probe & whose digital signal pin is connected to GPIO15 of the ESP32. The probe measures pulse – oxygen level and temperature from the connected finger and then uploads to a cloud at thingspeak.com site.
The ESP32 has been provided with multiple wifi id and password. It will connect to which ever is available at that moment. The LED connected on GPIO12 is to provide an indication which will blink for a brief period to mark that the data has been uploaded to the cloud server at thingspeak.com. After uploading data, the MCU will go to deep sleep mode for 20 seconds and then it will wake up and do it all over. During sleep mode the IR led of the MAX30100 sensor will also become off and the total power consumption will go down to 4.2 mA and during active stage the current becomes 160 mA. On a to preserve battery power. On a 26650, [3.7 volt 3000 mAH] Li-Ion battery this expected to run for couple of weeks non stop.
Schematic
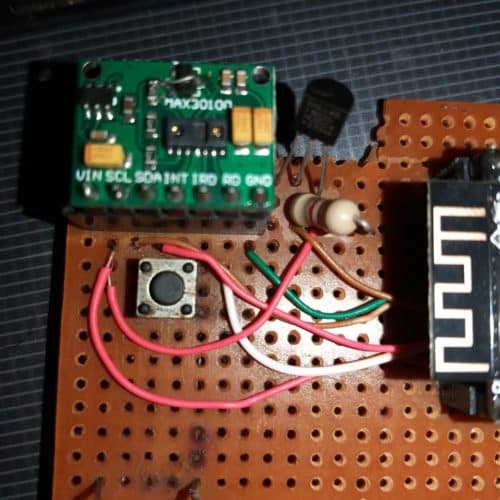
Prototype

Checks: While putting the finger or the wrist on the sensor , ensure that the body part area is clean and without oil, ink or grease. It’s better to clean it with some spirit. In case the body contact is not perfect, then the device will hang. To avoid that situation, the MCU will restart after 25 seconds from here. In case the internet ,though connected but not able to deliver the data to the website [“Error on HTTP request”], the MCU will restart.
BOM:
ESP32 MCU = USD 5 / INR 450
MAX30100 = USD 3 / INR 250
DS18B20 = USD 1 / INR 100
Size 18650, 3000 mAh , Li-Ion battery = USD 2 / INR 660
LED, Resistor & power supply extra.
———————————————
Total = USD 11 / INR 1460 [approx]
Software
Thingspeak account
Well, this is very common today. Just open an account [free] in thingspeak.com. Get the write key and then replace the same in the sketch with your own key. The HTTP GET command actually open the browser and write the data into the cloud account. Do it on your own or read their HOWTOs on the internet.


G:\Project\__MACOSX\ESP32_Temp_Oxymeter_thingspeak_multiple_networks\ESP32_Temp_Oxymeter_thingspeak_multiple_networks.ino: In function ‘void setup()’:
ESP32_Temp_Oxymeter_thingspeak_multiple_networks:65:8: error: ‘class WiFiClass’ has no member named ‘mode’
WiFi.mode();
^
ESP32_Temp_Oxymeter_thingspeak_multiple_networks:93:46: error: request for member ‘c_str’ in ‘WiFi.WiFiClass::SSID((i & 255))’, which is of non-class type ‘char*’
if (strcmp(KNOWN_SSID[n], WiFi.SSID(i).c_str())) {
^
ESP32_Temp_Oxymeter_thingspeak_multiple_networks:120:26: error: invalid conversion from ‘const char*’ to ‘char*’ [-fpermissive]
WiFi.begin(KNOWN_SSID[n], KNOWN_PASSWORD[n]);
^
I am getting this error in the program:
In file included from G:\Project\__MACOSX\ESP32_Temp_Oxymeter_thingspeak_multiple_networks\ESP32_Temp_Oxymeter_thingspeak_multiple_networks.ino:21:0:
C:\Program Files\WindowsApps\ArduinoLLC.ArduinoIDE_1.8.42.0_x86__mdqgnx93n4wtt\libraries\WiFi\src/WiFi.h:79:9: note: initializing argument 1 of ‘int WiFiClass::begin(char*, const char*)’
int begin(char* ssid, const char *passphrase);
Can anyone suggest what is the issue?