


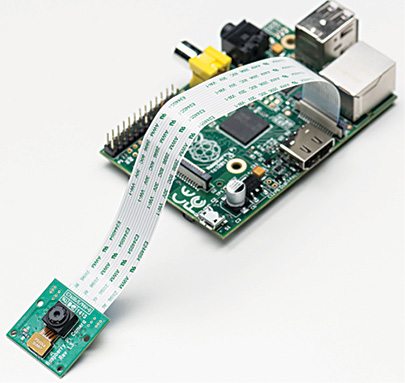
This surveillance system detects motion of any object within its camera’s range, captures the image and stores it in Raspberry Pi. You can retrieve images from Raspberry Pi any time. Since Raspberry Pi camera is static-sensitive, take good grounding measures before you touch it. Connect the camera as shown in Fig. 1.
Installation of camera
Open Raspi config utility using the command:
[stextbox id=”grey”]$ sudo raspi-config[/stextbox]

Now, enable the camera as shown in Fig. 2.
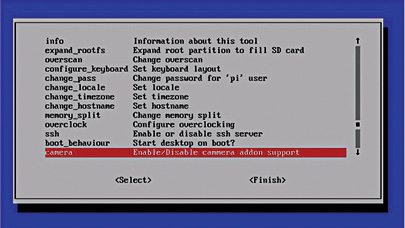
If your firmware is old, you need to update and upgrade it using the command mentioned below to see the camera enable option:
[stextbox id=”grey”]$ sudo apt-get update
$ sudo apt-get upgrade[/stextbox]
After enabling and connecting the camera to Raspberry Pi, use following commands to check if it is working well. The first command is raspistill, which is used to take still pictures. For example, if you want to capture an image, type the following command (also see Fig. 3):

[stextbox id=”grey”]$ raspistill -v -o image.jpg[/stextbox]
If red LED of the Raspberry Pi camera glows for some time, it shows that the image has been recorded. You may check the image under Home folder in Raspberry Pi to ensure that the camera is properly installed.
Capturing motion
We have two methods for motion detection. First method uses the light-weight motion detection Python script while the second method uses ‘motion’ software to detect motion and capture images.
Method 1: Using Python script. Python script depends on Python Imaging Library, which is meant for analysing and manipulating images. So we have to install the library using the following command (also see Fig. 4):

[stextbox id=”grey”]$ sudo apt-get install python-
imaging-tk[/stextbox]
We can get the script from the link mentioned below:
[stextbox id=”info”]https://github.com/skl/raspberry-pi-cam/archive/master.zip[/stextbox]
Make the script executable by using the command (also see Fig. 5):

[stextbox id=”grey”]$ chmod +x picam.py[/stextbox]
The script is designed to store images in a directory named picam under Home directory, so create it as shown below before executing the script:
[stextbox id=”grey”]$ mkdir ~/picam[/stextbox]
We shall be ready to run the script after giving the following command:
[stextbox id=”grey”]$ ./picam.py[/stextbox]
The script will turn on red LED of the Raspberry Pi camera and start taking low-resolution images. It will then compare them and look for movement by comparing the pixels in the images. If it detects any changes in the pixels, the script will capture a higher-resolution image.
The script is written in such a way that it stores only high-resolution images. All these images are saved in the ~/picam folder which we had created. Note that, if the camera is placed in a windy area then set the threshold variable in config file to a higher value than the default.
For running the script during booting, we need an init script that runs the picam.py script and kills it before shutting down the Raspberry Pi. To get the script, issue the command given below:
[stextbox id=”grey”]$ wget http://pastebin.com/AfqbjQrb
-O picam_init[/stextbox]
Move the script into its correct location using the command (also see Fig. 6):

[stextbox id=”grey”]$ sudo mv ~/picam_init /etc/init.d/
picam[/stextbox]
Next make the script executable using the command (also see Fig. 7):

[stextbox id=”grey”]$ sudo chmod +x /etc/init.d/picam[/stextbox]
To make the script start during booting, type the command given below (also see Fig. 8):

[stextbox id=”grey”]$ sudo update-rc.d picam default[/stextbox]
The script will now start and shut down along with the Raspberry Pi. We can also control it manually. That is, to stop the script, use the command:
[stextbox id=”grey”]/etc/init.d/picam stop[/stextbox]
To start the script, use the command:
[stextbox id=”grey”]/etc/init.d/picam start[/stextbox]
Method 2: Using motion software. To install motion software, use the command below (also see Fig. 9):

[stextbox id=”grey”]$ sudo apt-get install
motion[/stextbox]
The standard motion packages do not yet work with Raspberry Pi camera. For that we have to install the special binary code known as motion-mmal. So install following dependencies (also see Fig. 10):

[stextbox id=”grey”]$ sudo apt-get install -y libjpeg62
libjpeg62-dev libavformat53 libav
format-dev libavcodec53 libavcodec-
dev libavutil51 libavutil-dev libc6-
dev zlib1g-dev libmysqlclient18
libmysqlclient-dev libpq5 libpq-dev[/stextbox]
After installing all the dependencies, download motion software from the link:
[stextbox id=”info”]https://www.dropbox.com/s/xdfcxm5hu71s97d/motion-mmal.tar.gz[/stextbox]
Extract it using the command (also see Fig. 11):

[stextbox id=”grey”]tar -zxvf motion-mmal.tar.gz[/stextbox]
This will extract the motion application as well as a configuration file. Run the extracted motion application along with its configuration file using the command (also see Fig. 12):

[stextbox id=”grey”]./motion -n -c motion-mmalcam.conf[/stextbox]
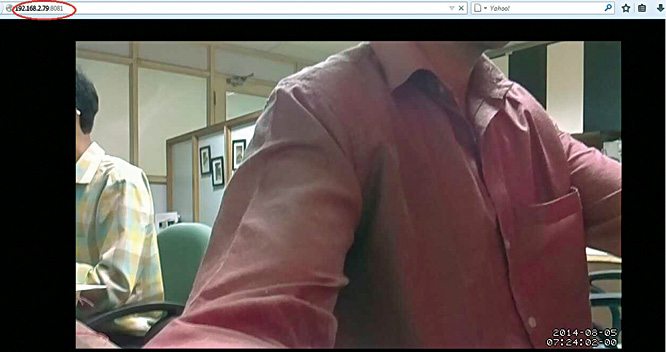
While motion application is running, open the browser and type the IP address of your Raspberry Pi with the 8081 port (for example, 192.128.2.79:8081), as shown in Fig. 13, to see the live streaming video.
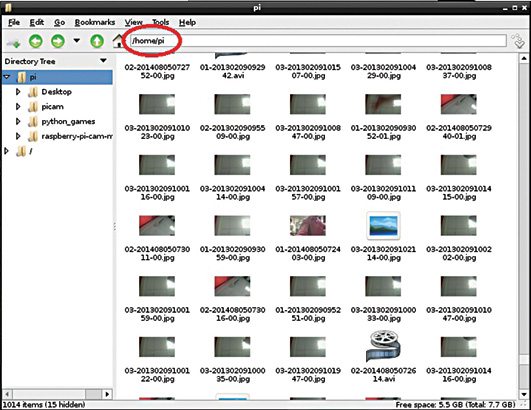
When camera detects the motion it will also capture the image and store it in Raspberry Pi Home folder, as shown in Fig. 14.
The author is a B.Tech (electronics and communication) from GGSIPU, New Delhi