 Several articles about water-level controllers for overhead tanks have been published in earlier issues of EFY magazine. But the project we are going to share today is new and unique. So presented here is a Web-based water-level monitor and motor-pump controller using ATmega128 microcontroller, Ethernet controller ENC28J60 and TCP-IP protocol.
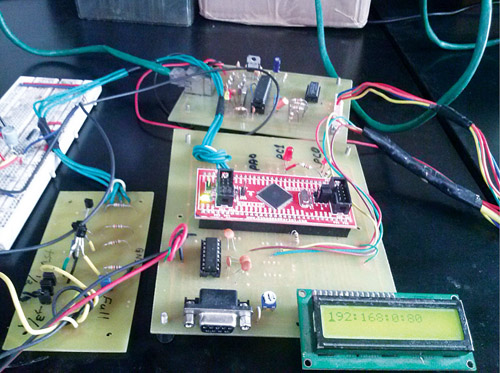
The design involves the use of port-forwarding facility of broadband modem or router. By using this facility, one can port forward a local IP address to a public IP address with which controlling appliances from any part of the world through the Web becomes possible. The authors’ prototype is shown in Fig. 1. Five water-level sensors are used to monitor the water levels in the overhead tank via Web browser.
Circuit and working
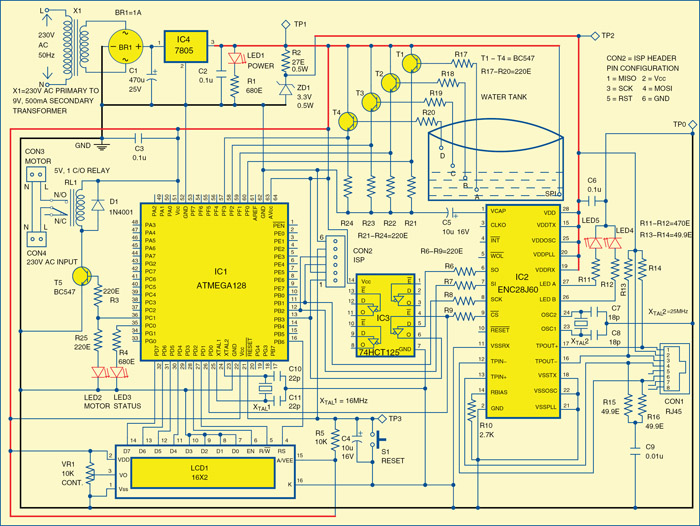
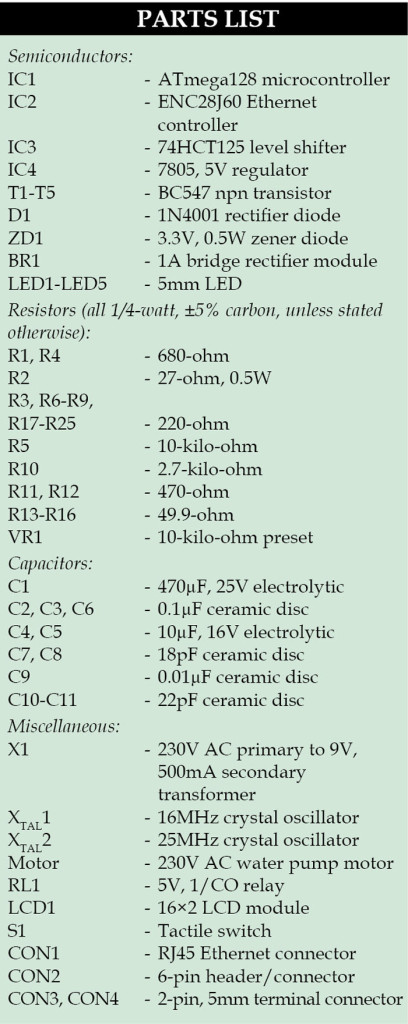 The circuit diagram of the Web-based water-level monitor and pump controller is shown in Fig. 2. The circuit is built around microcontroller ATmega128 (IC1), Ethernet controller ENC28J60 (IC2), a sensor circuit and 16×2 LCD display.
ATmega128
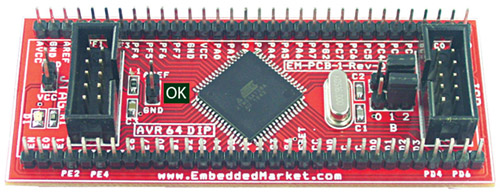
ATmega128 microcontroller of AVR family is chosen for the design as it is inexpensive and has sufficient memory to carry out the necessary tasks. ATmega128 has 128k Flash memory, 4k EEPROM and 4k SRAM. It is available in 64-pin TQFP package and has SPI hardware. Even though it is not difficult to solder 64-pin TQFP package, off-the-shelf available ATmega128 module (Fig. 3) is used to speed up the design process.
The code is written in C and compiled using AVR-GCC to fit into the memory size of ATmega128. The HTML code is put into program memory of ATmega128; therefore the use of external EEPROM is avoided.
ENC28J60 module
ENC28J60 Ethernet controller from Microchip is a low-cost and easy-to-handle IC since it comes with a 28-pin DIP package having a serial peripheral interface (SPI) bus. A number of Ethernet controllers are available in the market but Microchip Ethernet controller is easy to integrate with any other controller. It operates at 3.3V power supply and is readily available in the market. Details of the driver and its functions are provided in the Microchip TCP/IP stack section of http://www.microchip.com website. The driver functions have been implemented in this design after careful study.
SPI communication
ATmega128 microcontroller is chosen as master and ENC28J60 as slave for the SPI communication. FOSC/2 clock mode is chosen by properly setting SPSR register in the microcontroller. Since ENC28J60 operates at 3.3V power supply, it is necessary to use a proper level shifter/buffer in the SPI bus when it is interfaced with a microcontroller operating at 5V supply.
The LCD is operated in 4-line mode. Port pins PD4 through PD7 of IC1 are used as data lines. Pins PD1, PD2 and PB6 serve as control lines for the LCD display. Pin PD0 acts as chip select pin for IC2. Pins PB1 and PB2 are connected to SCK and SI pin of IC2, respectively. Pin PB3 is connected to SO pin of IC2 via level shifter IC3 to maintain proper TTL level since IC2 is operated at a 3.3V power supply. The INT pin of IC2 is not used. We have used 74HCT125 as the level-shifter-interface IC between the microcontroller and the Ethernet controller. A 16MHz crystal is used as the external clock source for the microcontroller. A TYCO magnetic jack is used to establish connections between Ethernet controller IC2 and PC using RJ45 connectors.
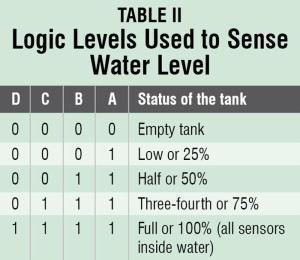
The water-level sensor rods (A, B, C and D) are connected to the bases of four BC547 transistors whose emitters are connected to port pins PF0 through PF3 of IC1. The logic levels used for sensing water level in the overhead tank are shown in Table II.
Depending upon water level in the tank, a graphical image of the water tank is displayed on the main Web page. Here, the uniqueness is that the information is displayed as an image instead of data on the Web page. The water-level data is updated and displayed as a visual which is refreshed using AJAX in the HTML code. Timer function is not included in the AJAX code, so the refreshing rate of the page depends upon the size of updated data. If the data contained no visual information, the refreshing rate would be faster.
Port pin PC1 of IC1 is used to drive the relay circuit. LED2 connected to pin PC1 simulates the motor on/off action by clicking ‘motoron’ and ‘motoroff’ buttons in the HTML page. The electric motor is turned on/off through the relay. Transistor T5 is used as a relay driver.
Software program
software for the ATmega128 microcontroller is written in C.
SPI communication between ATmega128 and ENC28J60 is first initialised, as given below, with the selection of master and clock signals:
SPCR = (1<
SPSR |= (1<
All the instructions for SPI communication are available in ENC28J60.c
After SPI initialisation, ENC28J60 should be initialised for proper network protocol transmission. ENC28J60 initialisation and other relevant codes are also included in the ENC28J60.c file. The ENC28J60 uses a number of software routines for proper operation. These routines are taken from Microchip TCP/IP stack and ported to our application. MACInit ( ) routine does necessary initialisation of registers in ENC28J60 module.
Note that the Ethernet controller should be first connected to ATmega128 via SPI bus and should be initialised by issuing MACInit ( ) routine. Some important routines used in this project are mentioned here:
MACPutHeader ( ) routine is used for preparing header for outgoing Ethernet packet
MACFlush ( ) routine is used to send Ethernet packet
MACGetHeader ( ) routine is used to analyse header in the incoming packets.
MACPut ( ) routine helps to prepare outgoing packets.
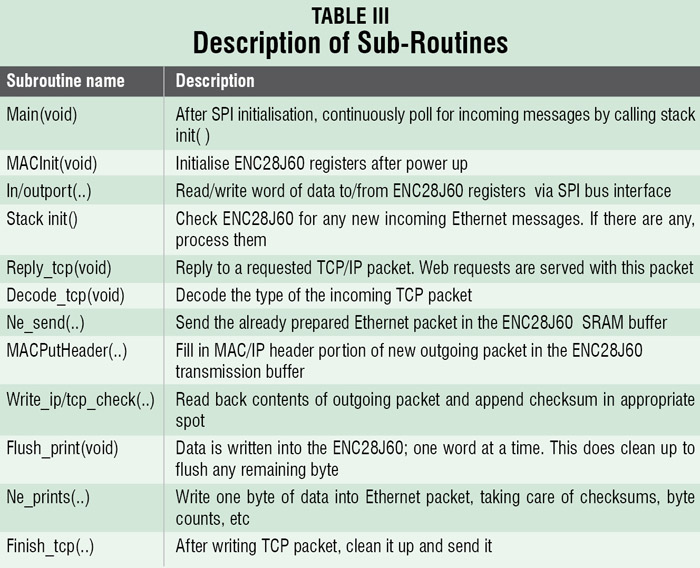
More sub-routines used in the source code are listed in Table III. Since all the communications are done through a computer network line, IP address and Web page are required. In order to see the HTML Web page properly, your browser should support AJAX.
IP address
The IP address changes from one computer to another. The dynamic IP address, which is assigned by DHCP client routine, is eliminated and fixed IP address 192.168.0.80 is used in this project. To find out the IP address of a system, you can use ipconfig command at the command prompt. There are many software modules written for this project including IP, ARP and ICMP. The IP, ARP and ICMP protocol implementations are ported from Microchip TCP/IP stack only. But the necessary codes for TCP protocol and HTTP are self-written in C and compiled using AVR-GCC compiler to fit into the memory size of ATmega128. The TCP protocol implementation and HTTP routines are available in http.c source file.
HTML page
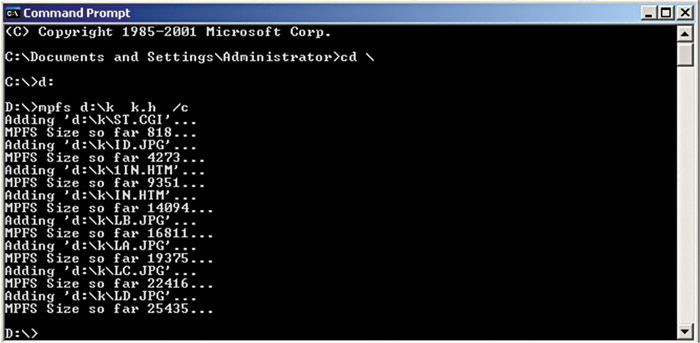
The Web pages are developed using Aurora Web Editor 2008 Professional and converted into arrays of data using MPFS utility program from Microchip. Then the converted file is used in the firmware to access the Web page. The detailed steps for this conversion are out of the scope of this article. Only some details are given here. First, you need to put all required files into one folder, say kat. The MPFS program creates arrays for all files in the folder and the generated arrays is available in the user-defined k.h header file. Fig. 4 shows the invoke command and the arrays information in k.h file. In this typical example, the folder k in D drive contains Web page files. The command is:
D:\>mpfs d:\k k.h /c
The generated k.h file has to be edited to make it suitable for use. In original header file, array names are given as MPFS_0000, MPFS_0001 and MPFS_0003, etc. But here, we are using array names with two alphabets like IN and LA instead of MPFS_000, etc for easy decoding. In this project, the k.h file is MPFSImg.h. The content of the MPFSImg.h starts with #include ‘GenericTypeDefs.h’ line. The structure definition of the MPFSImg.h file is as shown below:
#include ‘GenericTypeDefs.h’
typedef struct __FAT_TABLE_ENTRY
{
int8_t Flags;
ROM uint8_t* Address;
uint8_t Name[12];
uint16_t size;
} FAT_TABLE_ENTRY;
At the end of the MPFSImg.h file are ROM table entry details containing different array names. The modified table information is shown below for reference:
ROM FAT_TABLE_ENTRY MPFS_Start[] =
{
{ 0x00, IN, ‘I’, ‘N’, ‘.’, ‘H’, ‘T’,
‘M’, ‘ ‘, ‘ ‘, ‘ ‘, ‘ ‘, ‘ ‘, ‘ ‘ },
{ 0x00, EE, ‘E’, ‘E’, ‘.’, ‘H’, ‘T’,
‘M’, ‘ ‘, ‘ ‘, ‘ ‘, ‘ ‘, ‘ ‘, ‘ ‘ },
{ 0x00, IB, ‘I’, ‘B’, ‘.’, ‘J’, ‘P’,
‘G’, ‘ ‘, ‘ ‘, ‘ ‘, ‘ ‘, ‘ ‘, ‘ ‘ },
{ 0x00, IC, ‘I’, ‘C’, ‘.’, ‘J’, ‘P’,
‘G’, ‘ ‘, ‘ ‘, ‘ ‘, ‘ ‘, ‘ ‘, ‘ ‘ },
{ 0x00, LB, ‘L’, ‘B’, ‘.’, ‘J’, ‘P’,
‘G’, ‘ ‘, ‘ ‘, ‘ ‘, ‘ ‘, ‘ ‘, ‘ ‘ },
{ 0x00, LA, ‘L’, ‘A’, ‘.’, ‘J’, ‘P’,
‘G’, ‘ ‘, ‘ ‘, ‘ ‘, ‘ ‘, ‘ ‘, ‘ ‘ },
{ 0x00, LC, ‘L’, ‘C’, ‘.’, ‘J’, ‘P’,
‘G’, ‘ ‘, ‘ ‘, ‘ ‘, ‘ ‘, ‘ ‘, ‘ ‘ },
{ 0x00, LD, ‘L’, ‘D’, ‘.’, ‘J’, ‘P’,
‘G’, ‘ ‘, ‘ ‘, ‘ ‘, ‘ ‘, ‘ ‘, ‘ ‘ },
{ 0x00, LE, ‘L’, ‘E’, ‘.’, ‘J’, ‘P’,
‘G’, ‘ ‘, ‘ ‘, ‘ ‘, ‘ ‘, ‘ ‘, ‘ ‘ },
{ 0x00, ST, ‘S’, ‘T’, ‘.’, ‘C’, ‘G’,
‘I’, ‘ ‘, ‘ ‘, ‘ ‘, ‘ ‘, ‘ ‘, ‘ ‘ },
{ 0x04, 0xffffff, ‘E’, ‘N’, ‘D’,
‘ ‘, ‘O’, ‘F’, ‘ ‘, ‘F’, ‘A’, ‘T’,
‘ ‘, ‘ ‘ },
};
The array name definition should be edited and changed as shown below to store it in the program memory of ATmega128. The key tag PROGMEM is used to store the array in program memory:
static uint8_t PROGMEM ST[] =
{
0x3c, 0x21, 0x44, 0x4f, 0x43, 0x54,
0x59, 0x50, 0x45, 0x20, 0x48, 0x54,
0x4d, 0x4c, 0x20, 0x50,
0x55, 0x42, 0x4c, 0x49, 0x43, 0x20,
0x22, 0x2d, 0x2f, 0x2f, 0x57, 0x33,
0x43, 0x2f, 0x2f, 0x44,
0x54, 0x44, 0x20, 0x48, 0x54, 0x4d,
0x4c, 0x20, 0x34, 0x2e, 0x30, 0x20,
0x54, 0x72, 0x61, 0x6e,
…..
…..
};
A typical example code for sending Web page information array to network unit is appended below:
else if (sendata==0x4542) {
ne_prints(“HTTP/1.1 200 OK\r\n”);
ne_prints(“Content-type:text/html\
n\n”);
send_file(&EB,sizeof(EB)-4,remote,yy);
}
The send_ file routine is used to send the array information and ‘ne_prints’ is used to send HTML header information to the Web page, so that you can see the water-level status on your PC monitor through microcontroller.
LCD driver routines are available in lcd_lib.c and the definitions in lcd_lib.h files, respectively.
Programming the code. A 6-pin header is provided in the circuit for programming ATmega128 using ISP protocol. Before programming the ATmega128, you need to remember two things: first ensure that ENC28J60 is removed from the board, otherwise, it may get damaged. Second, you need an AVR programmer board and software tool to be installed in your PC. We used WinAVR2010 software for the same.
The ATmega128 comes with the following preloaded factory fuse settings:
Low fuse:E1
High fuse:99
Extended fuse:FD
The preloaded fuse setting makes use of the built-in 1MHz oscillator. In this project, we used a 16MHz crystal as clock source. So, before loading the hex code into the microcontroller, you need to change fuse bit settings. The fuse setting for this project is as follows:
Low fuse:CE
High fuse:D9
Extended fuse:FF
We have used AVR-ISP programmer manufactured by EmbeddedMarket.com for programming the fuse setting as well as loading the hex file into the microcontroller.
The fuse setting is changed by typing the following commands one by one in the command prompt:
1) avrdude -p atmega128 -P usb -vvv
-c avrispmkII -U lfuse:w:0xce:m
2) avrdude -p atmega128 -P usb -vvv
-c avrispmkII -U hfuse:w:0xd9:m
3) avrdude -p atmega128 -P usb -vvv
-c avrispmkII -U efuse:w:0xff:m
The command for loading the hex code(webchart.hex) into the microcontroller is as follows:
avrdude -p atmega128 -P usb -vvv -c
avrispmkII -U flash:w:webchart.hex:i
Construction and testing
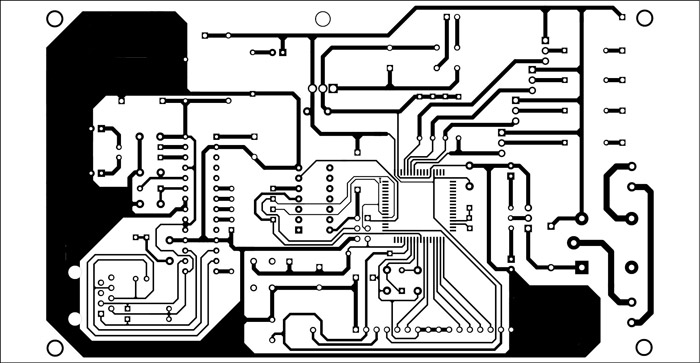
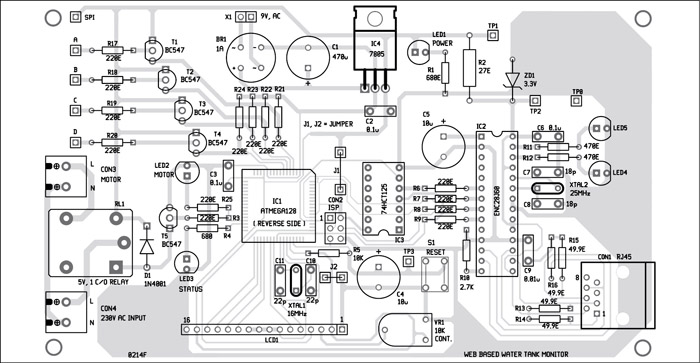
A single-side PCB for the circuit is shown in Fig. 5 and its component layout in Fig. 6.
Download the PCB and component layout PDFs: click here
Download source folder: click here
All the components are easily available in electronics components shops. After assembling the components on PCB, you can connect the LCD. Ensure that power supply connections are properly checked. Connect the board and the PC using Ethernet cable. Switch on the circuit. LED3 at PC0 blinks and at the same time the LEDs (LED4 and LED5) near the ENC28J60 blink continuously. Depending upon the stack, LED3 may stop blinking sometimes since it is in polling loop. If all these LEDs are blinking, it means the circuit is working fine. Now, you can see 192.168.0.80 being displayed on the LCD.
Next, configure the network connection in your PC from the control panel. Note that basic knowledge of computer networking is required for configuration. Now, open Web browser on your PC. We have tested it on Google Chrome but it will work on Mozilla Firefox also. Type the IP address as 192.168.0.80 on the address bar. If everything is fine, you will see a window on your computer screen as shown in Fig. 7. This is the HTML main page for monitoring the water level in the overhead tank having five sensors, viz, A, B, C, D and SPI. Place the sensors as shown in the circuit diagram, with SPI sensor connected to +Vcc and place it near the bottom of the tank. The water in the tank is shown by graphical green colour inside the tank image. When water level reaches D level, you need to turn off the motor by clicking ‘motoroff’ button.
Some of the parameters given under status section on the main page are for debugging purpose only. The ‘Pot0: 5’ displays analogue voltage at port PA1, the button displays the water-level sensor input status at port F. The LEDs display the output status of port C.
For connecting the target board to the Internet, connection through modem is necessary so as to make the board accessible through the Web page from any part of the world. We have already set the IP address at 192.168.0.80 in the firmware. If you have other 192.168.0.xx node setup, this arrangement is not required. By typing ipconfig in the command prompt, you can verify your node network address. Normally, the default IP address used by Linksys broadband routers is 192.168.1.1, which will be the gateway for the board. You can change your board IP address suiting your existing network in the code, but for that you have to recompile the code and burn the hex file again.
The prototype was tested with the board connected directly to PC using Ethernet cable (straight type). To test it on the local network, you can connect your computer to the same network via Wi-Fi or Ethernet and type 192.168.0.80 in the browser. You will get default home page with EFY logo along with other details as shown in Fig. 7. To access the board from outside the network, you need to apply port forwarding setting in the router.
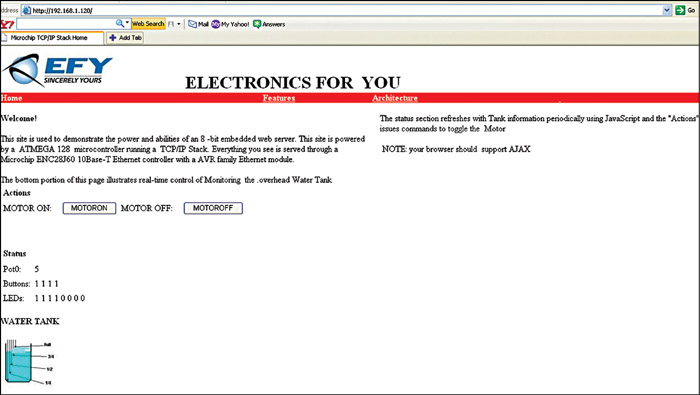
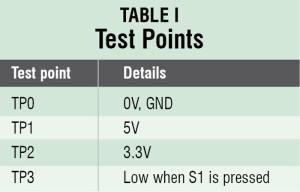
On top of the main page, you can see ‘features’ and ‘architecture’ options. This is just additional information related to the projects. If there is display problem on the LCD, you can vary VR1 to change the contrast until the character is clearly visible. If problem persists, press reset switch S1 momentarily and check the display again. For more troubleshooting, you can refer to the test points table.
Further applications
Monitoring of parameters such as temperature, pressure, voltage and current can be done via Web page from any part of the world by connecting suitable sensors to the input port of the microcontroller.
The author, M. Kathiresan, is a sub-divisional engineer (Retd), mobile services, BSNL, Madurai, A. Robson Benjamin is an associate professor of Physics, The American College, Madurai and C. Vijayan is an associate professor of Physics, S. Vellaichamy Nadar College, Madurai


great
could i measure Diesel Level instead of Water with this crcuit??