


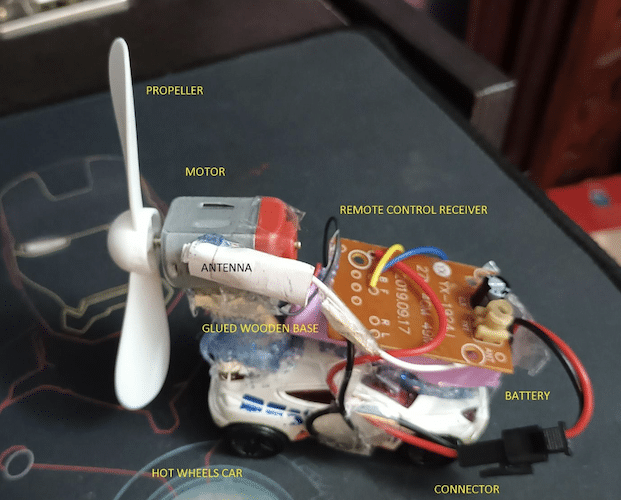
Remote Controlled Car – Components Required
- Motor
- Hot Wheels car
- Fan Blade
- Popsicle stick
- 3.7-volt battery (lithium-ion)
- Matched remote controller
- Battery connector
- 4 Wires
The author wanted to turn a normal hot wheels car into an RC (Remote Control) car using discarded parts from old broken toys.
Also Check: Remote Toy Car

Remote Controlled Car – Construction
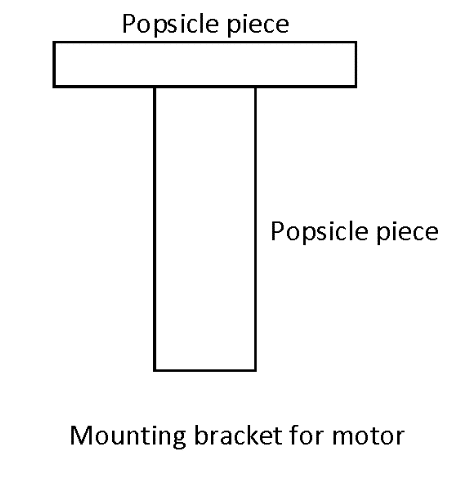
- First, take a Popsicle stick
- Make two pieces and glue them in the manner given in the diagrams at the end.
- Glue the motor to the wooden base.
- Then glue the motor with the wooden base to the car.
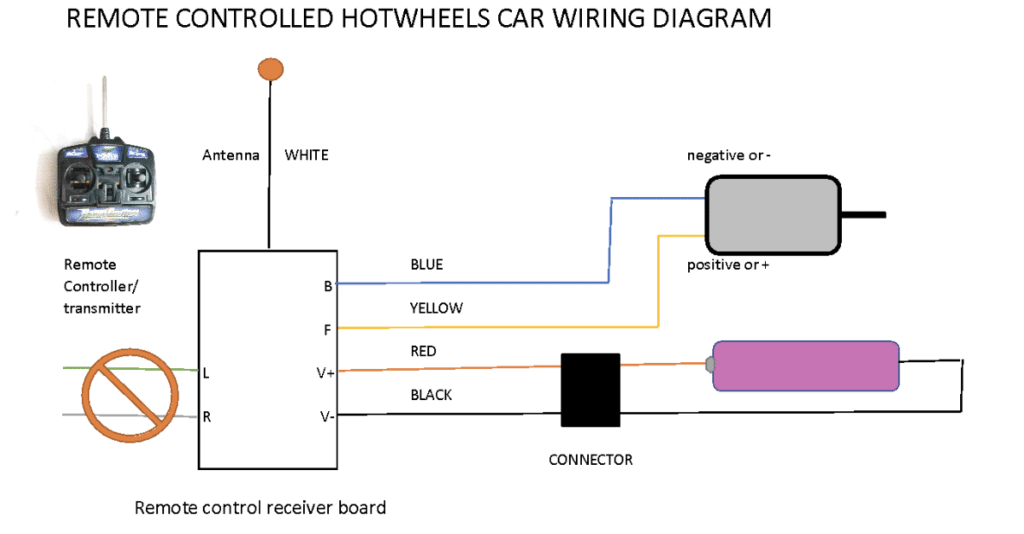
- After they are fully glued, connect the wires of the motor to the accelerating motor ports or wires on the receiver.
- Stick the battery to the top of the car.
- Connect the battery connector to the voltage ports (V+, V-} on the receiver board.
- At last, glue the receiver board on top of the battery.
- Remote control receiver board (YX-1924J) has five wires connected to it.
- Red wire is positive and black wire is negative supply. These wires are connected to the battery connector. Battery charger has also similar connector. Lithium battery has a matching connector. So, the battery can be connected to the RC board or to the charger as required.
- Yellow and blue wires are connected to the motor positive and negative supplies respectively.
- White wire is the antenna which is glued to the side of motor.
- Left and Right wires or points are not connected.
- Wires are joined as described. Insulating tape must be fixed over the joints individually.
- And you completed your RC car.
- Enjoy playing with it with your matched remote controller.
- Insert the batteries to the matching remote controller and switch it on. It has joysticks for operation for forward, backward, left, and right etc. We will use only forward and backward joystick. Move it. The fan fixed to the motor turns and the car moves. If it is going reverse by the forward command of RC controller, reverse the wires to the motor.
- You can disconnect the battery and charge it with a suitable charger.
Remote Controlled Car – Connection Diagrams
K Anmol is an Electronics Enthusiast and is only 9 years old.