THE HARDWARE
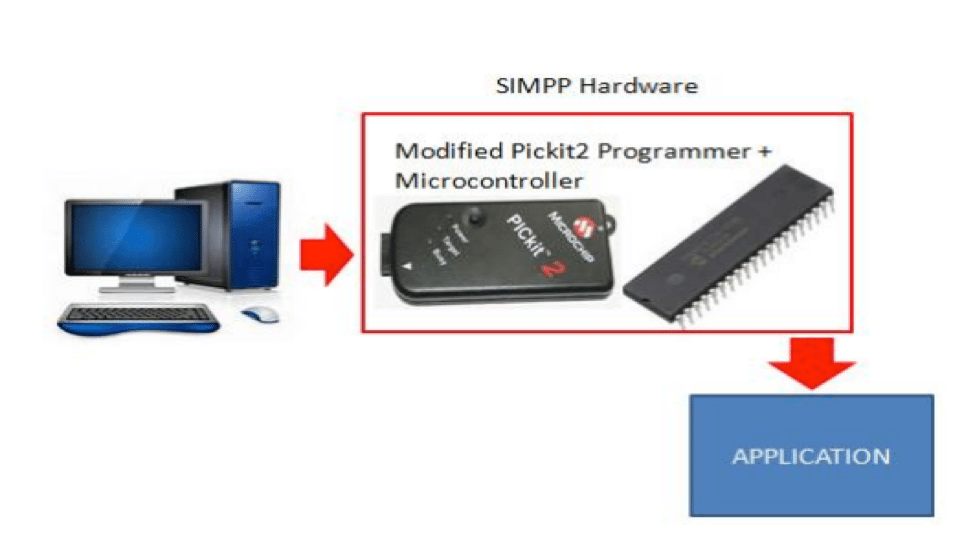
SIMPP or Simple Prototyping Platform is an open source electronic prototyping platform used for building electronic circuits or projects that mainly use microcontroller. SIMPP is physical programmable circuit board hardware (the microcontroller) and uses a software or IDE (Integrated Development Environment) that runs on computer where computer code or microcontroller task is written, compiled and from the IDE uploaded to the Hardware (SIMPP). SIMPP uses “Microchip PIC Microcontroller” as it core controller and Microchip IDE (MPLAB) for the software. SIMPP Utilizes Microchip PICKIT-2 modified Programmer circuit and Firmware in-order for the SIMPP to be connected directly to MPLAB IDE thru USB. The SIMPP can functions as development board and a programmer board. Below are the Basic Specs of SIMPP.
Microcontroller: PIC16F877A 8bit microcontroller
Clock: 4Mhz
GPIO: 30 (external) + 1 (internal)
Digital IO: 30
Analog Input: 5 (multiplex to Digital IO)
Power Supply: 9-12V, 1amp (External) or USB
Computer Interface: USB
Programming Language: C Programming
Board Size: 2.6×2 inch
Some basic specs of SIMPP will be updated in future upgrade of the hardware.
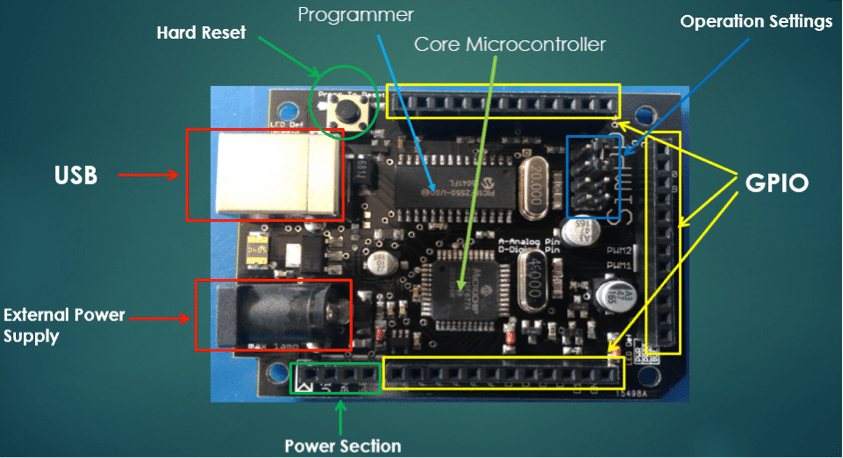
Main Sections
External Power Supply – requires regulated dc adapter supply with range of voltage from 9v to 12v and with max current of 1amp. External power supply is required for projects that requires voltage source higher than 5v.
USB – interface to the PC. It also provides the power source for the hardware and the circuit applications operating in 5v supply.
Power Section – power source of external circuit application. The external circuit can tap on this section voltage range of the external power supply, 5v and 3.3v.
GPIO – general purpose input and output, it’s a female header where a wire or a DuPont male cable can be hook up in-order to connect to the microcontroller.
Operation Settings – The SIMPP can be set to a development board or a programmer board. Development settings is where a new application circuit can be created using SIMPP. While the programmer settings is where the SIMPP is used to program other PICs Microcontroller. Since the SIMPP utilize the Pickit2 and MPLAB platforms, a lot of microcontroller is supported by the SIMPP during programmer settings.
Hard Reset – The button is used to reset the microcontroller to its initial address of programming.
Programmer – The one communicating between the MPLAB and the microcontroller, to download program compiled from MPLAB to the Core Microcontroller. It has the USB interface and part of the pickit2 circuitry with pre downloaded pickit2 firmware.
Core Microcontroller – It is the brain of the SIMPP. This is wWhere all computational processes are executed.
THE SOFTWARE
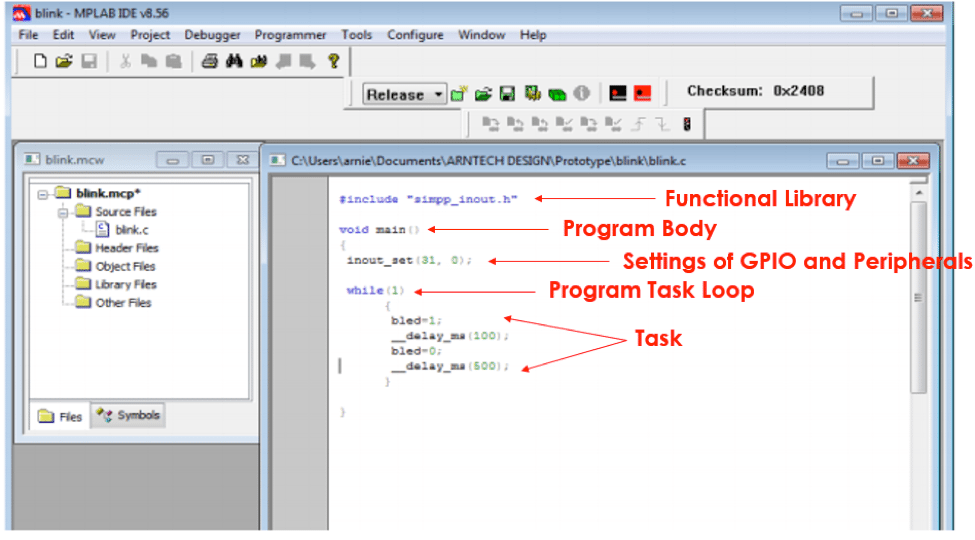
The SIMPP utilize the MPLAB IDE and programming in C language. In-order for the C programming to be compiled in MPLAB, another software name PICC is also needed to be installed for the C programming be compiled in the MPLAB. The MPLAB and PICC software’s are downloadable from the internet. A programming structure and functional libraries was created for the development of projects. This will help the programming simple and easy. On figure2, the programming structure is shown.
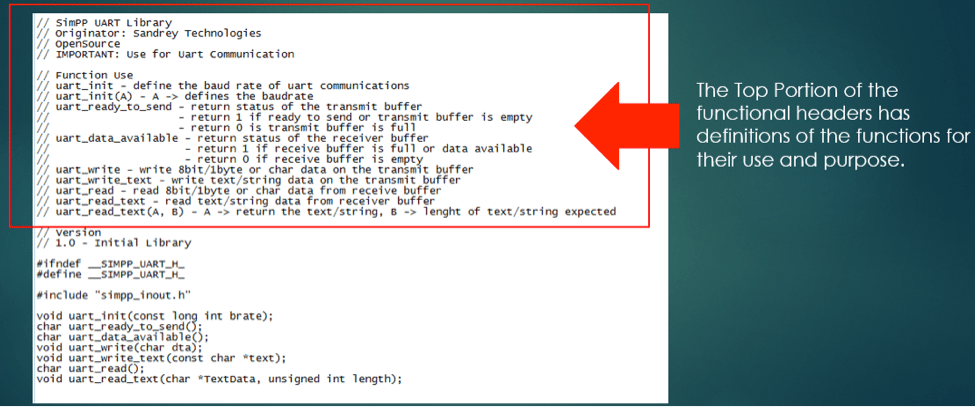
Functional Library – a header file format created to help program easy. Complex task or calculation was created and define in functional manner and that the user will just use the function. In figure3 a sample function is shown.
Top portion of the functional library was used to define the functions included in the library. This is for the user to properly understand the meaning and the usage of the functions.
Program Body – Define the entire coverage of the program. Execution of the microcontroller task is covered in the program body. It includes the settings and microcontroller task.
Settings of the GPIO and Peripherals – In this section or part of the program structure. The user defines the initial settings of the GPIO and the peripherals that will be used in the microcontroller task. This should be defined first before the actual task.
Program Task Loop – Enclosed in this section is where the task of the microcontroller is define. The program task loop is just a loop function where the microcontroller task is done in repeating manner.
Task – is instructions to core microcontroller on what to execute and this will then reflect to the external circuit application.
Figure4, shows the list of available library for the SIMPP to use during project development.
SIMPP SAMPLE PROJECT
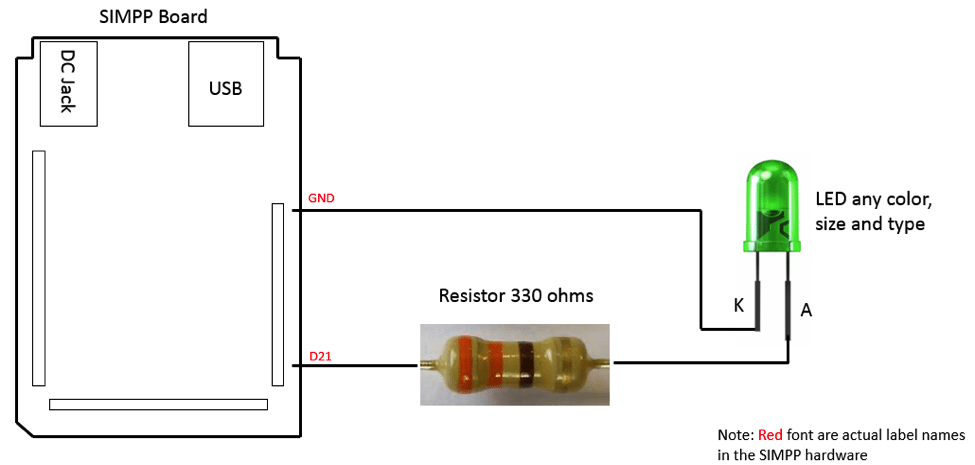
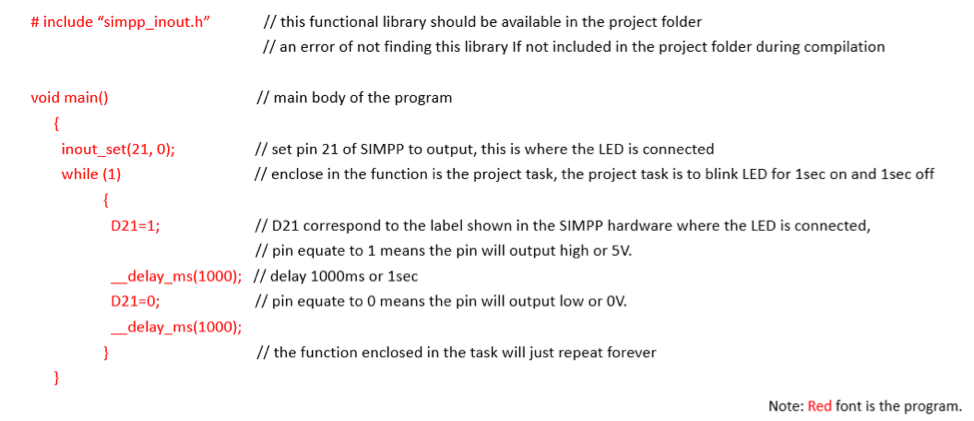
Task: Create a blinking LED using SIMPP
Parts Needed: SIMPP, LED, and resistor
Connection:
Program:
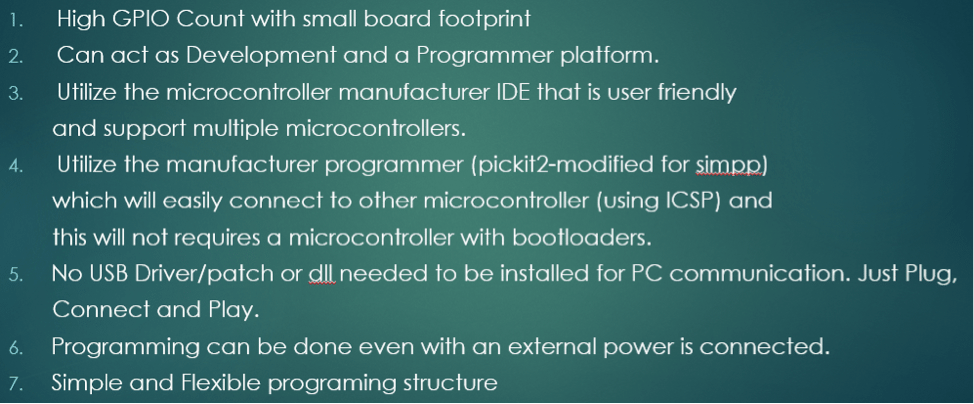
Difference of SIMPP from Other Platform
1. High GPIO Count with small board footprint
2. Can act as Development and a Programmer platform.
3. Utilize the microcontroller manufacturer IDE that is user friendly and support multiple microcontrollers.
4. Utilize the manufacturer programmer (pickit2-modified for simpp) which will easily connect to other microcontroller (using ICSP) and this will not requires a microcontroller with bootloaders.
5. No USB Driver/patch or dll needed to be installed for PC communication. Just Plug,
Connect and Play.
6. Programming can be done even with an external power is connected.
7. Simple and Flexible programing structure
WHY USE SIMPP?
Some Tested Projects Utilizing SIMPP
• RFID with SMS Attendance System
• Mail box with SMS notification
• Plant Irrigation and Monitoring system
• Low cost Centrifuge
• Thermostat (used in egg incubators)
• Parking System with Lock and SMS notification
• Green House System
• Door Lock with SMS Notification
• Car Presence Sensing using Ultrasonic Sensor
Arnie Omallao, Currently working in semiconductor industry as Test Engineer. He has been working for the field of test engineering for the past 8 yrs. Arnie Omallao is an Electronic Enthusiast, Hobbyist and a Part Time Teacher for Microcontrollers in school for Electronics and Computer Engineering course.


Good day, EFY. We are working on a Dextrose Monitoring System for our thesis. We are using PIC16F877a as our MCU. I would like to know if you have a legit design for a locally made/DIY PIC programmer to burn our firmware to our MCU. I would appreciate the help. Thanks.