


Arduino enthusiasts can take advantage of the various wearable health devices available in the market today to monitor health status conveniently at home, without needing to visit a doctor. How about making one yourself?
In this DIY project, we will try to make a Smart Health Monitoring Device that can measure SpO2 (percentage of oxygen in the blood) and heart rate.
Table of Contents
Athletes can use this wearable device to monitor their heart rate and blood oxygen levels during a workout. The best part of this project is that you can connect this device to an app that automatically saves all the sensor data to a text file.

So, let’s start the project.

Components Required for the Project
- Max30100 sensor
- Any Arduino Dev board (Arduino Uno, Nano or Pro Mini).
- OLED Display (SSD 1306).
- Bluetooth HC 05
- Wires
Code for SpO2 and Heart Rate Monitoring
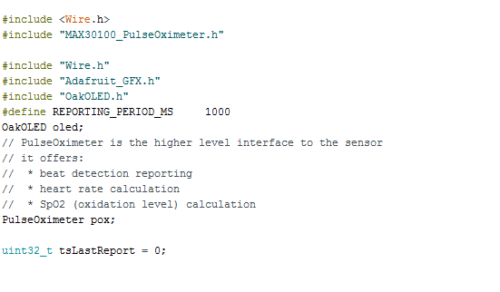
First, we must install the required library to the Arduino IDE. Go to tools and open the library manager and search these libraries (“Addafurit GFX”, “Oak Oled”, “Max30100”) and install these libraries.
Once we have installed the libraries, we can start coding. In the first part of the code, we have included the required libraries in code.
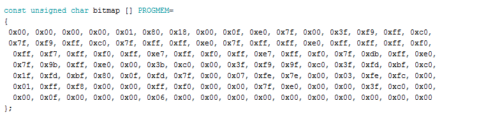
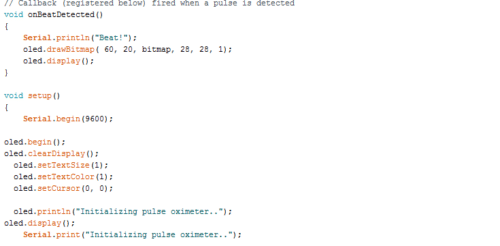
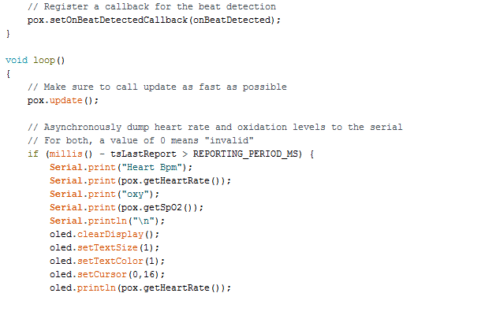
After this, we will add a short bitmap code that has a heart symbol logo. In the next part, we have a function that displays the heart bitmap logo whenever your heart beats (Refer to Fig 3). Now, we can create a setup function and set the Bluetooth baud rate along with other settings. (Refer Fig 4)

Then we will create a loop function that updates the readings of the sensor and displays those readings on the OLED screen.

Now, connect the components as illustrated below.
Also Check: Contactless Heart and Pulse Rate Monitoring System
Circuit Connection Guide
| Arduino | Components |
| 5v | OLED and Max30100 VCC |
| GND | OLED and Max30100 GND |
| SCL | SCL of OLED and Max 30100 |
| SDA | SDA of OLED and Max30100 |
| 5V | Bluetooth VCC |
| GND | Bluetooth GND |
| RX | TX |
| TX | RX |
Building the Mobile App with MIT App Inventor
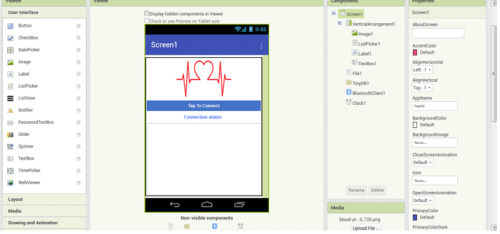
We are done with the coding and connection parts, so let’s build the app. We are going to use MIT App Inventor. First, we will create a layout and add the following components to it.
- An Image View
- A Button
- A Text Level
- A Text Input
- Bluetooth Clint
- Clock Timmer
- File Storage
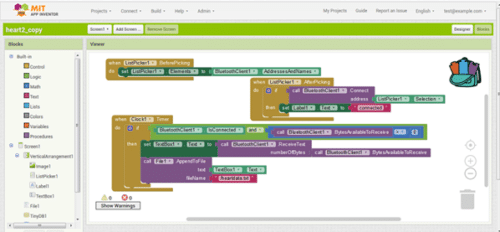
Then Join the MIT App inventor code blocks according to Fig 9.
Check other Interesting Arduino Projects.
Testing and Using Smart Health Monitoring Device
After connecting the components, recheck each connection. Then power the Arduino. When you power the Arduino, you get a message on the OLED screen that says – “Initializing Sensor.”
After a few seconds when Arduino detects the sensor, it shows the reading on the screen. Initially, it will show a 0 or a false reading.
Now place your finger on the sensor and let it detect your heartbeat rate and blood oxygen level. After a few seconds, your SpO2 (oxygen percentage in the blood) and heartbeat rate will be displayed on the OLED screen.
Next, open the app that you have made and connect it to Bluetooth.
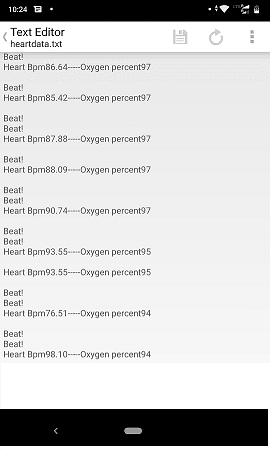
After it is connected, you can see the blood oxygen percentage (SpO2) and pulse rate in the app. The app automatically saves the sensor data in the form of a text file, which you can share with a doctor or use for analysis.
Download Source Code

CAN WE GET THE BLOCK DIAGRAM OF THIS PROJECT PLZ …..
What type of diagram ? you mean to say circuit diagram.
Yes, circuit diagram
Hi there, the whole thing is going perfectly here
and ofcourse every one is sharing information, that’s in fact good, keep up writing.
Where can you get the image for the app blood-pr…0_720.png ???
can Anyone help me with Connections please my [email protected]
What problem are you facing,
Connect the sensor as described or check the I2c pins of arduino and connect the oled and sensor according to I@C connection of arduino
nyc
Thank you for your feedback.
mind blowing fanastic awesome
Thank you for your feedback.
error help
Arduino: 1.8.10 (Windows 10), Board: “Arduino/Genuino Uno”
Sketch uses 15040 bytes (46%) of program storage space. Maximum is 32256 bytes.
Global variables use 1834 bytes (89%) of dynamic memory, leaving 214 bytes for local variables. Maximum is 2048 bytes.
Low memory available, stability problems may occur.
avrdude: stk500_getsync() attempt 1 of 10: not in sync: resp=0x45
avrdude: stk500_getsync() attempt 2 of 10: not in sync: resp=0xfc
avrdude: stk500_getsync() attempt 3 of 10: not in sync: resp=0x45
avrdude: stk500_getsync() attempt 4 of 10: not in sync: resp=0x7c
avrdude: stk500_getsync() attempt 5 of 10: not in sync: resp=0x11
avrdude: stk500_getsync() attempt 6 of 10: not in sync: resp=0xfc
avrdude: stk500_getsync() attempt 7 of 10: not in sync: resp=0x45
avrdude: stk500_getsync() attempt 8 of 10: not in sync: resp=0x1c
avrdude: stk500_getsync() attempt 9 of 10: not in sync: resp=0x11
avrdude: stk500_getsync() attempt 10 of 10: not in sync: resp=0x3c
An error occurred while uploading the sketch
This report would have more information with
“Show verbose output during compilation”
option enabled in File -> Preferences.
may be problem with arduino IDE. Download the new IDE and then upload a bare minim code on arduino and then try a blink code in that then try this code . Hope this helps you
Same problem its still not working
Elaborate your problem.
You have multiple libraries installed for wire.h delete one of them .If still face same problem then uninstall Arduino IDE delete the Arduino folder and the install Arduino latest version if using windows then use portable.zip for Arduino and reinstall right library don’t install wire.h it is already in Arduino IDE
Please Help
heart_rate:62:18: error: could not convert ‘pox.PulseOximeter::begin((PulseOximeterDebuggingMode)0u)’ from ‘void’ to ‘bool’
if (pox.begin()) {
^
exit status 1
could not convert ‘pox.PulseOximeter::begin((PulseOximeterDebuggingMode)0u)’ from ‘void’ to ‘bool’
Have you done any changes in code use the same code tat is provided with the article.Also check have you properly initialized the sensor correctly.
The code you provided is not compiling. It says
Arduino: 1.8.5 (Windows 10), Board: “Arduino/Genuino Uno”
C:\Users\Student\Desktop\bloodoxy\bloodoxy.ino:2:36: fatal error: MAX30100_PulseOximeter.h: No such file or directory
#include “MAX30100_PulseOximeter.h”
^
compilation terminated.
Multiple libraries were found for “Wire.h”
Used: C:\Program Files (x86)\Arduino\hardware\arduino\avr\libraries\Wire
Not used: C:\Users\Student\Documents\Arduino\libraries\Wire
exit status 1
Error compiling for board Arduino/Genuino Uno.
This report would have more information with
“Show verbose output during compilation”
option enabled in File -> Preferences.
What to do now
You have a conflict with library.Go to library manager and install the library
Arduino: 1.8.13 (Windows Store 1.8.42.0) (Windows 10), Board: “Arduino Nano, ATmega328P”
Sketch uses 15828 bytes (51%) of program storage space. Maximum is 30720 bytes.
Global variables use 1840 bytes (89%) of dynamic memory, leaving 208 bytes for local variables. Maximum is 2048 bytes.
Low memory available, stability problems may occur.
Serial port not selected.
This report would have more information with
“Show verbose output during compilation”
option enabled in File -> Preferences.
You haven’t selected the right serial port for this Arduino, go to ports and select the port number for Arduino
i need circuit Diagram
Pls share block diagram
Hello,
Thanks for the project.
I want to add one more thing: when the oxygen level falls below 90% it gives an audio visual alarm.
Kindly provide the modified code and connection.
Thanks and best regards,
Can u share me the whole report of this project including circuit diagram
can i use 16×2 lcd display?