

Roof-top solar photovoltaic (PV) installations are gaining popularity. Usually these are grid connected systems. Their power levels range from one kilowatt to a few tens of kilowatts. These are being installed on the roofs of small buildings, office buildings, individual houses, and bungalows, etc. Even in apartment complexes, on the roofs of the apartment buildings big solar systems are being installed. The power generated by this system is used for common area lighting, lifts, etc, in that apartment complex (net metering).
However, for individual apartments of high rise buildings, there are no PV installations. As the number of apartments in cities are increasing, we have to look for ways and means to install PV panels there. This will open up new opportunities for harnessing solar energy.
Challenges
Before any system is proposed for the apartments, there is a need to identify the issues and concerns. Following are some of the main reasons apartments do not have PV installations:

Safety
Solar panels are quite heavy and use glass panes. Hence, if installed in the high rise buildings, there are chances that these may fall down due to various reasons. This poses threat to life. Unless it is completely safe, we cannot install solar panels in high rise buildings.
No space
It is very difficult to find a suitable place where panels could be installed. The only possibility is on the balcony wall or grills.
Less sunlight
Most apartments get sunlight only for four to five hours. If the balcony is east-facing, sunlight is available in the morning and for west-facing balcony in the afternoon. The amount of power generated is less. Therefore, it is not an attractive proposition for apartment owners.
Rented apartments
For the apartments given on rent, the tenant may be interested in having solar power, but the owner may not permit it, because of so many issues. Therefore, the system should be such the tenants should be able to quickly install the panels. Whenever required, the removal also should be easy.
In spite of above problems, it is worth exploring the possibility of harnessing solar energy in apartments. Otherwise, a big section of population will be deprived of solar energy. It is worth making a humble beginning. As the technology advances, it may become more efficient and cost-effective. Here is an attempt to design a PV system for this segment.
Standardisation
In order to make effective use of limited space and limited power generation potential, it becomes necessary to standardise various aspects of the design. A detailed discussion on each of the design parameters to be standardised is given below.
PV voltage
PV panels are available in various voltage ratings. For roof-top applications with sufficient space, there is no restriction on the number of panels and operating voltage. However, in the proposed design, there may be space to install only a few small panels. Hence, there is a need for standardising the PV voltage. It will encourage people to design appliances for a standard voltage and will drive down the cost.
Further, due to limited space, the amount of power generated will be in the range of 100 to a few hundred watts. At these power levels, it is not possible to design a grid connected system. It has to be an off-grid system. Therefore, extra wiring is required in the house.
From wiring point of view, with thinner cables, wiring becomes cheaper. Thin wires can be easily concealed without spoiling the interiors of the apartment.
Considering above points, and taking into account the safety of the user, we can standardise the PV voltage to 120V DC. Some countries have 120 volts as standard, and it may offer some advantages too (to be explored). A PV panel with 36 cells (mono-crystalline) connected in series produces 17.5V at maximum power (Vmp). Which means, for generating 120 volts, we have to connect seven such PV panels in series.
PV panel size
As discussed above, heavy solar panels made using glass and aluminium are a safety hazard. Such panels should not be used at all. Luckily, there are solar panels made using polymer. These are light in weight and fairly safe to install. These panels are well suited for apartments. One drawback of polymer panels is their life. Usually, these last for about fifteen years only, which is acceptable here.
Having standardised the PV voltage to 120 volts, we have to connect seven panels in series. Handling so many panels will become another challenge. One possibility is that all the cells of seven panels be mounted in a single polymer sheet. That means all 36×7=252 cells are mounted inside a single panel and connected in series. This will simplify the mounting of the panels on the balcony grill. If we select each mono-crystalline solar cell of size 10cm×2.5cm (4”x1”), then the panel with 252 such solar cells will produce 100W peak power. Based on this selection criteria, two types of solar panel designs are proposed here.
Panel Type I
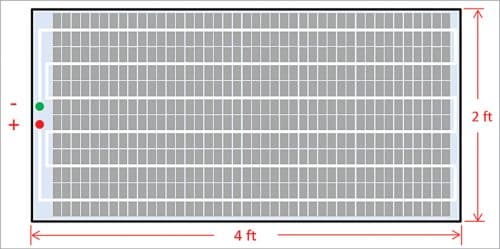
Design of Type I panel is shown in Fig. 1. The cells are arranged in a matrix of 42×6 (252 cells). The overall dimensions are 122cm×61cm (4ft×2ft). Due to longer length and smaller width, it is suitable for horizontal mounting.
Panel Type II
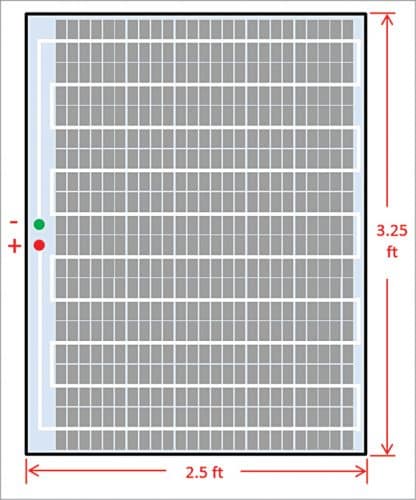
Design of Type II panel is shown in Fig. 2. The cells are arranged in a matrix of 25×10 (250 cells). The overall dimensions are 99cm×76cm (3.25ft×2.5ft). This shape and size is suitable for vertical mounting.
Panel mounting
Once the panel sizes are standardised, it becomes easier to install them. When the building is under construction, guides are provided at specified distance on the balcony grills. At the time of construction itself, the builder or customer will decide panel type to be installed.
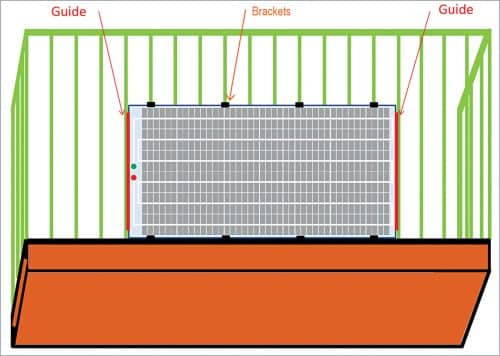
Fig. 3 shows Type I panel installation on the balcony grills. The builder has already provided two guides spaced 122cm apart, which is the length of the Type I panel. Whenever, user decides to install the panel, he has to just insert it between the two guides. The lower edge of the panel rests on the bottom support provided (during construction). Thus, we see that the mounting is very easy and whenever required the panel can be taken out. (Caution: The user should not do the installation himself. He should employ professionals who have experience in working on high rise buildings.)
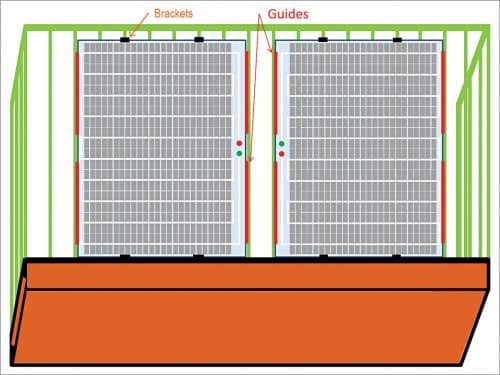
Similarly, Fig. 4 shows two Type II panels installed vertically on the balcony grill. In this case the grill has to be slightly taller because the panel height is 99cm. Here, for each panel, four small guides are provided so that the panel fits properly.
Grill vs wall
Some balconies have grills and some have walls. Walls will stop the wind. Hence the panels mounted on the walls are safe against wind. However, through grills wind can blow behind the panel and there is chance that the panel may come out of the guides. Hence, additional brackets have to be fixed on the grills. As shown in Fig. 3 and Fig. 4, brackets should be fixed at top and bottom edges of the panels.
Thus, there is a need to introduce building code for fixing the ‘guides’ for standardisation purpose. This will go a long way in making the solar panel installation simple and safe.
Electrical accessories
The proposed system produces direct current (DC) and so has polarity. Hence, it is necessary to standardise altogether different types of accessories for this system such as pins, sockets, cables, connectors, switches, lamp holders, etc.
The design should be such that a user would be unable to plug in PV accessories into 230V mains supply or vice versa by mistake. Cables also should be colour coded, so that it is easy to identify which is PV cable and which is 230V AC cable. This is very important for user safety as well as for ease of use without any confusion to a layman.
Power levels
User should be able to decide what will be the power rating of the system he wants to install. This decision will depend upon how much money he can invest and how many panels could be mounted in his apartment. The lowest power will be using single panel with 100Wp rating. If more than one panel has to be installed, the power rating will be in multiples of 100Wp.
All the panels have to be connected in parallel to maintain standard voltage of 120V. One Schottky diode should be connected in series with each panel before connecting the panels in parallel. The diode stops one panel dumping current in another panel if the PV voltages are not equal. Do not connect panels in series, as it will produce 240V, which is not safe.
Voltage levels
Open circuit voltage of panel=21.2×7 =148.4, or about 150V
Minimum PV voltage=100V
Max current for 100W system=100W/122.5V=0.816A. (Cables should be selected for at least 1A rating)
Note that the accessories have to be rated for at least 150V, otherwise insulation breakdown may happen. So, check the ratings of the accessories before using them.
Precautions
- Do not run 230V AC mains and PV cables together in the same conduit. These two wirings have to be kept separate to avoid short circuit between the networks.
- Do not touch the live 120V wires. Even though 120V does not give a severe shock, it is good practice not to touch these bare wires. If possible, work either in the early mornings or in the evenings/night, when PV voltage is very less/zero.
- Do not use 230V accessories such as plug tops, sockets, switches, etc. For PV system use altogether different types of switches (toggle switches), jack pins, terminal strips, etc that are not used for 230V AC.
- Do not short PV+ and PV- terminals. Also, do not use any accessories that are not polarised. Otherwise, the supply polarity to the appliance will get reversed.
- Do not connect mobile charger to Vpv and try to charge a mobile phone. It will damage the phone due to fluctuating nature of sunlight.
Solar day lamp
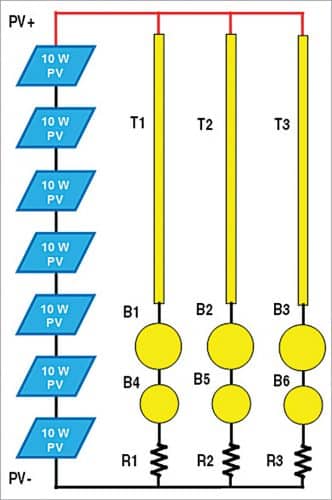
Circuit diagram of a simple solar day lamp (SDL) that works on the 120V PV supply voltage is shown in Fig. 5. Seven 10Wp PV panels are connected in series. This is a sample application of the proposed 120V PV system for apartments.
The reason for showing separate panels is that, as of today, single panels that generate 120V are not available in the market. So, for those who want to implement SDL with seven individual panels, they can do so on their roof-top. (Do not install panels made using glass panes on a balcony; it is unsafe.)
Three lamp loads are connected to the PV output. Each lamp load consists of following LED arrays. Each LED is a white LED with 1W power rating:
- T1, T2, T3→24 LEDs connected in series. This MCPCB is used in tube lights. It is mounted inside a small aluminium ‘C’ channel. Apply thin layer of heat-sink compound for better heat transfer.
- B1, B2, B3→7 LEDs connected in series. This MCPCB is a round PCB used in 7W LED bulbs. Mount it on an aluminium channel.
- B4, B5, B6→5 LEDs connected in series. This MCPCB is a round PCB used in 5W LED bulbs. Mount it on an aluminium channel.
Resistor value calculations
1. Voltage at maximum power Vpv= 17.5×7=122.5V
2. Number of LEDs in each lamp =24+7+5=36
3. Total forward voltage of LEDs= 36×3=108V
4. Voltage difference= 122.5 – 108 =14.5V
5. LED forward current =0.25A (maximum allowed 0.33A)
6. Value of series resistance required=14.5/0.25=58Ω
7. Power dissipated in resistor=0.25×0.25×58 =3.5W
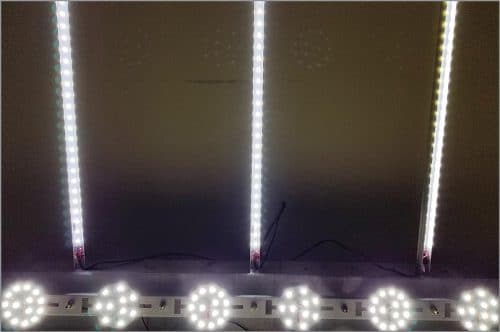
Standard resistor value selected for R1, R2, and R3 is 56Ω, 5W. Photographs of the SDL are shown in Fig. 6 and Fig. 7.

This lamp provides light throughout the day. It can be installed at homes, apartments, offices, small shops, storage area of kirana shops, etc. Wherever there is darkness during daytime, all those places can get good amount of light thoughout the day. It is necessary to have lamp(s) working on mains supply as a backup. Whenever the light from SDL is insufficient, the user can turn on the mains lamp(s).
Important note. PV system described here is just a proposal. For performance evaluation, we need to implement it in a few apartments. Then, based on the outcome of the evaluation, it can be installed in many more places.
This PV system for apartments is proposed in spite of so many limitations. Hence, we may not get very high returns. Therefore, it is not for those who are looking for big savings in their power bills. Rather, this is for those who want to contribute to the cause of environment. It will take some time before the system matures and many more applications are identified. Along with that, the improvement in solar cell efficiency will help in getting more output. With that, we can expect good returns from the system.
Meanwhile, we can derive other benefits of the off-grid system such as higher reliability and uninterrupted service for many years. This is useful for remote locations where the grid supply is not available.
Dr Vijay Deshpande, recently retired from Honeywell India, is now working on solar energy projects. He has worked for more than 30 years as electronics hardware engineer in several companies.


