


Getting started with an Arduino board and uploading the code could be a little confusing for some beginners. Getting all the details from one source is not always easy.
To program an Arduino board, you need to install the drivers and Arduino software (also known as the Integrated Development Environment, or IDE), and then upload the code (called a sketch) to the board.

This applies to PCs running Windows 7, 8, or 10. The steps also apply to Windows XP, though some dialogue boxes may differ.
Table of Contents
Programming Arduino
The step-by-step procedure to upload code to an Arduino board is given below.
- Install Arduino IDE on your PC. You can download the latest version of Arduino software.
- Connect the Arduino board to your PC using a USB cable and wait for Windows to begin the USB driver installation process.
- If the Windows installer does not start automatically, open the Windows Device Manager from the Start→ Control Panel option and find the Arduino under the Ports (COM&LPT) list.
- If Arduino is not found, go to Other Devices and select the Unknown Device option. Then update the driver.
- Select Browse my computer for driver software, navigate to the Arduino software folder, and select ‘Arduino.inf’ or ‘Arduino Uno.inf’ (depending on your version) to install the driver.
- After successful installation of the driver, from the Arduino IDE select the Tools/Board option. From here select your Arduino board among those listed, such as Arduino Uno, Arduino Mega 2560, Arduino Leonardo, etc.
- Choose the correct serial COM port for your board. The COM port number will be visible under the Device Manager.
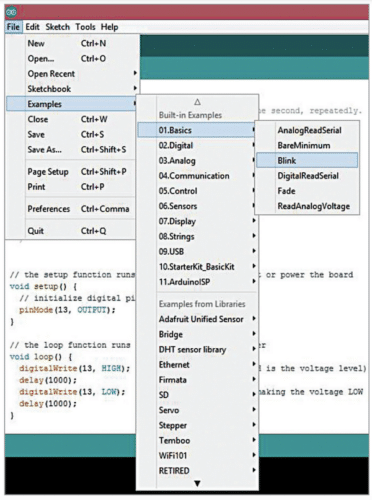
- Open the source code/sketch, compile it and upload the code to the Arduino board by clicking the Upload button. If you do not have the sketch ready, the easiest way to start with the Arduino programming is to use the ‘Blink’ sketch from the Examples in Arduino. You can access Blink source code from the File→Examples→Basics option, as shown in Fig. 1.
- Compile the code and upload it to the Arduino board.
After uploading the code, you can use the Arduino pins to interface with other devices
We hope now you know how to upload code to Arduino.
Interesting Arduino Projects
Most Common Errors when uploading code to Arduino
When programming Arduino, you may face the below errors. So let’s discuss how we can solve these errors.
Exit Status 1
You can get this error either during compilation or uploading. Check the preceding lines in the error output for specific information.
If it is showing a compilation error, then check the code. Otherwise check the ports and connections.
No device found on <port>
- Make sure the correct port is selected in Tools > Port.
- Close other instances that may be blocking the port e.g. Arduino IDE, serial monitors, and other software.
- Restart your computer.
Couldn’t find a Board on the selected port
If the board on the selected port has been disconnected from the computer or reassigned to a different port, then you can face this error. To overcome this error, make sure you have selected the correct port.
- Make sure the board is connected to your computer.
- Select the board in Tools > Port.
If it is correct, try pressing the board’s reset button after initiating the upload.
dfu-util: No DFU-capable USB device available
Upload error: Failed uploading: uploading error: exit status 74
- Make sure the board is connected to your computer.
- Make sure that the right board is selected in Tools > Board.
- Make sure the correct port is selected in Tools > Port.
- Close other instances that may be blocking the port e.g. Arduino IDE, serial monitors, and other software.
- Restart your computer.
jssc.SerialPortException: Port name – <port>; Method name – openPort(); Exception type – Port busy
- Make sure the correct port is selected in Tools > Port.
- Close other instances that may be blocking the port e.g. Arduino IDE, serial monitors, and other software.
- Restart your computer.
If you still encounter issues or have questions, please don’t hesitate to ask in the comments below.
Also, check the most popular and latest Arduino projects.
