


In industries, many systems are based on networks comprising different devices and controllers that work on some protocols. Often the need arises to monitor the entire communication process to make the system more efficient. Sometimes, there is a need to monitor the process to remove numerous faults and errors. A packet sniffer is just the software needed to meet such requirements. This article describes how you can check and analyse data passing through a network using a popular packet sniffer called Wireshark.
What a packet sniffer is
Packet sniffers or protocol analysers are tools that are commonly used to diagnose network-related problems. These can also be used by hackers for spying on network user traffic and collecting passwords.
In its simple form a packet sniffer simply captures all packets of data that pass through a given network interface. Typically, it only captures packets that were intended for the machine in question. However, if placed into promiscuous mode, it is also capable of capturing all packets traversing the network, regardless of destination.
How it works
Packet sniffers work by intercepting and logging network traffic that these can see via the wired or wireless network interface to the computer in use.
On a wired network, what can be captured depends on the structure of the network. A packet sniffer might be able to see traffic on an entire network or only a certain segment of it, depending on how network switches are configured, placed, etc.
On a wireless network, a packet sniffer can usually only capture one channel at a time, unless the host computer has multiple wireless interfaces that allow for multichannel capture.
Once raw packet data is captured, packet sniffing software must analyse it and present it in human-readable form so that the person using the software can make sense of it. The person analysing the data can view details of the conversations happening between two or more nodes on the network.
Wireshark
Wireshark is a free and open source packet analyser. It is a computer program that can intercept and log traffic passing over a digital network or part of a network. As data flows across the path, the sniffer captures each packet and, if needed, decodes its raw data, showing the values of various fields in the packet and analyses its content. Packet capture is the process of intercepting and logging traffic.
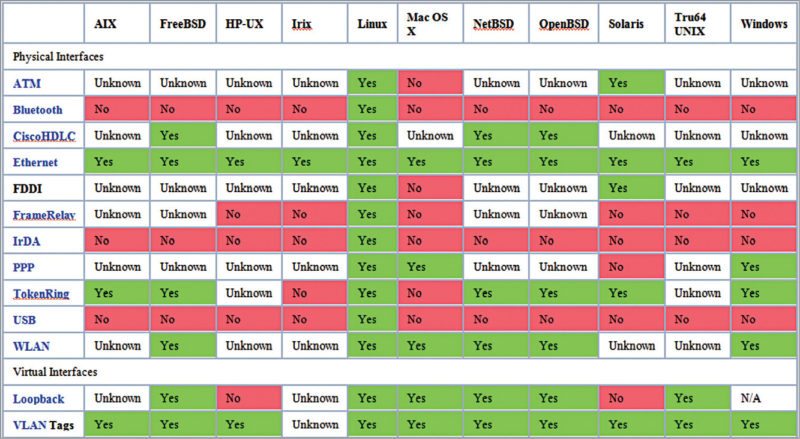
Wireshark runs on GNU/Linux, OS X, BSD, Solaris, some other Unix-like operating systems and Microsoft Windows. There is also a terminal based (non-GUI) version called TShark. Wireshark and other programs distributed with it such as TShark are free software, released under the terms of the GNU general-public licence. Network types supported on various platforms by Wireshark are shown in Fig. 1.
Wireshark is very similar to tcpdump (common packet analyser that runs under command line) but has a graphical front-end, plus some integrated sorting and filtering options.
Features of Wireshark
Data can be captured ‘from the wire’ from a live network connection, or read from a file of already-captured packets. Live data can be read from a number of types of network including Ethernet, IEEE 802.11 and PPP. Captured network data can be browsed via a GUI or via the terminal (command line) version of the utility, TShark. Captured files can be programmatically edited or converted via command-line switches to editcap program. Data display can be refined using a display filter.
Plugins can be created for dissecting new protocols. Voice over Internet Protocol, or VoIP, calls in the captured traffic can be detected. If encoded in compatible encoding, media flow can even be played. Raw USB traffic can be captured, packets on many criteria filtered/searched and captured packet data saved.
Getting started with Wireshark
To get started with Wireshark, follow the steps given below:
1. Wireshark can be downloaded from its official website link
2. Follow the instructions for installation.
3. Run the application.
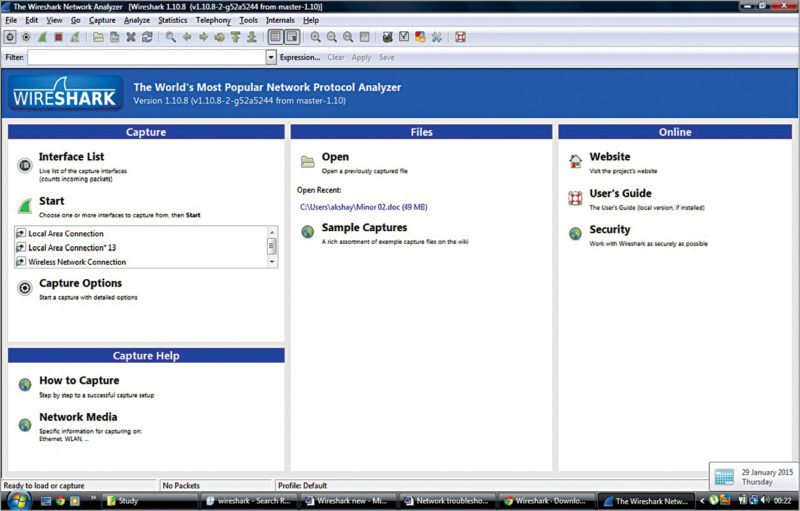
4. Select the appropriate network hardware connection you wish to check or trace (for example, local area network or wireless network connection)
5. Click Start on Home screen (Fig. 2) to start capturing live packets from the hardware connection specified.
Fig. 4 demonstrates display filter specification and the list of packets being captured by Wireshark. This information is used for data analysis and for finding a probable error in the communication system.
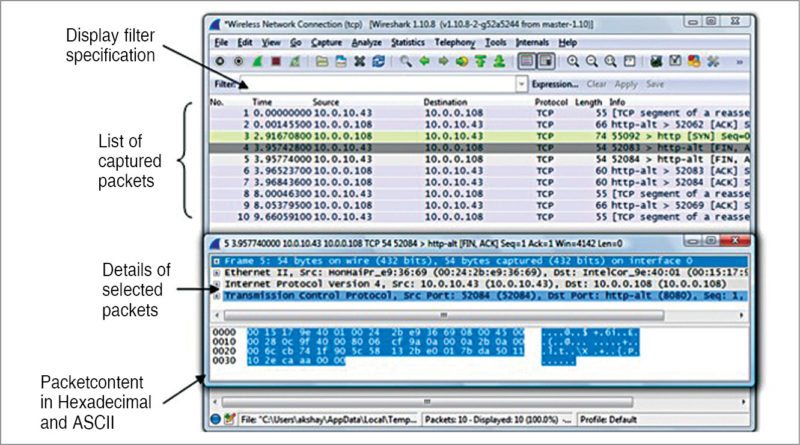
Details of different Wireshark components and operations are given below:
1. On the left-most side of Wireshark window (Fig. 4) we have two parameters: packet number and time. Both parameters are very important to decide the sequence and time of packet captured. For example, we know that the fault in the system was during x time, say, between 7.30 pm and 8.30pm. By changing time characteristics, we can see and study the packets for that period of time only.
For seeing different timing formats, click ViewTime Display Format.
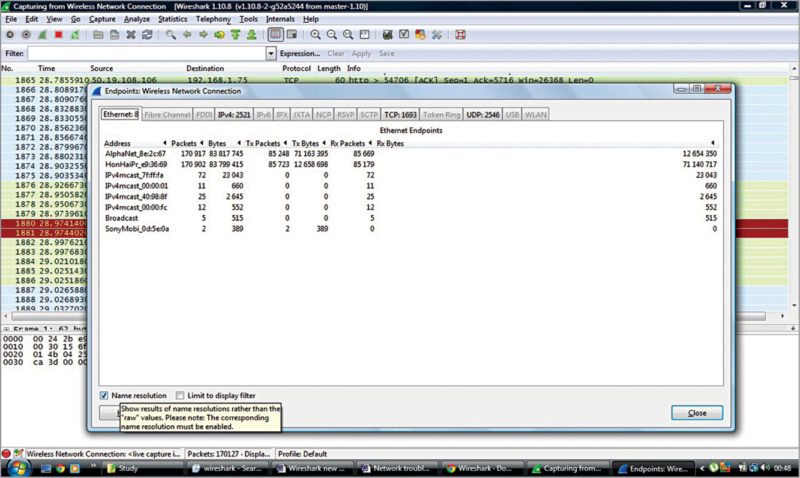
2. To find out whether the trace you have conducted has devices you are looking for, click Statistics Endpoints. Hence, we can check the source or from where the data is coming and the destination.
We can also convert MAC address to names of devices as shown in Fig. 5. To see the MAC address, click to turn off Name resolution checkbox at the bottom of the window. You can also see your devices according to the IP address by clicking on IPV4 tab. UDP packets can also be checked.
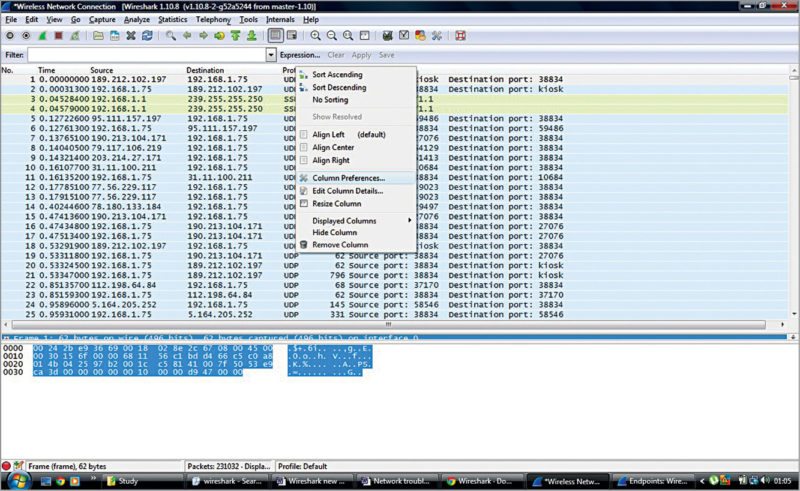
3. You can also right-click on Title bar of data and change column properties by clicking Column Preferences, according to your need, as shown in Fig. 6.
4. In Wireshark, we can filter out only the required data from the pool of data using filters, namely, Capture and Display.
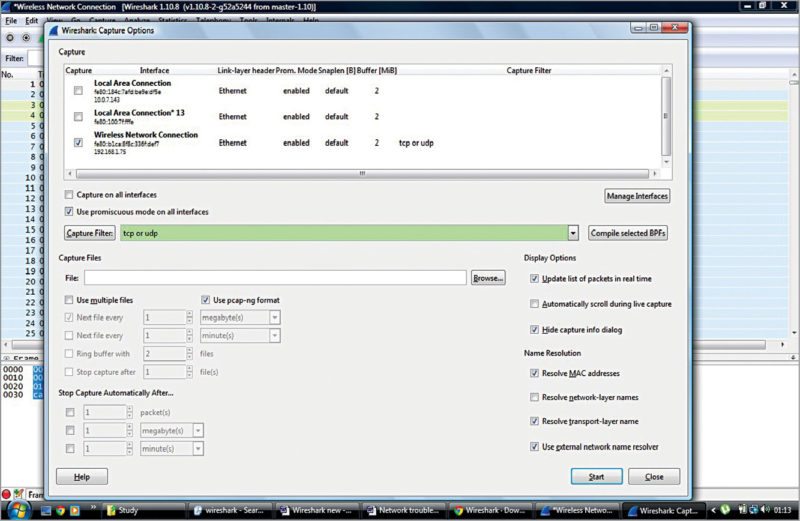
Capture filter is important if you know exactly what kind of data you want. It restricts the basic capturing of non-required packets. Here, we do not have other pool of packets and we capture only the packets that fulfill the filter criteria.
To set capture filter, click CaptureInterfacesOptions and set the one that you wish to have. We can also use OR and AND like operators for multiple filter options like ‘tcp OR udp’ as shown in Fig. 7.
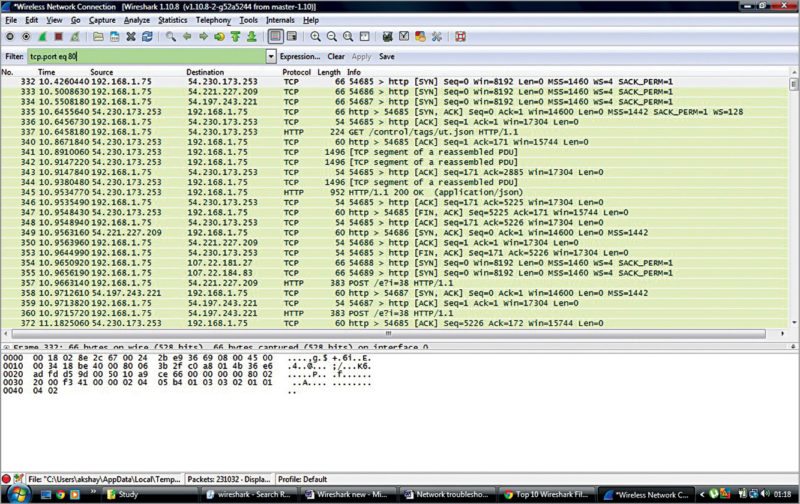
5. Display filters are used if after sending and capturing a trace, you need to filter out packets based on some conditions (say, protocols or port numbers). For example, we can give ‘!tcp.port eq 80’ to see non-Web data only. We can even run a display filter while taking a trace we can also set the filter as ‘tcp.port eq 80’ as shown in Fig. 8.
6. You can save the packets captured simultaneously in various files. Click CaptureInterfacesOptions. In Capture File section, specify file name and location. Click on multiple files if you wish to save data captured over a large number of files. You can also initiate to save in the next file according to size or time.
Ring Buffer option is used to overwrite existing files. Say, you give 24 in Ring Buffer section. Now after 24 files are created, it will overwrite the previous files.
7. You can use the telephony features for capturing and monitoring. Click TelephonyRTPShow all Streams. Using this you can monitor every RTP conversation (audio call) within the packet trace.
8. I/O graphs window (Fig. 9) can also be used to see the captured network packets in a graphical format. Click StatisticsI/O graphs. For example, you can plot a graph for a certain device with a particular IP address, ip.addr==192.168.1.1. Multiple filters can be put and their corresponding I/O graphs can be studied simultaneously in the same plane.
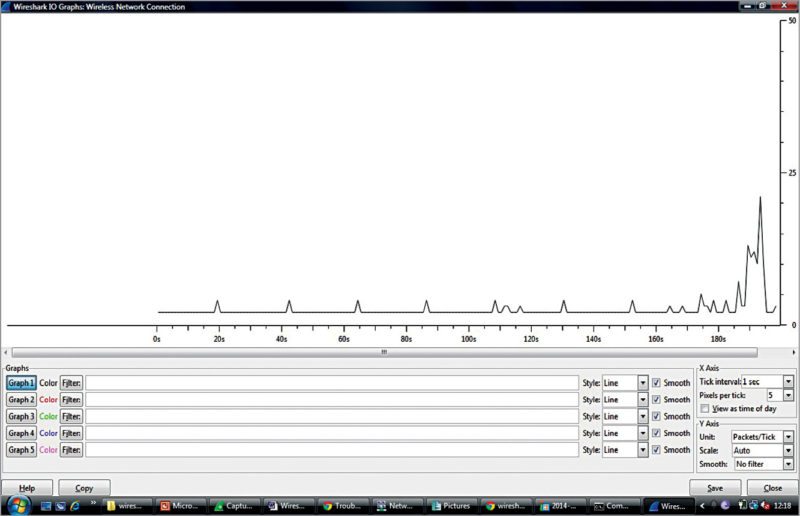
In I/O graphs, x-axis denotes time that has passed since capturing of the packet. Y-axis denotes the number of packets captured per unit time. This unit time can be selected using Tick interval on the left-hand side of the screen.
If you click on the graph, Wireshark window will move in the background to the corresponding data. The graph can be saved as .png, .jpeg and other formats by clicking Save.
Similarly, we can use Wireshark in a number of ways to study communication data and draw important conclusions.
What Wireshark is not
Wireshark is not an intrusion-detection system. It will not warn you when someone does strange things on your network that he/she is not allowed to do. However, if strange things happen, Wireshark might help you figure out what really is going on. It is like a monitoring device.
Wireshark will not manipulate things on the network; it will only measure things from it. It does not send packets on the network or do other active things.
EFY notes. 1. Working with a busy network can easily produce huge memory and disk space usage. So you need a machine with a fast processor, large memory and disk space. If Wireshark runs out of memory, it will crash. For silent installation and working, go for the command-line version.
2. With Wireshark, it is easy to troubleshoot the devices and make these work in a much better way.
Akshay Kumar is a B.Tech (engineering physics) student at Delhi Technological University, New Delhi
Joby Antony is masters in computer technology from the USA, and is currently working as engineer-F at Nuclear Inter-University Accelerator Centre (IUAC), New Delhi