The main objective of this project is to design a coal mining safety robot to detect toxic gases emitted in coal mines. It is used to detect the level of temperature and humidity inside a coal mine and to detect any fire inside the coal mine and extinguish it.

Coal mines are prone to fires due to the fact that coal itself is combustible. Coal fires can be so severe that mining operations may have to be stopped. Some severe consequences of fires may be coal dust explosions and the burning of coal seams. The need for designing and implementing safety measures and systems to prevent and mitigate the impact of fires is of utmost importance.
This DIY article elucidates the causes of fires in coal mines, the detection methods, the prevention methods, fire suppression methods, alerting and evacuation during fires, and the latest technological trends. The author’s prototype is shown in Fig. 1.
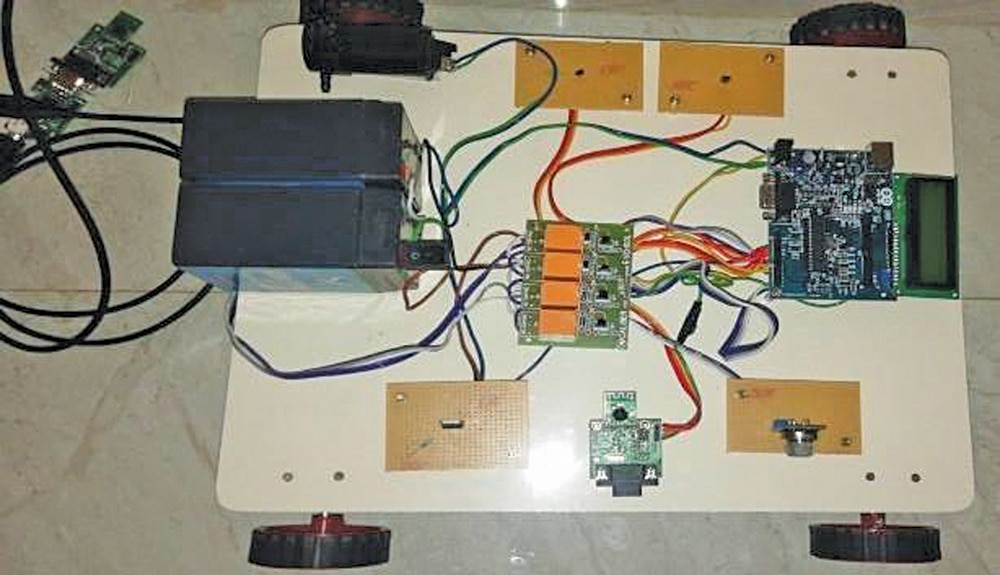
The proposed intelligent security system monitors environment hazardous conditions such as temperature, gas, smoke, and humidity. The robot enters and moves inside a coal-mine and detects any hazardous gas present there and provides safety against fire explosion, poisoned gases like CO, CO2, and CH4, and alerts people inside the tunnel.
You can see the demo video given below to get a brief idea about the project-
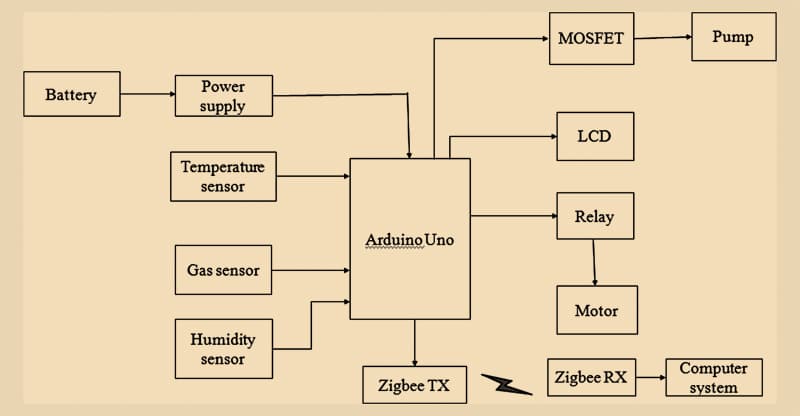
Block Diagram
Bill of Material
| Bill of Material | ||
| Components | Quantity | Description |
| Arduino Uno | 1 | Arduino is an open-source electronics platform |
| Motor 5V | 2 | DC motor |
| Zigbee Tx and Rx | 1 set | Zigbee Tx, Zigbee Rx |
| P55NF06 MOSFET | 1 | For pump driver |
| Humidity sensor | 1 | For humidity measurement |
| 12V relay module (RL1, RL2) | 2 | Single changeover relay |
| 16×2 LCD | 1 | LCD1 |
| 12V battery | 1 | For power supply |
| LM35 temperature sensor (S1) | 1 | For measuring temperature |
| Pump | 1 | For moving liquids/gases |
| MQ2 gas sensor (S2) | 1 | For gas sensing |
Arduino Uno is an open-source electronics platform based on easy-to-use hardware and software. Arduino boards can read inputs such as a light on a sensor, a finger on a button, or a Twitter message and turn it into an output to activate a motor, turn on an LED, or publish something online.
Recommended: Arduino Projects Ideas
Zigbee is a wireless technology developed as an open global standard to address the unique needs of low-cost, low-power wireless IoT networks. The Zigbee standard operates on the IEEE 802.15.4 physical radio specification in unlicensed bands, including 2.4GHz, 900MHz, and 868MHz.
LM35 is a temperature sensor that outputs an analog signal proportional to the instantaneous temperature. Its output voltage can be easily interpreted to obtain a temperature reading in degrees Celsius.
The advantage of LM35 over a thermistor is that it does not require any external calibration. The coating on it also protects it from self-heating. Low cost (approximately $0.95) and greater accuracy make it popular among hobbyists, DIY circuit makers, and students.
MQ2 is a commonly used gas sensor in the MQ series. It is a metal oxide semiconductor (MOS) type gas sensor, also known as Chemi-resistor as the detection is based upon a change of resistance of the sensing material when the gas comes in contact with the material.
Using a simple voltage divider network, concentrations of the gas can be detected. MQ2 works on 5V DC and draws around 800mW. It can detect LPG, smoke, alcohol, propane, hydrogen, methane, and carbon monoxide concentrations anywhere from 200 to 10000ppm.
Humidity sensor is an electronic device that measures the humidity in its environment and converts its findings into a corresponding electrical signal. A humidity sensor is used to measure and report moisture. Humidity sensors vary widely in size and functionality.
Relay is used to make or break an electrical connection. It has a flexible moving part that is controlled electronically through an electromagnet. Basically, it is just like a mechanical switch that is controlled with an electronic signal instead of manually turning it on or off.
Liquid-crystal Display (LCD) is a flat-panel display or other electronically modulated optical device that uses the light-modulating properties of liquid crystals combined with a polarizer. Liquid crystals do not emit light directly; they use a backlight or reflector to produce images in color or monochrome.
DC Motor converts electrical energy into mechanical energy. DC motors take electrical power from direct current and convert it into mechanical rotation.
MOSFET (metal oxide semiconductor field effect transistor) is a 3-terminal n-channel silicon device with a current conduction capability of about 50A, fast switching speed, low on-state resistance, breakdown voltage rating of 60V, and a max threshold voltage of 4V. Thin semi 50N06 is a 3-terminal silicon device with a current conduction capability of about 50A, fast switching speed, low on-state resistance, breakdown voltage rating of 60V, and a max threshold voltage of 4V. It is mainly used for electronic ballasts and low-power switching mode power appliances.
Motor Pump is used to move liquids/gases from one place to another through its mechanical action. Different types of mechanical pumps are available in the market to serve in an extensive range of applications like water pumping from wells, filtering of an aquarium’s or pond’s water, and in industries like automobile, energy, and medical.
Power supply The Arduino Uno can be supplied power with the help of a USB cable or an external power supply. The external power supplies include AC to DC adaptor and a battery. The adaptor can be connected to the Arduino Uno by plugging it into the power jack of the Arduino board. Similarly, the battery leads can be connected to the Vin and GND pins of the power connector. The suggested voltage range is 7 to 12V.
Coal Mining Robot Circuit Diagram
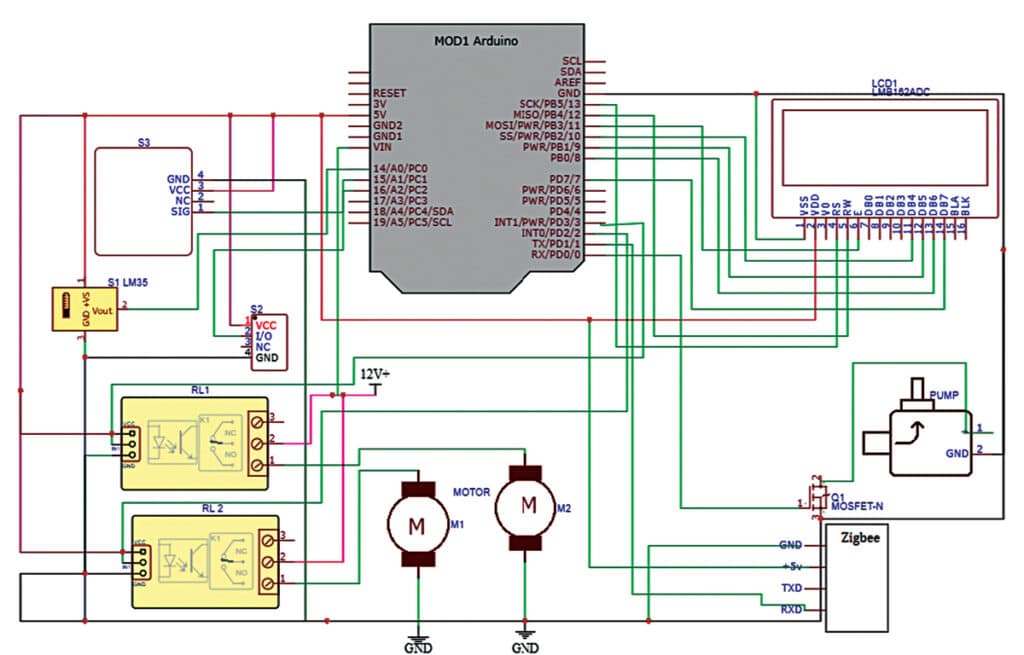
The circuit diagram of the coal mining safety robot is shown in Fig. 3. The circuit comprises an Arduino Uno board, Zigbee, temperature sensor, gas sensor, humidity sensor, relay, LCD, DC motor, MOSFET, pump, and a few other components.
DIY Coal Mining Robot – Code
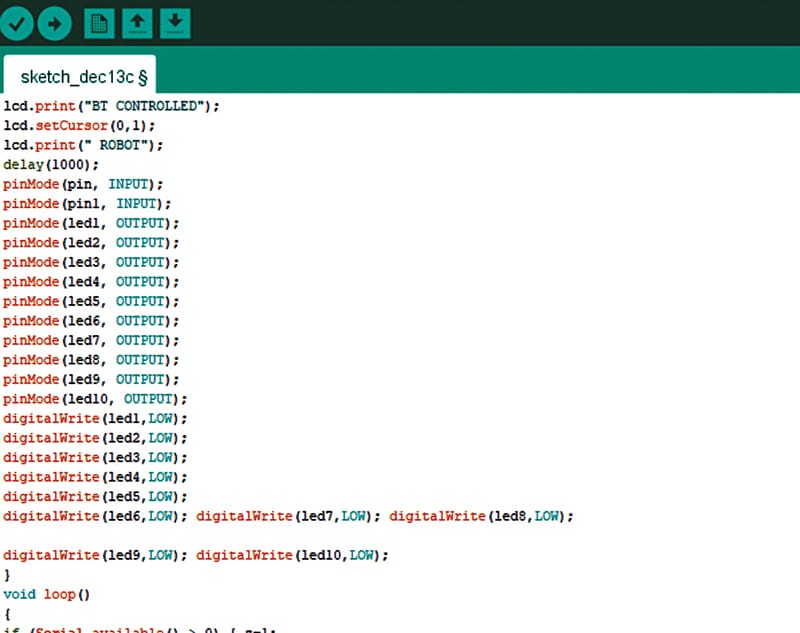
To prepare the code for the robot, open Arduino and declare variables and pin modes when the sketch starts. Each will power up by importing their libraries. Code’s first snippet is shown in Fig. 4.
Step-by-step Guide to Make the Robot
An overflow will occur for a millisecond so that the Arduino board begins running the current program. After setting the functions in the code, upload the code by selecting the right port and board to Arduino. Then connect the components according to the circuit diagram. Follow the steps mentioned below.
Step 1. Upload the source code to the Arduino Uno board.
Step 2. Complete the wiring of the project as per the circuit diagram shown in Fig. 3
Step 3. For the sensor’s reading, the sensor’s output is connected to an Arduino analog input. So, the Arduino will read the input data from the sensors like the humidity and temperature of the room.
Step 4. Convert the data read from the sensor into normalized data set to show the data as a percentage.
Step 5. Log into an SD card if you want to store data. (It is not compulsory) By using the SD library, we can keep our data like temperature and humidity on an SD card. The maximum capacity is 2GB for SD cards and 16GB for micro SD cards.
Step 6. We can also send data from the serial monitor to Arduino by entering text in our system. When we command Forward, it will move in the forward direction. Likewise, Backward, Right, and Left commands move it in backward, right, and left directions, respectively.
After correctly assembling the robot, as shown in Fig. 1, we may power the robot. The robot can now be controlled by sending commands using the serial terminal for forward, backward, and other movements set in code. The robot can now enter hazardous environments to provide various gas data.
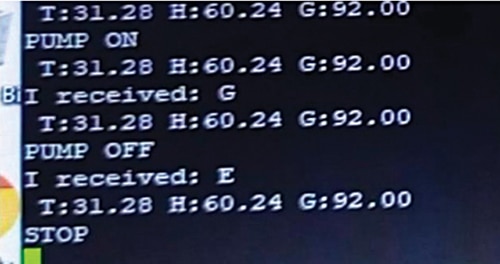
This robot provides the ambient temperature and detects any flame in the coal mine and extinguishes it. Using Zigbee wireless technology, the LCD connected to the robot shows the values of temperature, humidity, and gas presence in the coal mine. Fig. 5 shows the software commands on the LCD.
You can also check more such interesting DIY Electronics Projects
Dr. S. Rajan is a Professor in the Department of Electronics and Communication Engineering, at Velalar College of Engineering and Technology.


