


Python offers endless possibilities to unleash your creativity and enhance your programming skills. Let’s embark on this exciting journey and create unforgettable gaming experiences together!
Table of Contents

Have you ever wondered how video games are created? It is not as complicated as you might think. Presented here is a simple game called Bunnies and Moles, where the hero, the bunny, has to defend a castle against a horde of moles. We built this game using Python.
It is a popular embedded programming language used in Arduino, Raspberry Pi and others. This article aims to familiarise beginners with some Python libraries that can be implemented in embedded projects as well. Python is simple to start out with, fun and easy to learn.

Installing Python
To try this tutorial on a Windows PC, install Python 2.7.3 version (not 3.3.0). Run the installer, and you will get IDLE in All Programs folder in Start menu. Launch IDLE.
If you are using a Mac, you will already have Python installed. Open Terminal; once at Python prompt, to test if it is correctly working, type ‘print 1+1’ and hit Return. It should print 2. You have just written your first Python program!

Now that Python is working correctly, install PyGame to write a game using Python. PyGame is a Python library that makes writing games easy. It provides functionalities such as image handling and sound playback that you can incorporate into the game.
Download PyGame library for Python 2.7 version, PyGame installer appropriate for your system, from www.pygame.org/download.shtml
Running Python Code from File
If you want to work on a bigger program (like a game), you should save your code to a file so that you do not have to type it repeatedly.
There are several ways to run a Python program as a file. One way is to use a plain text editor like Notepad in Windows or TextEdit in Mac. Open a new text file, type in your Python code like print 1+1 and save it as xxx.py (xxx can be any descriptive file name).
On Windows, double-click this file to run it. On Mac, open Terminal and type Python, then drag the file that you saved in Terminal window and click Enter.
The other way is to type in your code using IDLE editor, which is what we do here. To run IDLE, type ‘idle’ on Terminal. Choose File\New Window from IDLE menu and you will get a text editor window where you can type in your Python code. Save your code via File\Save and run it via Run\Run Module (F5). Do note that, Run menu is only available if you have a file open in an editor window.
Adding Resources
You are almost ready to create game. But what is a game without some great graphics and sound effects? The graphics and sound effects required for this game have been included in the design.
Create a folder for your game on your hard disk and extract the resources folder into that folder so that your game folder has a sub-folder named Resources, with various resources grouped in the folders inside.
Software Development
Hello, bunny. Create a bunny image on the screen. Run IDLE, open a new text editor window and type the following code:
# 1-Import library
import pygame
from pygame.locals import *
# 2 – Initialize the game
pygame.init()
width, height = 640, 480
screen=pygame.display.set_mode((width,
height))
# 3 – Load images
player = pygame.image.load(“resources/
images/dude.png”)
# 4 – Keep looping through
while 1:
# 5 – Clear the screen before
drawing it again
screen.fill(0)
# 6 – Draw the screen elements
screen.blit(player, (100,100))
# 7 – Update the screen
pygame.display.flip()
# 8 – Loop through the events
for event in pygame.event.get():
# Check if the event is the X
button
if event.type==pygame.QUIT:
# If it is quit the game
pygame.quit()
exit(0)
Save the file in the game folder (the one where the resources sub-folder is) and name it game.py.
Now, let us go through the code section.
Import library(#1) imports PyGame library and allows you to use functions from the library in your program.
Initialize the game(#2) initialises PyGame and sets up the display window.
Load images(#3) loads the image that you would use for the bunny.
Keep looping through(#4) keeps looping over the following indented code.
Clear the screen(#5) clears the screen. Fill the screen with black before you draw anything.
Draw the screen element(#6) adds the bunny image that you loaded to the screen at x=100 and y=100.
Update the screen(#7) updates the screen.
Loop through the event (#8) checks for any new events; if there is one, and if it is quit command, exit the program.
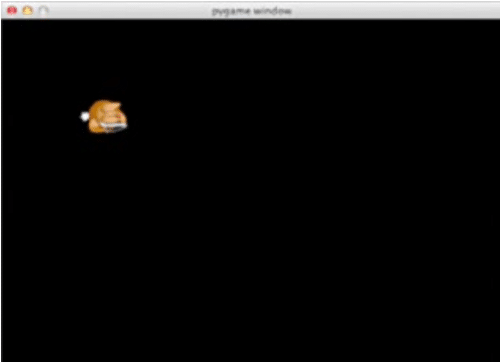
If you run the code now (via Run\Run Module in Idle menu), you would see a screen as shown in Fig. 1. W00t, the bunny, is on the scene and ready for action.
Add scenery
Add a background to the game scene, which can be done with some more screen.blit() calls.
At the end of load image section #3 above, after loading the player image, add the following code:
grass = pygame.image.load (“resources/
images/grass.png”)
castle = pygame.image.load (“resources/
images/castle.png”)
This loads the images of grass and castle, and puts these into specific variables. But if you check the grass image, you would notice that it does not cover the entire screen area, which is 640×480.
Add the following code to game.py at the beginning of draw the screen section #6 (before the player is drawn on the screen):
for x in range(width/grass.get_
width()+1):
for y in range(height/grass.
get_height()+1):
screen.blit(grass,
(x*100,y*100))
screen.blit(castle,(0,30))
screen.blit(castle,(0,135))
screen.blit(castle,(0,240))
screen.blit(castle,(0,345 ))
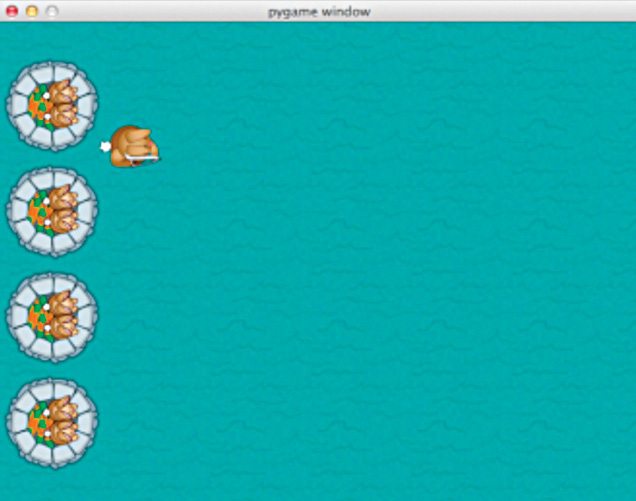
As you can see, the ‘for’ statement loops through x first. Then, within that loop, it loops through y and draws the grass at x and y values generated by ‘for’ loop. The next couple of lines draw castles on the screen. If you run the program now, you would get something like shown in Fig. 2.
Make the bunny move
Next, add some actual gameplay elements, like making the bunny respond to key presses. To do that, implement a method of keeping track of which keys are being pressed at any given moment. You can do this simply by making an array of key states that hold the state of each key you want to use for the game.
Add the following code to game.py at the end of initialise the game section #2 (after you set the screen height and width):
keys = [False, False, False, False]
playerpos=[100,100]
This code is self-explanatory. The keys array keeps track of the keys being pressed in the following order: WASD. Each item in the array corresponds to one key with particular action—first to W for up, second to A for left, S for down and D for right movement.
Playerpos variable is where the program draws the player (bunny).
You now need to modify the existing code for drawing the player to use the new playerpos variable. Change the following lines in draw the screen section:
screen.blit(player, (100,100))
to
screen.blit(player, playerpos)
Update the keys array based on the keys being pressed. PyGame makes key press detection easy by adding event.key functions.
At the end of loop through event section #8, right after the block checking for event, type pygame.QUIT. Put the following code at the same indentation level as pygame.QUIT block:
if event.type == pygame.KEYDOWN:
if event.key==K_w:
keys[0]=True
elif event.key==K_a:
keys[1]=True
elif event.key==K_s:
keys[2]=True
elif event.key==K_d:
keys[3]=True
if event.type == pygame.KEYUP:
if event.key==pygame.K_w:
keys[0]=False
elif event.key==pygame.K_a:
keys[1]=False
elif event.key==pygame.K_s:
keys[2]=False
elif event.key==pygame.K_d:
keys[3]=False
Check to see if a key is being pressed down or released. If the key being pressed or released is one of the keys you are using, update the keys variable accordingly.
Finally, update playerpos variable in response to the key being pressed. This is quite simple. Add the following code to the end of game.py (with one indentation level, putting it at the same level as ‘for’ loop):
# 9 – Move player
if keys[0]:
playerpos[1]-=5
elif keys[2]:
playerpos[1]+=5
if keys[1]:
playerpos[0]-=5
elif keys[3]:
playerpos[0]+=5
This code checks which keys are being pressed, and adds or subtracts from the player’s x or y position (depending on the key pressed) to move the player. Run the game and you would get a player just like before. Press WASD. Yay! It works.
Turn bunny with mouse
Your bunny can now move (up, down, left and right) when you press appropriate keys on the keyboard. But can you use the mouse to rotate the bunny to face the direction of your choice? It is simple to implement this using trigonometry. Take a look at the illustration in Fig. 3.
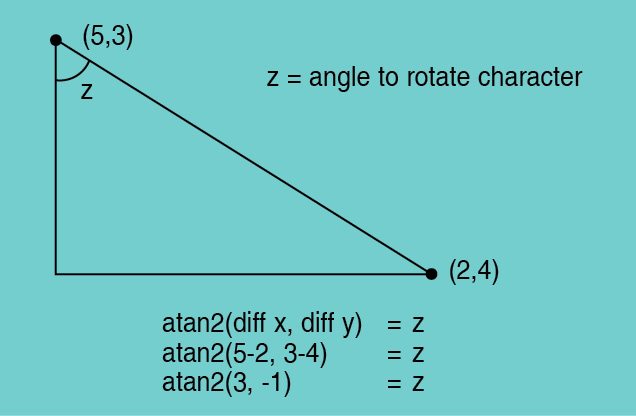
In the above image, if (5,3) is the position of the bunny and (2,4) is the current position of the mouse, you can find the rotation angle (z) by applying atan2 trigonometric function to the difference in distances between the two points. Of course, once you know the rotation angle, you can simply rotate the bunny accordingly.
You use this stuff all the time in game programming. To do this, use PyGame Surface.rotate(degrees) function. Keep in mind that z value is in radians. The atan2 function comes from Python Maths library.
Add this library to the import library section #1 first.
Replace the last line in draw the screen element section #6 (player.blit line) with the following code:
# 6.1 – Set player position and rotation
position = pygame.mouse.get_pos()
angle = math.atan2(position[1]-
(playerpos[1]+32),position[0]-
(playerpos[0]+26))
playerrot = pygame.transform.
rotate(player, 360-angle*57.29)
In the above code, first, get mouse and player positions and feed those into atan2 function.
Then, convert the angle received from atan2 function from radians to degrees (multiply radians by approximately 57.29 or 360/2p). Since the bunny will be rotated, its position will change.
Calculate the new bunny position and display the bunny on the screen.
Run the game again. If you use just WASD keys, then the game would behave exactly like before. But if you move your mouse, the bunny rotates, too.
Shoot, bunny, shoot!
Now that your bunny’s moving around, it is time to add a little more action. How about letting the bunny shoot enemies using arrows? This step is a bit more complicated because you have to keep track of all arrows, update, rotate and delete these when these go off screen.
Add the necessary variables to the end of initialisation section, section #2:
acc=[0,0]
arrows=[]
The first variable keeps track of the player’s accuracy and the second tracks all arrows. The accuracy variable is essentially a list of the number of shots fired and the number of moles hit. Later, we use this information to calculate an accuracy percentage.
Load the arrow image at the end of section #3 using the following:
arrow = pygame.image.load (“resources/
images/bullet.png”)
When a user clicks the mouse, an arrow should fire. Add the following to the end of section #8 as a new event handler:
if event.type==pygame.MOUSEBUTTONDOWN:
position=pygame.mouse.get_pos()
acc[1]+=1
This code checks if the mouse was clicked, and if it was, it gets the mouse’s position and calculates arrow rotation based on the rotated player position and the cursor position. This rotation value is stored in arrows array.
Draw arrows on screen. Add the following code right after section #6.1:
# 6.2 – Draw arrows
for bullet in arrows:
index=0
velx=math.cos(bullet[0])*10
vely=math.sin(bullet[0])*10
bullet[1]+=velx
bullet[2]+=vely
if bullet[1]640 or
bullet[2]480:
arrows.pop(index)
index+=1
for projectile in arrows:
arrow1 = pygame.transform.
rotate(arrow, 360-projectile
[0]*57.29)
screen.blit(arrow1,(projectile[1],
projectile[2]))
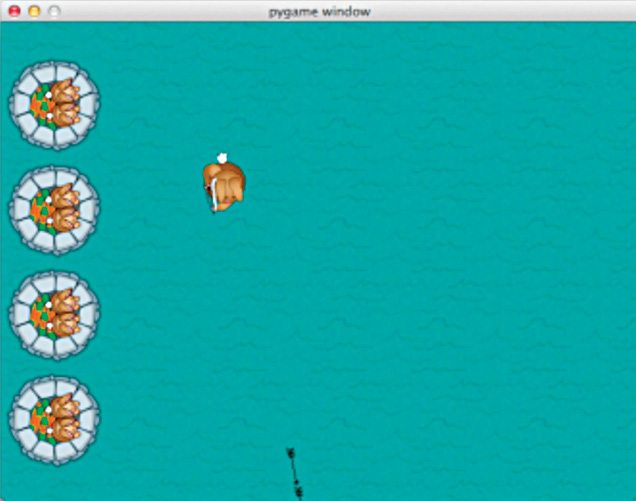
The vely and velx values are calculated using basic trigonometry. Ten is the speed of the arrows. The ‘if’ statement checks if the bullet is out of bounds and, if so, deletes the arrow. The second ‘for’ statement loops through the arrows and draws these with the correct rotation. Run the program; you would have a bunny that shoots arrow (Fig. 4) when you click the mouse.
Take up arms, moles!
You have a castle and a hero who can move and shoot. So what is missing? Enemies who attack the castle that the hero can shoot at!
In this step, you will create randomly-generated moles that run at the castle. There will be more moles as the game progresses. So let us see what you will need to do so. Add bad guys to a list of array. Update the bad guy array frame, show the bad guys on the screen.
Add the following code to the end of section #2:
badtimer=100
badtimer1=0
badguys=[[640,100]]
healthvalue=194
This sets up a timer (as well as a few other values) so that the game adds new moles after some time has elapsed. Decrease all badtimer frames until these reach zero to release a new mole.
Add the following to the end of section #3:
badguyimg1 = pygame.image.
load(“resources/images/badguy.png”)
badguyimg=badguyimg1
The first line above is similar to all the previous image-loading codes. The second line sets up a copy of the image so that you can animate the bad guy much more easily.
Update and show the bad guys. Add the code given below after section #6.2:
# 6.3 – Draw moles
if badtimer==0:
badguys.append([640, random.
randint(50,430)])
badtimer=100-(badtimer1*2)
if badtimer1>=35:
badtimer1=35
else:
badtimer1+=5
index=0
for badguy in badguys:
if badguy[0]<-64:
badguys.pop(index)
badguy[0]-=7
index+=1
for badguy in badguys:
screen.blit(badguyimg, badguy)
The first line checks if badtimer is zero, and if it is, creates a mole and sets up badtimer again based on the number of times badtimer has run so far. The first ‘for’ loop updates x position of the moles, checks if moles are off screen and removes these if so.
The second ‘for’ loop draws all moles. In order to use the random function in the above code, import the random library. Add the following code to the end of section #1:
import random
Add the following after the while statement (section #4) to decrement the value of badtimer for each frame:
badtimer-=1
Run the program. Now you would start seeing some real gameplay—you can let the bunny shoot, move and turn, while the moles try to run towards him (Fig. 5).
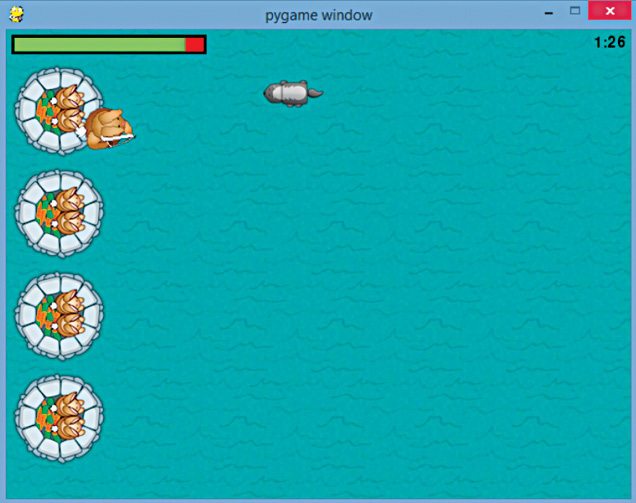
But wait! Why are the moles not blowing up the castle? Add the code given below before index+=1 on the first for loop in section #6.3:
# 6.3.1 – Attack castle
badrect=pygame.Rect(badguyimg.get_
rect())
badrect.top=badguy[1]
badrect.left=badguy[0]
if badrect.left<64:
healthvalue -= random.randint(5,20)
badguys.pop(index)
# 6.3.3 – Next bad guy
The first line checks if badtimer is zero, and if it is, creates a mole and sets up badtimer again based on the number of times badtimer has run so far. The first ‘for’ loop updates x position of the moles, checks if moles are off screen and removes these if so.
The second ‘for’ loop draws all moles. In order to use the random function in the above code, import the random library. Add the following code to the end of section #1:
import random
Add the following after the while statement (section #4) to decrement the value of badtimer for each frame:
badtimer-=1
Run the program. Now you would start seeing some real gameplay—you can let the bunny shoot, move and turn, while the moles try to run towards him (Fig. 5).
But wait! Why are the moles not blowing up the castle? Add the code given below before index+=1 on the first for loop in section #6.3:
# 6.3 – Draw moles
if badtimer==0:
badguys.append([640, random.
randint(50,430)])
badtimer=100-(badtimer1*2)
if badtimer1>=35:
badtimer1=35
else:
badtimer1+=5
index=0
for badguy in badguys:
if badguy[0]<-64:
badguys.pop(index)
badguy[0]-=7
index+=1
for badguy in badguys:
screen.blit(badguyimg, badguy)
If the moles’s x value is less than 64 to the right, then delete that bad guy and decrease the game health value by a random value between 5 and 20.
If you build and run the program, you would get a bunch of attacking moles who vanish when they hit the castle. Although you cannot see it, the moles are actually lowering your health.
Collisions with moles and arrows
The moles are attacking your castle. It is time to set the arrows to kill the moles so you can safeguard your castle and win the game. Basically, loop through all the bad guys and inside each of those loops, loop through all the arrows and check if these collide. If they do, then delete the moles and the arrow, and add one to your accuracy ratio.
Right after section #6.3.1, add the following:
#6.3.2 – Check for collisions
index1=0
for bullet in arrows:
bullrect=pygame.Rect(arrow.get_rect())
bullrect.left=bullet[1]
bullrect.top=bullet[2]
if badrect.colliderect(bullrect):
acc[0]+=1
badguys.pop(index)
arrows.pop(index1)
index1+=1
If you run the program, you should finally be able to shoot and kill the moles.
Add a HUD with health meter and clock
Now all you need is a way to keep score and to show how well the bunny is doing. The easiest way to do this is to add a heads-up display (HUD) that shows the current health level of the castle. You can also add a clock to show how long the castle survived.
Add the clock and add the following code right before the beginning of section #7:
# 6.4 – Draw clock
font = pygame.font.Font(None, 24)
survivedtext = font.render(str((90000-
pygame.time.get_ticks())/
60000)+”:”+str((90000-pygame.time.
get_ticks())/1000%60).zfill(2), True,
(0,0,0))
Next, add the health bar. But before drawing that, load the images for the bar. Add the following code to the end of section #3:
healthbar = pygame.image.load
(“resources/images/healthbar.png”)
health = pygame.image.load(“resources/
images/health.png”)
The first is the red image used for the full health bar. The second is the green image used to show the current health level. Add the following code right after section #6.4 (that you just added) to draw the health bar on the screen:
# 6.5 – Draw health bar
screen.blit(healthbar, (5,5))
for health1 in range(healthvalue):
screen.blit(health, (health1+8,8))
The code first draws the all-red health bar. Then, it draws a certain amount of green over the bar, according to how much life the castle has remaining. If you build and run the program, you would have a timer and a health bar.
Win or lose
You need some sort of a win or lose scenario to make the game worth playing. Do this by exiting out of the main loop and going into a win or lose loop. In this loop, figure out if the user won or lost, and display that on the screen accordingly.
Add the following lines to the end of game.py:
#10 – Win/Lose check
if pygame.time.get_ticks()>=90000:
running=0
exitcode=1
if healthvalue<=0:
running=0
exitcode=0
if acc[1]!=0:
accuracy=acc[0]*1.0/acc[1]*100
else:
accuracy=0
# 11 – Win/lose display
if exitcode==0:
pygame.font.init()
font = pygame.font.Font(None, 24)
text = font.render(“Accuracy:
“+str(accuracy)+”%”, True, (255,0,0))
textRect = text.get_rect()
textRect.centerx = screen.get_rect().
centerx
textRect.centery = screen.get_rect().
centery+24
screen.blit(gameover, (0,0))
screen.blit(text, textRect)
else:
pygame.font.init()
font = pygame.font.Font(None, 24)
pygame.display.flip()
The first ‘if’ statement checks if the time is up. The second checks if the castle is destroyed. The third calculates the accuracy ratio. After that, a quick ‘if’ statement checks if you won or lost, and displays the correct image.
Note
The acc[0]*1.0 is just converting acc[0] to a float. If you do not do this, the division operand will return an integer like 1 or 2 instead of a float like 1.5.
If you want to display images for the win and lose screens, then those images have to be loaded first. To do so, add the following code to the end of section #3:
gameover = pygame.image.load(“resources/
images/gameover.png”)
youwin = pygame.image.load(“resources/
images/youwin.png”)
Change section #4 to:
# 4 – keep looping through
running = 1
exitcode = 0
while running:
badtimer-=1
The running variable checks if the game is over and the exit code variable tells whether the player won or lost.
Gratuitous music and sound effects. PyGame makes loading and playing sounds simple. First, initialise the mixer by adding the following at the end of section #2:
pygame.mixer.init()
Then, load the sounds and set the volume level at the end of section #3.
# 3.1 – Load audio
hit = pygame.mixer.Sound(“resources/
audio/explode.wav”)
enemy = pygame.mixer.Sound(“resources/
audio/enemy.wav”)
shoot = pygame.mixer.Sound(“resources/
audio/shoot.wav”)
hit.set_volume(0.05)
enemy.set_volume(0.05)
Most of the above code is simply loading audio files and configuring audio volume levels. But, pay attention to pygame.mixer.music.load line. It loads background music for the game and the next line sets the background music to repeat forever.
This takes care of the audio configuration. Play various sound effects as needed. Do that as per the directions in the comments for the code given below:
# section 6.3.1 after if badrect.
left<64:
hit.play()
# section 6.3.2 after if badrect.
colliderect(bullrect):
enemy.play()
# section 8, after if event.
type==pygame.MOUSEBUTTONDOWN:
shoot.play()
You now have background music and sound effects for collisions and shooting, and the game is much more alive.
Where to go from here
You have just finished creating a fun game packed with music, sound effects, a killer bunny, kamikaze moles and more. At this point, feel free to modify this game. May be, replace the art with your own drawings, or add different weapons or types of monsters into the game.
Testing the Game
Before running the game, install library file pygame-1.9.1.win32-py2.7. Make sure the resource files and game.py are in same folder. Then, click on game.py file and the game will automatically start. Use your mouse to shoot ithe moles.
Download source code
Feel interested? Check out other software projects.
This article was first published on 13 December 2016 and was updated on 23 October 2024.
Hello..
how to write a code to start over this game
thanks
The code is given within the article.
it works for Python 3 ?
yeah its works for python3
hello,
from where should i take resources??
The resources are present at the end of the article.
In line 52 type error is occurred
Please resolve my issue ?
What is the exact error message? Please check proper syntax, spelling and indentation in the code.
hi i have created a pong using python code and pycharm IDLE
but i dont know to use except in pycharm after running and testing
how can run game normaly without opening pycharm
I keep getting a syntax error about a number.
Kindly elaborate your query.
I typed in the code where it said to draw arrows. The code kept getting an invalid syntax over the number ‘640’.
Something is up with the formatting.
Kindly elaborate your query.
In the program, it kept saying that the spaces were inconsistent in this code:
for badguy in badguys:
if badguy[0] <- 64:
badguys.pop (index)
badguy[0] -= 7
index += 1
it do not work
Kindly elaborate.
# 3 – Load images
player = pygame.image.load(“resources/images/dude.png”)
it says invalid character in identifier.
that means it cant acess the resource folder
make sure the resource foldar and the and your python filr are in the same folder
Delete this line and retype the code again by maintaining correct indentation
I keep getting eol while scanning string literal