


Today, we’re going to build a smart gps tracker using Arduino that can help you keep tabs on your child’s location – and as a bonus, it can also be used for tracking vehicles or other valuable items.
As parents, ensuring the safety of your child is always a top priority. Questions like ‘Has my child safely reached school?’, ‘Are they home alone?’, or ‘Are they at the playground with friends?’ often flood your mind when you’re away from them.
But what if you could have peace of mind by tracking their location in real-time using GPS?


Table of Contents
Essential Components for DIY GPS Tracker
- GPS Module
- Arduino Nano
- SIM800L
- 2G SIM card
- OLED Display
- Small 3V battery
- Wires
Key Setup Steps Before Building Smart GPS Tracker
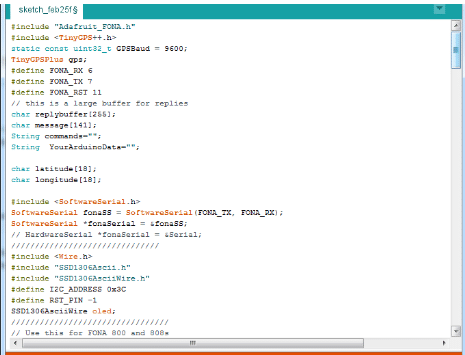
First, install the necessary libraries: ‘Tiny GPS++’ and ‘FONA’ in the Arduino IDE. To do this, go to Tools → Library Manager → search for the required libraries → install them.
Step-by-Step Code Guide
In the first part of the code, initialize the libraries. Next, create variables to store the message, GPS location, and other necessary data. After that, define the pins for the GPS module and SIM800L module.
Then, create the setup function where you set the baud rates for the SIM800L and GPS modules to 4800 and 9600 respectively for serial communication.
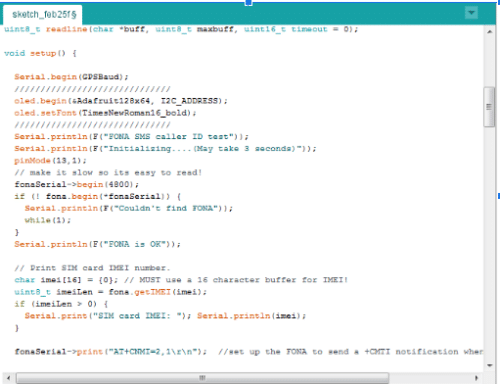
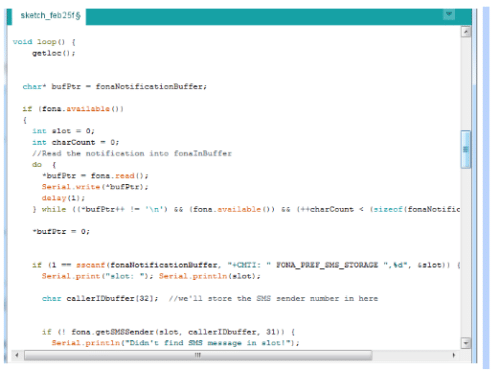
In this step, we’ve created a loop function to check if an incoming message has been received by the SIM800L module. If a message is received, it is converted into a readable string.
The function checks if the message contains the ‘get location’ command. If it does, the collected GPS data will be sent back to the requesting device.
Within the same loop function, the getLocation() function is called, which continuously updates the GPS data and returns the results to the loop function.
Smart GPS Tracker Circuit
Now, connect the components as shown in the diagram below:

Arduino based GPS Tracker – Testing
Power the device with a battery and wait for a few minutes for it to initialize. Once ready, you can begin using it.
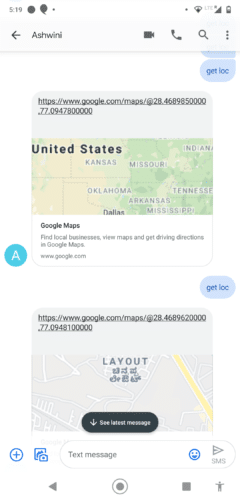
To use, simply send the message ‘get location’ to the smart device, and you’ll receive a response with the location URL, which you can view on Google Maps.
As we wrap up this exciting journey of creating a smart tracker with Arduino, we hope you feel empowered to explore even more innovative Arduino projects.
This device not only enhances the safety of your loved ones but also opens the door to a world of possibilities in tracking and monitoring various objects.
Your creativity knows no bounds!
We encourage you to share your thoughts, questions, or even your own experiences in the comments below. Your insights can inspire others and contribute to our vibrant community of makers.
So, let’s keep the conversation going and make technology work for us!
Wow..
Thanks
How can we download the code Sir/Madam?
Code is attached at the bottom of page you can download directly.Just click on the “Code” written in DEEP Red color
I need more information Arduino led dot matrix scrolling display
Yes you can read these article for reference.
Article 1.
Article 2.
Good evening,
I have a project for my Baschelor that deals with the same subject and I really need your help. I’m begging you. Here’s my email. You can write me so we can exchange ideas.
I would really appreciate it if you can help me.
017687888597
Thank you in advance
Very good for learners
Thank you for your feedback.
Good evening,
I have a project for my Baschelor that deals with the same subject and I really need your help. I’m begging you.
Here’s my email. You can write me so we can exchange ideas.
I would really appreciate it if you can help me.
Thank you in advance
004917687888597 (Watzap)
Lukas
Yes, why Not ?? What Type of help do You need? ask me on mail [email protected]
Hello, I have a lot of doubts regarding this project. Could I please have your contact details. It’s really urgent.
What doubt can you elaborate on, You ask doubt here in comment or what’s app me on 7061350809
Hello, Source code attached to this article is not available right now . Can you please have a look about this issue?
Hi Nagashree, please click the mobile version of the website from the end of the page and redownload.
How is the resolution? I want to do a in-home GPS device.
It depends on the GPS module. It is good for outdoor use in-home the GPS module takes a lot of time to get Position. Resolution is good up to 4 decimal points in lat and long
Hi, I have done a project similar to yours.
I cannot find a network with my module, kindly suggest the possible solution.
Power on your device and module and let it keep on for more than 6 to 7 hours and also try to get it in open space either in the garden or outside your house if it gets the FIX sat location then the red led start blinking and you will get the location.
how to make server for this using php myadmin
can u please the Liberary named TinyGPS++.h
I didn’t get this Liberary in web
Here is link for liberery
http://arduiniana.org/libraries/tinygpsplus/
from where i can get hardware can you help please ….
https://www.kitsnspares.com/
how far can this gps go? when tracking?
can you elaborate
Is gsm and gps both used in this project?
Why do we need an OLED display?
yes
MY GSM MODEM IS NOT RECIVING SMS “get loc”….can tou help me out
Check your sim card in 2G network and also check the sim card on the phone that it is receiving SMS. Then check the SIM card memory and delete all the SMS in the card if sim card memory is full it will not receive
Mam ,is 4G Sim will work for this tracking or not mam
No only 2g sim will work
I WANT TO ASK..IS IT SIM AT SIM800L SAME WITH SIM ON THE PHONE?
The sim card you need to use is the same sim card used in the phone but it must also support the 2G cards.
it means .. i need to use 2 simcard .. one in the phone..and one in project ? macam pula dengan rangkaian..what types of rangkaian..using umobile simcard can?
hi admin, i want to save local in server, can you help me
Kindly elaborate your query.
when “get location” we will get the address to device. can admin get the address to sever?
Hi! I would like to refer to this project to build a remote gps tracker of our own! I was wondering if this setup/circuit connections would work if I were to use a SIM900A mini GSM module? Also in this project, for what component do you use the 3V battery?
3,7V battery used to power the SIM800L Module. Sim900A will also work but might need some changes in code.
we have to use SIM800L with antenna or without antenna
Yes, without antenna, network coverage in my area is good but if you face a problem in network coverage you have to add antenna.
can i have your email or number .. easy to me to contact you…bcs i use your project as my final year project…please madam
Hi, you can contact us at [email protected].
act admin use arduino nano or uno in this project .?
bcs at hardware arduino uno ..then in video arduino uno
whch one
Arduino Uno, Nano, Mini all work for this project without changing any single line in code and connection.
I have used Arduino Uno to test it as a pin connection using Jumper wire is easy. If you need your device looks small and compact you can use nano, mini
Hy,
I have my final year project on iot , ardiuno . I have to make a gas leakage detector that sense gas and send an email , an alarm system and GpS tracker that give location in email also.
Can you please guide me which devices will be used in this . Pleaseee
ok , Do you need me to make a DIY on this and publish it for your reference.
Hi! Thanks a lot!
I have a question. Can the device share the location automatically without any “get loc” message? Maybe each minute or when it’s turning on? Or when someone press a buttom in the device?
Regards.
yes you cand do some change in code and add this function
Oh great! One more question.
Which SIM card works? Where can I found it?
Thanks a lot!
Regards.
Any 2G compatible sim card will work for this.
Great! And the display is necessary or It can work without?
Thanks again.
what do you connect the battery up to?
Yes, it works without a display as well.
i click at code . has 2 code which is ( final code simple & gps final 2 ).. which one coding use in this project
Hello is there anyone I can contact to get some help with the code?
You can send an email to [email protected]
Hi, I did this project at home but it doesn’t works. The red led in SIM module turns on but in the GPS module doesn’t works. All the elements are new and funtional. I check the connections and the code, but it still not working. Can you help me please? Thank you
Check the Gps Module, Some GPS module takes time for first-time position fixing. Try put the GPS module in open space or at least near the window and wait until the GPS module LED to indicate the Position-fixing is done
Mam ,I have chosen this project as my mini project .Can u please tell me the working and limitations of this tracker and ,is it works efficiently or not ???
Its limitations is you have to send message every time when you want to get location. Also for good GPS tracking you have to use better GPS modue that can catch location even indoor
dear where we can add our phone number in code . when sim card is inside the sim800l module?
I need your help.
Can’t download the code,
the red “CODE” is not clickable
Can you help me out?
it is clickable I have rechecked it. Try from another device like a smartphone
Hello .. Good night
I speak of Brazil.
I would like to carry out this project but without using the oled display.
What changes do I need to make to the code?
It will work without OLED as well remove the OLED part of the code, or just leave whole code don’t connect it the project will work.
Hello.
Congratulations, really good work!
What’s exactly the GPS Module, on this implementation?
UBlox Neo 6m
Ubblox Neo 6m
What is the interface used here?
Can you elaborate? For GSM and GPS we have used USART
hi admin, can we use a 4g sim to do such task instead of a 2g sim as they are no longer available on market.
any idea, airtel or another local network will support this they still have 2g towers
how ever you can use different GSM module having 3g or 4g support
use SIM900A support 4G
Cloud services/modules used is?
The module used is Neo 6MGPS. No cloud services used it based on SMS whenever you message “get locn” to the device it will reply with a link containing the location on google map
how u put your number phone in coding to send a sms
The location is sent to the number who send the specific code message getLOC or any other coded message of your choice
Sir instead of sending sms I want to make it in an application like Google map showing location live how can I ????
Two way one is to use google Maps API but you need a good microcontroller or SBC like raspberry pi for that. Another one is you can update the location data and transfer using services like a mosquito, Thingspeak, google cloud.
I have a problem ;
My oled display keeps showing “Couldn’t find SIM”
Why is that ? I have insert it on SIM800l module and the network is working..
check its 2g sim and registered on 2g network.use font library example with AT command to check Simcard status
can you provide me synopsis for this project ?
The article consists of all details of the project if the face in making and connection please let me know. synopsis you can create yourself
can I replce the GSM 800L to GSM 900A .. should i chnge the code ?
if yes .. which part should i change ?
if yes .. which part should i change ?
Check the default baud rate of sim800l and change in code. I am not sure if the sim900l works as I havn’t tasted the project with that but it should worl as both work on serial port and also use almost same AT commands
both of GSM use baud rate 9600 .
can i get your contact ? easily to ask about coding
yes, send me what help you need on whats app 7061350809
sir .. if I want to run this project without usb .. can I replace it with battery 9v?
Yes , You can add 5v battery
it will be fine using 9v? i don have 5v battery
Arduino able to hold 9v because it have regulator but sim 800l and GPS module can’t hold 9v.
thnkyou so much for your fast respons
can u help me how to check consistency of gps module ?
The code given in related to arduino balance
Can You elaborate? I have rechecked the code downlding and is GPS tracker code
Hello my friend.
I download your code. I have already connected all the modules in my Arduino Nano, as you show before (Fig. 4). The code uploaded in Arduino. But when i open the Serial Monitor, shown that it find the SIM Module, but i’m getting this error here “No GPS detected: check wiring.”
Can you help my please?
Thank you in advance!
Hello, I can’t get the attached code
Kindly refresh the page and retry
Hello, The source code attached to this article is not available right now. Can you please have a look about this issue?
Hi Rakshitha, please click the mobile version of the website from the end of the page and redownload.
Thank you
You are most welcome.
Hi, I’m new for making this project. I understand all the codings etc, But one thing i can’t understand is when i use my simcard and put it in to module what simcard im gonna use to get the location? Please reply asap. This is my first project if i understand this this is the good start for me. Thanks
And also if i need to contact someone, Do you have email to contact for this project.
Another thing i want to ask, How about the routing from map i want to see when i get the location. Like when i get location i see all dots from the like having a route did you know what i mean? Thankyouu so much