
Smart presentation pointers are readily available in the market but are expensive. Here is a simple, easy-to-build, inexpensive and infrared (IR)-based smart slide pointer using Arduino Leonardo.
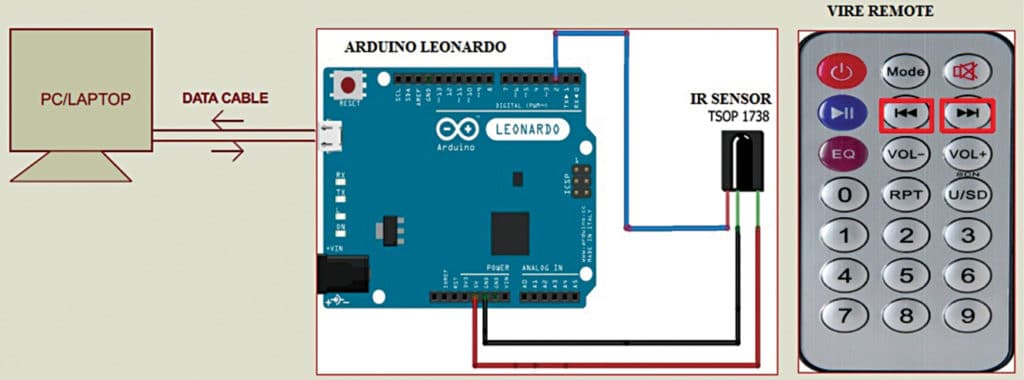
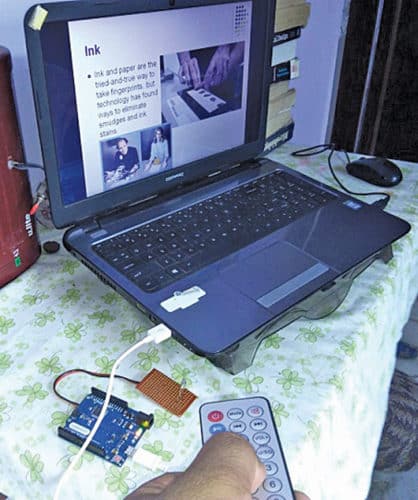
Slide presentations using PowerPoint can be frustrating because you may need to click the mouse to navigate. This IR remote-based slide pointer looks ergonomic when compared to a mouse or arrow keys on the keyboard. The block diagram of the smart slide pointer is shown in Fig. 1. The author’s prototype is shown in Fig. 2.
Circuit and working
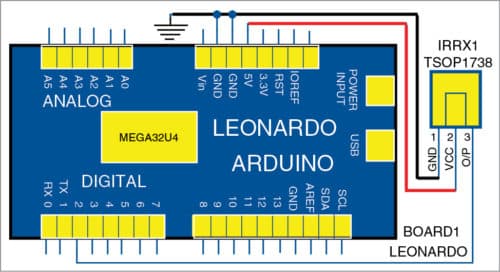
The circuit diagram of the smart slide pointer is shown in Fig. 3. It is built around Arduino Leonardo (Board1), IR sensor TSOP1738(IRRX1) and remote control.
Connections are simple. Connect GND pin of the sensor to GND pin, Vcc pin to 5V pin, and O/P pin to digital pin 2 of Arduino Leonardo, respectively, as shown in Fig. 3.
To download the source folder: click here
Arduino Leonardo
This board is based on ATmega32u4 microcontroller (MCU). It has twenty digital input/output (I/O) pins (of which seven can be used as PWM outputs and twelve as analogue inputs), 16MHz crystal oscillator, micro-USB connection, power jack, ICSP header and reset button.

It contains everything needed to support the MCU; simply connect it to a computer with a USB cable or power it with an AC-to-DC adaptor or battery to get started. Arduino Leonardo differs from all preceding boards—in this board ATmega32U4 has inbuilt USB communication, eliminating the need for a secondary processor.
The software
Circuit operation is done through the software program loaded into the internal memory of Arduino Leonardo. The program/sketch is written in Arduino programming language. Arduino IDE 1.6.4 is used to compile and upload the program. ATmega32U4 on Arduino Leonardo board comes with a pre-programmed boot loader that allows you to upload a new code to it without using an external hardware programmer.
The sketch is at the heart of the system and carries out all major functions. Program coding is divided into two parts. In the first part, the program decodes the keys/buttons that you want to use from your TV/MP3 remote. You will be able to decode the IR signal transmitted by each button from the remote.

In the second part, each decoded signal obtained from the first part is assigned to a particular function to be used in the slide pointer application.
In the first part, IR_decoder.ino code is used. Whereas, in the second part, ppt_pointer.ino code is used.
IR_decoder.ino is used for decoding the keys of the remote control.
Decoded keys are used in ppt_pointer.ino code in the second part, where each key is assigned to a particular function. It is uploaded to Arduino Leonardo for the slide pointer application.
To run the above-mentioned source codes, you need software libraries like Arduino universal IR remote (IRremote.h) and keyboard (Keyboard.h) header files. Download the libraries and install them on the PC at correct locations/folders. You may download header files from GitHub website. Do not forget to follow the installation procedure given on github.com
Download source code
Construction and testing
Connect Arduino to the PC and select the correct COM port in Arduino IDE. Select the correct board from Tools->Board menu in Arduino IDE and upload the programs to Arduino.
For first part, upload IR_decoder.ino code to Arduino. Connect the circuit as shown in Fig. 1. MP3 Vire (21-key) remote was used during testing. Compile and upload the code to Arduino.
Now, point the remote control towards the IR sensor and press any button—the onboard LED of Arduino will blink. Open serial monitor window in Arduino IDE and press any key on the TV/MP3 IR remote.
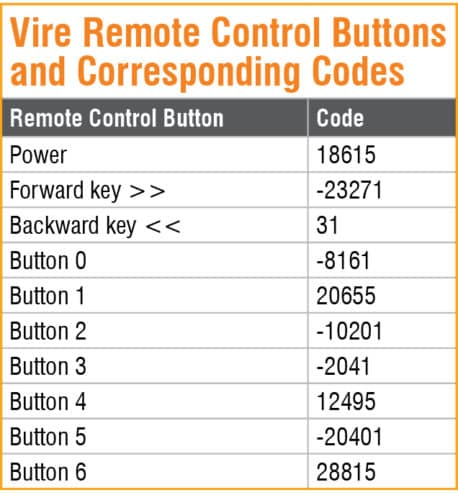
If everything is alright, when you press a button, you should see a corresponding number on the serial monitor. Each button has a unique corresponding key code, as listed in the table above. Note down the codes and buttons, as these will be used in ppt_pointer.ino code in the second part as explained earlier. (You can use any IR remote and decode the key/button codes using this program.)
Any key of the remote control can be used for pushing the slides forwards or backwards. During testing, >> (forwards) and << (backwards) buttons of the remote were used. Decoded forward key is -23271 and backward key is 31.
After uploading ppt_pointer.ino code to Arduino Leonardo and connecting the sensor, the smart IR pointer will be ready to use.
Open the presentation file with Microsoft PowerPoint or Presentation from Open Office or Libre Office. Open Slide Show page. Every time you press >> key from your MP3 Vire remote, the slide will move forwards and, similarly, on pressing << key, the slide will move backwards.
Pamarthi Kanakaraja is assistant professor in ECE department, KL University, Vaddeswaram, Andhra Pradesh


