




Ever since it was realized that human beings are the greatest polluters of the only home, the Earth, which is nothing but a “pale blue dot” among the countless celestial bodies as seen by Voyager-1 from 5 billion kilometres away in the heliosphere, it has become clear that greater responsibility than ever is needed to protect it.
The “protect the environment” initiative begins in homes each morning when wet waste is placed in one side of the bin and dry or recyclable waste in the other, so that the trash can be treated properly at the processing plant. Earlier, in developing countries, this segregation was not given much importance. However, with the introduction of the G7’s environmental policies, the Net-Zero drive, and other global initiatives, every nation was urged to adopt sustainable waste management practices.
India, being a responsible nation, has long embraced this idea. In almost every household, dual-compartment bins—or two separate bins—are now used for waste segregation.

Now, imagine trash bins that are intelligent enough to recognize the type of waste placed in them—instantly identifying whether it is wet, dry, or unknown—and then automatically opening the correct compartment to receive it. That is the inspiration behind this project.
The system intelligently detects, selects, and sorts the trash into the correct bin using machine vision and smart automation.
Hardware Setup
The Sipeed MaixCam is a compact AI-focused microcontroller originating from China. Detailed information about the board is available on the official Sipeed Wiki website. Although the website is primarily in Chinese, modern translation tools such as Google Translate can be used to navigate and understand its content effectively.

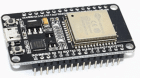
The ESP32 is set up through the Arduino IDE or PlatformIO, making it easy to programme and integrate with other hardware components. It serves as the actuation and control unit, receiving classification data from the MaixCam via UART and driving mechanical components such as servos, actuators, and relays. The ESP32’s built-in Wi-Fi and Bluetooth support also allows future upgrades for wireless monitoring or cloud-based data logging
Working Principle
The Python-based programme on the MaixCam analyses each detected object and sequentially processes it through two AI models—first the MobileNetV2 classifier, followed by the Kitchen Model. The combined outputs of these models are then evaluated to determine the object’s category among three possible classifications: Dry, Wet, or Unknown.
Each classification corresponds to a coded word—”DRY”, “WET”, or “UNK”—which is transmitted to the ESP32 via a fast and reliable UART communication link.
Once the ESP32 receives the classification result, it initiates the mechanical sequence. It first commands the linear actuator to lift or lower the wait plate, depending on whether the sorting cycle is beginning or ending.
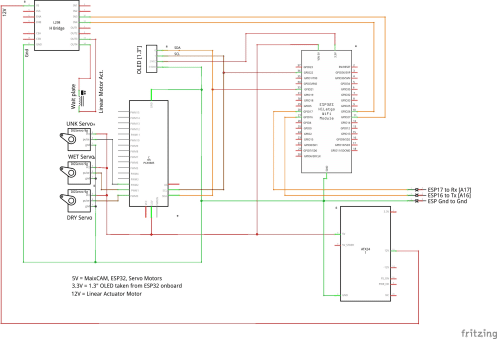
A PCA9685 servo driver board is used to control the sorting mechanism. It can drive up to 16 servos simultaneously through the I²C interface of the ESP32.
Based on the received classification, the ESP32 activates the corresponding servo to open the appropriate bin lid, allowing the waste to slide automatically into the correct compartment. For multi-bin systems or advanced segregation designs, servo groups can also be activated together to achieve more complex movements.
Controlling the servo motors from the ESP32 is straightforward using dedicated library files and standard PWM control. The linear actuator is controlled using an L298N H-bridge with just two GPIO control pins.
The operational cycle begins at the MaixCam for object detection, transitions to the ESP32 for mechanical actuation, and then returns to the MaixCam, where it waits for the next piece of trash to appear.
A process flow block diagram is shown below.
Start [MaixCam] → Trash Detected [MaixCam] → “DRY”/”WET”/”UNK” transmitted to ESP32 over UART [MaixCam] → Linear Actuator Moves Up [ESP32] → Wait Plate Lifts [ESP32] → Servo Activates [ESP32] → Bin Lid Tilts [ESP32] → Trash Sorted into Bin [ESP32] → Linear Actuator Moves Down [ESP32] → Wait Plate Returns [ESP32] → Top Lid Closes [ESP32] → Waits for Next Trash [MaixCam]
Bill of Materials
- MaixCam – 1
- Servo Motors – 3
- Linear Motor Actuator, 100 mm travel – 1
- ESP32 – 1
- L298N H-Bridge Motor Driver – 1
- I²C PCA9685 Servo Driver Board – 1
- 12 V and 5 V Power Supply
- Wires, Links, and Switches
Schematic diagram
Bin Pot Design
The bin assembly consists of a circular outer body internally divided into three compartments designated for Dry Waste, Wet Waste, and Unknown Waste, each spaced 120° apart using stackable bin containers.
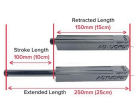
A circular wait plate is mounted on top, supported by a 50 mm central helical spring that allows it to tilt in any direction when pulled. The spring is seated on a 12 V linear actuator (0–100 mm stroke) positioned vertically at the centre.
Beneath the spring-mounted plate are three servo motors, also spaced 120° apart and fixed around the base of the spring. Since the linear actuator provides a 100 mm lift, the three waste compartments are positioned such that their top openings lie 100 mm below the fully raised wait plate, or 50 mm below the spring base plate.
In the normal (closed) position, when the actuator is fully retracted, the wait plate rests on the rim of the bin, covering all compartments and preventing access from outside. When waste is placed on the plate and a valid type of trash is detected, the actuator extends, lifting the wait plate upward by 100 mm. The corresponding servo motor then activates, tilting the plate towards the appropriate bin and allowing the waste to slide naturally into that compartment.
Each servo controls one waste section—Dry, Wet, or Unknown—by pulling the plate slightly towards its designated direction to guide the waste efficiently.
This configuration provides a simple, compact, and reliable mechanical solution for automated waste segregation. The bins can be made stackable, allowing easy removal and replacement when full.
A schematic diagram of the system is shown below.
A 100 mm travel linear servo can also be used in place of a linear actuator. However, the linear actuator has been selected because of its lower cost compared to a linear servo. A linear actuator is essentially a motor driving a long threaded shaft, which moves a nut forwards or backwards depending on the direction of motor rotation. It is an inexpensive yet sturdy and effective solution for bin control. The linear actuator is driven using an L298 H-bridge motor driver and two GPIO pins.

Enhancement
The project can be enhanced further by adding three Ultrasonic SR04 or VL53L0X (ToF) sensors below the wait plate to measure the height of the empty space in each bin. This information is processed by the ESP32. If any bin becomes full, the system can sound an alarm or flash a red indicator.
Connecting and Setting Up the MaixCam
To get started, download the latest MaixCam operating system from the release page. However, in most cases, the board is supplied with an operating system already installed. In such cases, the board only needs to be connected to a computer. There are three main methods of connecting the board:
- USB direct connection
- SSH
- MaixVision IDE for a more visual and integrated experience
For operating system installation, either open the back cover of the board, remove the SD card, write the operating system image to the card, and then reinsert it, or perform the installation without opening the enclosure by pressing the user button while connecting the USB cable to the computer. The user button may need to be pressed several times until the MaixCam appears as a USB drive labelled “boot” in My Computer.
Use balenaEtcher, or any similar software, to transfer the operating system image to the MaixCam drive. Once the transfer is complete, disconnect the USB cable and power the MaixCam again. The TFT display will show the start-up screen. From the touchscreen, open Settings, select Wi-Fi, scan for the desired network, and connect using the appropriate password.

After connecting to Wi-Fi, the MaixCam may prompt for the installation of the MaixPy Runtime. Follow the on-screen instructions to complete the installation. Once installed, the remaining menu options can be explored to become familiar with the board’s features.
MaixVision IDE and SSH Setup
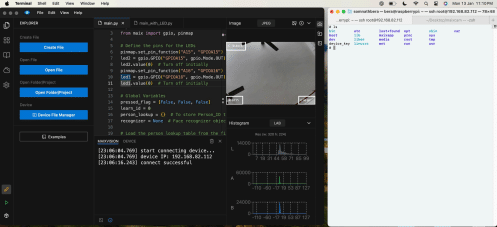
The MaixVision IDE is displayed on the left side of the screen, while the MaixCam can be accessed through SSH on the right. Within MaixVision, either SSH or GFTP (Graphical FTP) can be used to interact with the board.
Alternatively, the MaixCam can be accessed directly through the computer’s command prompt using:
Replace the IP address with the one assigned by the router. When prompted, enter the password:
root
Many sample projects are available on the MaixHub website. However, many of these projects are written in Chinese, and the accompanying documentation is often limited.
Note: If code is already running on the MaixCam, connecting or disconnecting through the MaixVision IDE will stop the running application. To avoid interrupting execution, it is recommended to connect using SSH:
This method allows the running application to continue uninterrupted.
Uploading Files
After establishing an SSH connection to the board (ssh [email protected], password: root), files can be uploaded using the scp command.
scp time_lapse_timed_photography.py [email protected]:/root/time_lapse_timed_photography.py
A more convenient approach is to install the MaixVision IDE and perform all file management directly from the application. Once the MaixCam and the computer are connected to the same network, select the Connect button located at the lower-left corner of the MaixVision IDE.
The Device File Manager, located in the upper-right corner of the IDE, provides options to upload, download, rename, delete, and move files on the board.
Important: Files should never be uploaded to the /boot directory, as doing so may corrupt the operating system and require the operating system image to be flashed again.
Running the Code from MaixVision IDE
Running code from the MaixVision IDE is straightforward. Once the MaixCam is connected to a Wi-Fi network, establish the connection using the Connect button at the lower-left corner of the IDE and then press the Play button. The code will begin executing immediately.
Boot Start
The boot process differs slightly from that of other Sipeed boards.
Open the Package option located in the lower-left corner of the MaixVision IDE and enter the required project information, including:
- ID
- Name
- Version
- Developer
- Description
- Project icon
After entering the details, select Submit, followed by Install and Complete. A suitable project icon may also be selected so that the application can be easily identified on the MaixCam.
This process creates an entry in the /maixapp/apps/app.info file and generates a folder named dry_wet_unknown_det_ESP32 inside /maixapp/apps/. The folder contains three files, one of which is main.py, the project’s Python source file.
Next, edit the /maixapp/auto_start.txt file and enter only the project name:
time_lapse_timed_photography
Save the file and upload it back to the board. No other entries should be present in this file.
After restarting the MaixCam, the application will start automatically.
The same configuration can also be performed through the MaixCam touchscreen by navigating to:
Settings → Start Menu → dry_wet_unknown_det_ESP32
Restarting the board after selecting the application enables automatic execution at boot.
Running from the MaixCam Menu
Once the application has been converted into a package (Package → Submit → Install → Complete), the code is stored in:
/maixapp/apps/dry_wet001/main.py
To launch the application from the MaixCam interface, power up the board and swipe up on the TFT display to reveal the installed application icons. Select the project package icon to start the application.
Code
The MicroPython code for the MaixCam and the Arduino sketch for the ESP32 are attached at the end.
Testing and Operation
The schematic above illustrates the operating principle of the smart trash bin equipped with a linear actuator and servo-controlled bin lids. The linear actuator is motor-driven and operates from a 12 V supply, while the servos operate at 5 V. The PCA9685 servo driver board supports a maximum servo supply voltage of 6 V.
The physical bin assembly is still under fabrication. However, preliminary testing of both the linear actuator and servo operation has been completed successfully.
// -------------------- Timing Constants --------------------

#define ACTUATOR_MOVE_MS 1200

#define SERVO_DELAY_MS   1000
These timing constants perform well under no-load conditions. However, slight adjustments may be required under actual operating conditions, as actuator movement can vary with mechanical load.
Alternatively, a servo-driven 100 mm linear actuator can replace the motor-driven version. In that case, the L298N H-bridge motor driver is no longer required, and the actuator can be controlled directly through the PCA9685 board with minor modifications to the ESP32 firmware.
The OLED display connected to the ESP32 through the I²C interface can be programmed to display operational information such as servo status, actuator timing, and wait plate position (lifted or retracted). These updates are managed entirely by the ESP32, as the MaixCam hands over control to the ESP32 immediately after completing object detection and classification.
Advantage with Duet of MaixCam + ESP32
To achieve this objective, an embedded platform capable of handling two demanding AI tasks simultaneously is required:
- Running a MobileNetV2 classifier—a versatile model capable of identifying around 1,000 different objects.
- Running a custom “kitchen-special” model—trained specifically to recognise common household and organic items such as vegetables, fruits, and leaves.
Together, these two models form a comprehensive detection system, covering a wide variety of objects and classifying them into Dry, Wet, or Unknown/Dangerous categories. This dual-model approach also allows the detection range to be expanded or reorganised into custom object groups as needed.
The Sipeed MaixCam is an ideal choice for this application. It delivers balanced performance—with an NPU offering 1 TOPS @ INT8 (1 TOPS = 1 Trillion Operations Per Second), a capable processor, an integrated camera, and a bright TFT display—all in a compact form factor that can operate from a single Li-ion cell. However, to maintain maximum responsiveness, the MaixCam’s role is deliberately limited to vision and classification. If the MaixCam were also used to handle motor or relay operations, the PWM load and peripheral control would slow down detection.
Therefore, once the type of waste is identified, the MaixCam hands over control to an ESP32 through UART communication, ensuring seamless cooperation without burdening either device. The ESP32 then manages all the actuator and servo operations, providing smooth, jerk-free mechanical control.
Complementing the MaixCam is the ESP32, a highly versatile and cost-effective dual-core microcontroller operating at up to 260 MHz. It integrates Wi-Fi, Bluetooth, PWM, ADC, and UART interfaces into a single chip, making it ideal for control and communication tasks. In this project, the ESP32 acts as the actuation controller, receiving classification data from the MaixCam over UART and driving the servos, relays, and actuators with precise timing.
Its real-time performance, low power consumption, and wide community support make it an excellent partner for the MaixCam in building responsive and intelligent embedded systems.
Prototype
Prototype under development.
Applications
A key advantage of this project lies in its modular design. By separating detection and bin control into two independent microcontrollers, processing speed is no longer a limiting factor, allowing the system to be deployed efficiently across a wide range of applications.
1. Smart Homes
- Automatically detects and sorts waste into wet (food scraps), dry (paper and plastics), and other waste (metal and glass).
- Stackable bins allow easy removal and replacement when full.
- Reduces manual sorting effort and improves hygiene.
2. Apartment Complexes / Housing Societies
- Centralised waste stations can sort garbage at the source.
- Servo-operated bins ensure minimal human contact, maintaining high sanitation standards.
- Stackable bins make maintenance and collection faster for staff.
3. Restaurants and Cafeterias
- Separates wet food waste from packaging and recyclables efficiently.
- Stackable bins enable quick replacement during peak hours.
- Servo operation can automate lid opening and closing for staff convenience.
4. Offices and Workplaces
- Keeps the workplace clean by automatically sorting dry waste (paper and cardboard) and wet waste.
- Reduces odour and prevents the mixing of different types of garbage.
5. Public Spaces and Smart Cities
- In parks, streets, or stations, bins can detect the type of garbage and sort it automatically.
- Stackable bins allow quick collection by municipal staff without interrupting public use.
- Servo operation ensures that lids open only when required, reducing litter.
6. Recycling and Waste Management Centres
- Can be used as a pre-sorting unit before waste is sent to recycling plants.
- Improves efficiency by separating recyclables from wet and hazardous waste.