


 Automation projects are nowadays highly appreciated due to the availability of cloud computing resources. This article is in continuation to the ‘Automatic Certificate Generation Using MATLAB’ DIY article published earlier, which garnered much attention because of the code’s readability and scalability. Several academicians, especially students, contacted us regarding the project and its future scope. This motivated us to create a similar project using Python.
Python will help to overcome a few challenges in MATLAB. The project uses only online tools and packages, hence does not require any installation. Python language is used in all applications ranging from image processing to artificial intelligence. Fig. 1 represents the basic idea about generating certificates using Python.

The Python script is run from an online tool called Colab. which accesses a sheet containing information, an image file that is a blank certificate and a ttf- font file to decide font type. When the script is run, a zipped folder is generated that can be downloaded to the local system from the browser. The folder contains all the certificates generated by the project. The code can be easily modified for generating any number of certificates and any number of fields to be printed on the certificates.
Advantages of Python on Colab
The project uses Colaboratory, colab in short—a Google cloud based platform that provides a Jupyter notebook-like environment to write and execute Python code on the go. Colab offers some of the free services to the users, which are sufficient to carry out minor projects involving data science, artificial intelligence, machine learning, and deep learning.
Apart from providing free runtime with around 12Gb RAM, it provides access to its GPUs and TPUs that can accelerate the training process when working with huge datasets.
Colab has almost all the standard libraries pre-installed, offering users the plug-and-play functionality that saves them from the headache of library dependency. Moreover, the files generated while executing the codes can be safely saved in the Google drive itself by just mounting it and giving permission to Colab to access your drive. These advantages of Colab makes it very popular among the beginners, researchers, and developers to build their projects and access them on the go.
Work environment
This section can be skipped by beginners in Python. Work environment is completely online and can be visualised by visiting the link below in any internet browser such as
tinyurl.com/EFYdiyWE
The environment consists of four files as shown in Fig. 2.
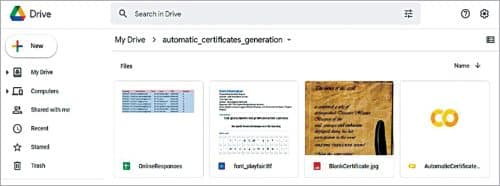
1. OnlineResponses. Google sheet containing participant information (provided by participants through a Google form created for an event).
2. font_playfair.ttf. True Type Font (.ttf) file which decides the font style being used for printing text on the image.
3. BlankCertificate.jpg. Image file consisting of the certificate.
4. AutomaticCertificateGeneration.ipynb. Ipython Notebook file where the code is to be executed.
Procedure to run the project
Step 1. Access Google Colaboratory by visiting the link below using an internet browser like Google Chrome, Internet Explorer, or Mozilla Firefox. The longer version of URL (uniform resource locator) is provided in case tinyurl is deprecated such as tinyurl.com/EFYdiy
If not signed in, click on ‘Sign in’ button as shown in Fig. 3 and join with your Google (Gmail) account.

Step 2. From the menu bar, select ‘Runtime’ and select ‘Run All’ as shown in Fig. 4.

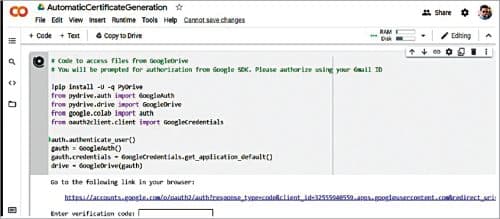
Step 3. Colab will ask for authorisation to access your Google drive using ‘Google Cloud SDK’ as shown in Fig. 5. Click on the link generated in the code and complete authorisation by pressing Enter. This is a security step and has to be completed every time this project is executed.
Step 4. The code continues its execution and asks for one last input as in Fig. 6. For testing this project, type ‘test’ (only four small-case letters) and press Enter. (After learning the project, customisation of the code can be done by typing ‘new’. Customisation of the project is very simple and is discussed in a later section.)

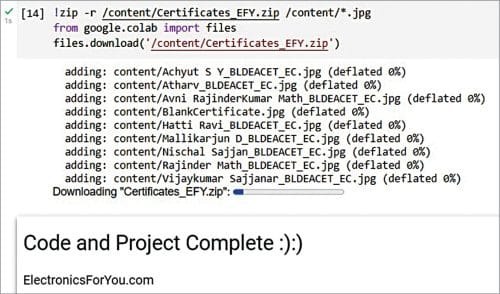
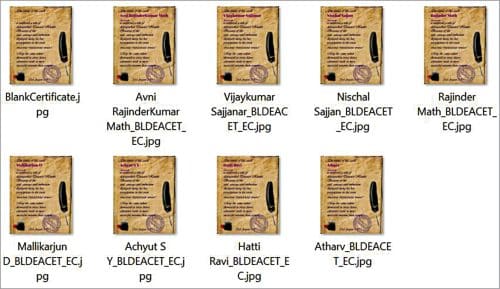
Step 5. The code continues its execution and successfully generates zip file Certificates_EFY.zip as shown in Fig. 7 and Fig. 8. The certificates can be viewed by unzipping the folder using software like WinRAR, or WinZip.
Customisation of the project
For creating your own project, minor changes are to be made in the environment setup depicted in Fig. 2. The Python code contains many headings and comments so that beginners in Python can also enjoy this project. Follow the steps given below.
Step 1. Make a copy of the code by using menu bar.
File->Save a Copy in Drive
Step 2. Open your Google drive by visiting the URL drive.google.com.
Step 3. Upload your Excel sheet or access Google sheet from Google drive. The sheet should contain information of participants. Click on share (View Only) and copy the shared link. Make any changes in the sheet as per your requirement.
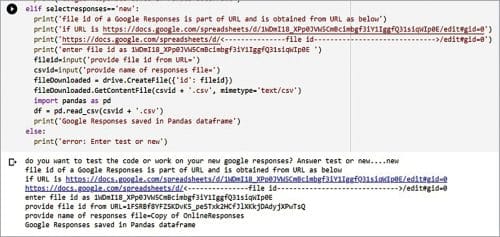
Step 4. Run the copied Colab code and select ‘new’ when prompted. Paste the shared link of Excel/Google sheet and its file name in the fields as shown in Fig. 9. In our example, the Excel sheet is named as ‘Copy of OnlineResponses’ and the shared link is:
https://docs.google.com/spreadsheets/d/1FSRBf8YFZSKDvK5_peSTxk2HCfJlXKkjDAdyjXPwTsQ/edit#gid=0. Here the id is 1FSRBf8YFZSKDvK5_peSTxk2HCfJlXKkjDAdyjXPwTsQ
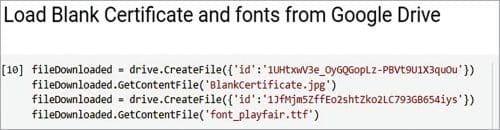
Step 5. For changing certificate image and fonts, change the code at various parts shown in Fig. 10. Many free fonts and certificates are available online. You can modify the BlankCertificate.jpg image and text fonts. The ‘id’ parts can be obtained from the URL after sharing the font file and image file.
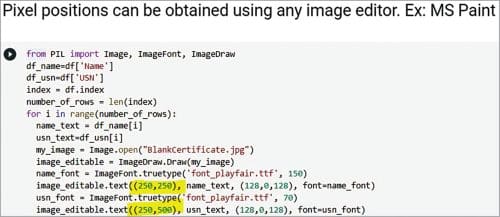
Step 6. Identify the pixel positions on the certificate where participants’ information is to be printed. Change code at highlighted parts shown in Fig. 11.
Step 7. Run the code to generate the customised certificates. You should be able to download the certificate in a zipped folder.
Results and future scope
This project is a complete online project and hence can be used with any configuration system, irrespective of operating system and hardware. The project is completely scalable and can be used to generate any number of certificates, any number of times. For intermediate to expert Python coders, the project offers a steep learning curve in the form of Python packages and their utilisation. Simple modifications to code can generate data analysis reports. Interested hobbyists can elaborate the code to create a website for this project using Python code deployment methods.
Download Source Code
Both Vijaykumar Sajjanar and Rajinderkumar M. Math are Assistant Professors, Department of Electronics & Communication, BLDEA’s CET, Vijayapur, Karnataka

Vijaykumar Sajjanar: Thank You everyone for contacting me through WhatsApp and email. The detailed and simplified procedure can be viewed here, https://www.youtube.com/watch?v=8slKr6Ei7UE