 Motion control plays a vital role in industrial automation. Manufacturing plants in industries like chemical, pharmaceutical, plastic and textile, all require motion control. And it may be a flat-belt application, flow control application or mixing of substances. Different types of motors—AC, DC, servo or stepper—are used depending upon the application. Of these, DC motors are widely used because controlling a DC motor is somewhat easier than other kinds of motors. Using the DC Motor Controller you can program the motion of the motor, i.e., how it should rotate.
Here are some of the features of this DC motor controller:
- Controlled through microcontroller AT89C51
- Message displayed on the LCD module
- Start, stop and change of direction of the motor controlled by push button switches and indicated by LED.
- Changes the running mode of the motor to continuous, reversible or jogging.
- Changes the speed of the motor
- Time settings are possible for forward and reverse running of the motor
Circuit description of Microcontroller-Based DC Motor Controller
Fig.1 shows the circuit of the microcontroller-based DC motor controller. At the heart of the DC motor controller is microcontroller AT89C51. Port pins P0.0 through P0.7 of the microcontroller are interfaced with data pins D0 through D7 of the LCD module, respectively. Port pins P3.0, P3.1 and P3.2 control the LCD operation through enable (E), register select (RS) and read/write (R/W) pins, respectively. Contrast of the LCD is set by preset VR1. Port pins P1.0 through P1.7 are connected to switches S1 through S8 for performing the various operations.
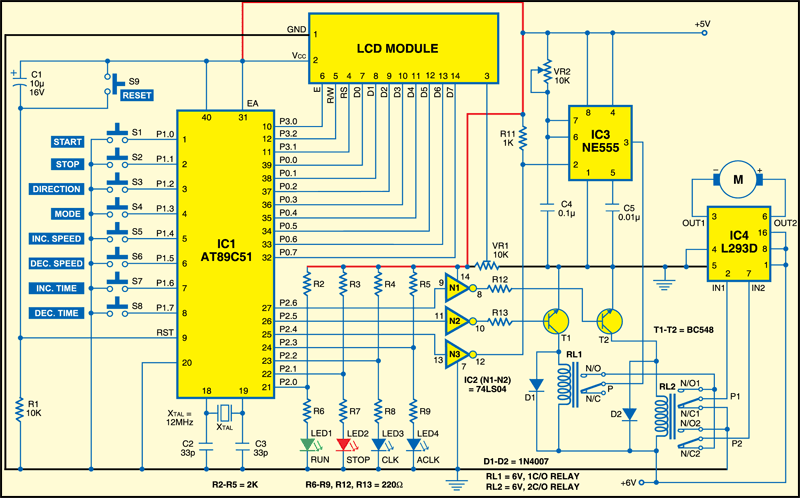
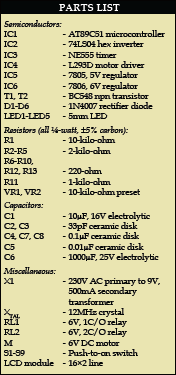 Power-on reset signal for the microcontroller is generated by the combination of capacitor C1 and resistor R1. Switch S9 provides manual reset to the microcontroller. A 12MHz crystal provides the basic clock frequency to the microcontroller. Capacitors C2 and C3 provide stability to the oscillator. EA pin (pin 31) of the microcontroller is connected to 5V to enable internal access. Port pins P2.0 through P2.3 of the microcontroller are used for LED indication of run, stop, clockwise and anti-clockwise rotation. Port pins P2.4 through P2.6 are connected to the inputs of inverters N3, N2 and N1 of 74LS04 (IC2). The output of inverter N3 is used to trigger pin 2 of NE555 timer.
Timer NE555 is configured as a monostable and its time period is decided by preset VR2 and capacitor C4. When pin 2 of NE555 goes low, output pin 3 becomes high for the predetermined period.
The output of NE555 is connected to pole P of relay RL1. Normally-open (N/O) contacts of relay RL1 are connected to N/O1 and N/C2 contacts of relay RL2. N/C1 and N/O2 contacts of RL2 are connected to ground. The outputs of inverters N2 and N1 drive relays RL1 and RL2 with the help of transistors T1 and T2, respectively. D1 and D2 act as free-wheeling diodes. Poles P1 and P2 of RL2 are connected to IN1 and IN2 pins of motor driver L293D. OUT1 and OUT2 of L293D drive motor M.
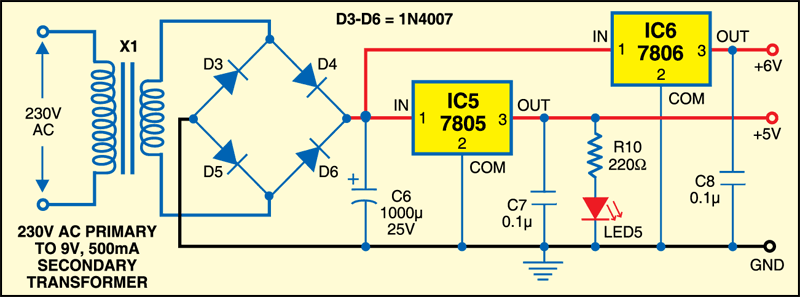
Fig.2 shows the power supply circuit. The 230V AC mains is stepped down by transformer X1 to deliver the secondary output of 9V, 500 mA. The transformer output is rectified by a full-wave bridge rectifier comprising diodes D3 through D6, filtered by capacitor C6 and then regulated by ICs 7805 (IC5) and 7806 (IC6). Capacitors C7 and C8 bypass the ripples present in the regulated 5V and 6V power supplies. LED5 acts as a power-‘on’ indicator and resistor R10 limits the current through LED5.
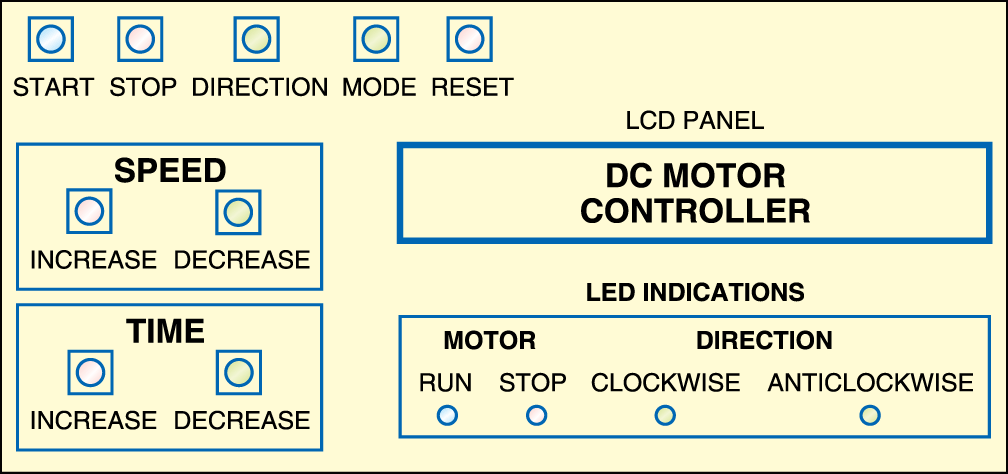
The proposed panel arrangement for the microcontroller-based DC motor controller is shown in Fig.3.
An actual-size, single-side PCB for the microcontroller-based DC motor controller and component layout can be download from link below.
Operation
The eight push button switches are connected for eight different functions as shown in the table.
When S1 is pressed, the microcontroller sends low logic to port pin P2.5. The high output of inverter N2 drives transistor T1 into saturation and relay RL1 energises. So the output of NE555 is fed to inputs IN1 and IN2 of L293D through both the contacts of relay RL2. Now at the same time, after RL1 energises, the microcontroller starts generating PWM signal on port pin P2.4, which is fed to trigger pin 2 of NE555 through inverter N3. The base frequency of the generated PWM signal is 500 Hz, which means the time period is 2 ms (2000μs). The output pulse width varies from 500 μs to 1500μs. The R-C time constant of the monostable multivibrator is kept slightly less than 500 μs to generate exactly the same inverted PWM as is generated by the microcontroller.
When switch S2 is pressed, port-pin P2.5 goes high and RL1 de-energises to stop the motor.
When switch S3 is pressed, relay RL2 energises. Pin IN1 of motor driver L293D receives the PWM signal and pin IN2 connects to ground. As a result, the motor rotates in one direction (say, clockwise).
When switch S3 is pressed again, relay RL2 de-energises. Pin IN2 of motor driver L293D receives the PWM signal and pin IN1 connects to ground.The motor now rotates in opposite direction (anti-clockwise).
When switch S4 is pressed, different modes are selected in cyclic manner as given below:
1. Continuous mode. The motor rotates continuously with the set speed in either direction
2. Reversible mode. The motor reverses automatically after the set time
3. Jogging mode. The motor rotates for the set time in either direction and then stops for a few seconds and again rotates for the set time. It is also called ‘pulse rotation’
Switches S5 and S6 are used to set the speed of the motor, either in increasing order or decreasing order, in continuous mode only.
Switches S7 and S8 are used to set the time either in increasing order or decreasing order.
Download PCB and component layout PDFs: click here
Software
The program is written in ‘C’ language and compiled using Keil μVision3 compiler. It is well commented and easy to understand. The program has three major sections: initialisation and key press, display and motor control.
Initialisation and key press
It consists of the main function that initialises timers, ports, LCD module and LED indication and then waits for key press.
When any key is pressed, the program calls that particular function.
In the main function, first the ports are initialised as input/output, then the LCD is initialised and cleared. At power-on reset or manual reset, message “DC motor controller” is displayed on the LCD and LED1 through LED4 turn off. When start switch S1 is pressed, message “Motor Start” is displayed for a second, and then the mode and current speed are displayed. Run LED and clockwise direction LED are ‘on.’ Now the program waits for key press. When any key is pressed, the program jumps to one of the functions (start,direction,mode,etc).
Display
It uses the following functions:
1. ‘writecmd’ function sends command byte to the LCD. It takes one argument byte and sends it to P0.
2. ‘writedata’ function sends data byte to be displayed on the LCD. It also takes one argument byte and sends it to P0.
3. ‘writestr’ function writes the whole string (message) on the LCD. It takes pointer as an argument that points address of the first character of the string, then through the pointer it sends all the characters one by one to P0.
4. ‘busy’ function checks the status of the busy flag of the LCD. If the flag is set, the LCD is not ready and the program remains within the loop. When the flag is reset, the LCD is ready and the program comes out of the loop.
Motor control
It uses the following functions:
1. ‘start’ function starts motor rotation in one of the modes (continuous, reversible or jogging). The mode is selected by mode-selection flag ‘m.’ As explained earlier, in continuous mode the motor keeps rotating with the set speed. In reversible mode, the motor changes direction automatically after the set time. In jogging mode, the motor rotates for the set time, stops for a few seconds and then rotates.
2. ‘stop’ function stops rotating the motor and displays the message on the LCD module. This is indicated by glowing of the stop LED.
3. ‘direction’ function increments the counter by ‘1’ every time and checks whether the count is even or odd. If the count is even, it selects clock-wise direction, and if the count is odd, it selects anticlockwise direction. This is also indicated on direction CLK and ACLK LEDs.
4. ‘mode’ function changes modes in cyclic manner. It increases mode selection flag ‘m’ every time. If m=0 it selects continuous mode, if m=1 it selects reversible mode and if m=2 it selects jogging mode. If m=3 it is reset to ‘0’ again and selects continuous mode and likewise.
5. ‘incspeed’ function increases the width of the pulse by 100 μs. The generated PWM is of 500 Hz. That means total time is 2 ms=2000 μs. The width of the pulse is varied from 500 μs to 1500 μs in steps of 100 μs. To display the speed, the variable is first converted into speed factor ‘1’ to ‘9’ and then into ASCII.
6. ‘decspeed’ function is the same as ‘incspeed’ but here the width of the pulse is decreased by 100 μs.
7. ‘inctime’ function increases the reversible time of the motor by one second. It increases the variable in multiples of 20. To display it on the LCD module, it is first divided by 20 and then converted into ASCII.
8. ‘dectime’ function is the same as ‘inctime’ but it decreases reversible time by one second.
Delay
It uses the following functions:
1. ‘keydly’ function generates a fix delay of around 50 ms for key debouncing.
2. ‘delay’ function generates a variable delay by timer 0. The basic delay is of 100 μs. It is rotated in loop from five to 15 times to generate minimum 500μs and maximum 1500μs delay.
3. ‘time’ function again generates a variable delay by timer 1. The basic delay is of 50 ms. It is rotated in multiples of 20 from 20 to 180 to generate minimum 1-second and maximum 9-second delay.
EFY note. The source code and other relevant files of this article are included in the link below:
Download source code: click here
This article was first published in June 2009 and is recently updated.


please Sande me DC mother control use 8051 campit cood
Kindly elaborate your query.
Hello, can i get the C code on mail, because the link it’s not working.
And another question: what software is used for the circuit design?
Mail: [email protected]
Hi, kindly refresh the page and re-download it.
Can it be implemented wirelessly (via TV remote)
The entire circuit does not contain, apparently, a feed back arrangement to govern RPM of, and Power applied to the dc motor, in case of sudden load variation, either side.
Will be grateful, if a fellow in line exhibits some practical solutions, either with back-emf of the motor and/or with shaft-speed counter of the motor, please.
Can you Please send me coding of microcontroller.
MY Gmail: [email protected]
Hi Mohammad Hassan, you can download the source code from the end of the article.
Does the circuit diagram have any corrections / changes to be incorporated wrt to the one shared on EFY web. Can you please share the code. My email id is [email protected].
We did not have any corrections/complaints on this project. So no corrections so far. The source code is given at the end of this article for download.
Can you please share the source code
The source code is shared with you on your email ID.
Can someone share the procedure on how to flash the AT89C51? If possible mail the same, would be grateful, thanks !