A smart talking grocery scale is an advanced digital weighing scale designed for small shops, grocery stores, and home use. It accurately measures the weight of an item using a load cell, a sensor that detects the weight placed on the scale, along with a signal-processing circuit that converts this measurement into a readable weight value.
The scale then provides instant voice feedback so the measured weight can be heard without constantly checking the display. This feature also makes the scale more accessible to visually impaired users. In addition to weighing items, the system includes a real-time web dashboard that can be accessed from a phone, tablet, or laptop connected to the same network.
The dashboard allows users to enter the commodity name, calculate the total price based on the price per gram, and record each transaction with its timestamp, item name, weight, and price. All transaction data is stored locally on the device and can be downloaded as a Comma-Separated Values (CSV) file for end-of-day sales reporting.
The system is designed to work in both online and offline modes, ensuring that voice feedback remains available even when an internet connection is not accessible. It also includes a local OLED display for status information, touch-based voice activation, and support for multiple weight units, including grams, kilograms, pounds, and ounces.
By combining accurate weighing, voice-based feedback, and smart digital features, this IoT-enabled weighing solution offers a convenient and accessible alternative to conventional weighing machines. Its low-cost design makes it suitable for small businesses, grocery stores, and everyday weighing applications.
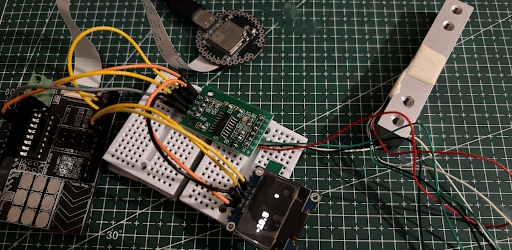
To keep the design compact and portable, the IndusBoard Coin is used as the main controller. The PCB is designed to connect easily with the IndusBoard Coin using a Flexible Printed Circuit (FPC) connector, making use of its FPC ecosystem. A sensor called the YZC-133 load cell is used to obtain the weight data of the commodity. The load cell can be changed according to the required weighing range, from 5 kg up to 200 kg, depending on the application.
An amplifier is used to increase the very small signal from the load cell to a level that can be read by the MCU. An appropriate load cell amplifier module is used for this purpose.
For audio output, a MAX98357 amplifier module is paired with a mini 8 Ω speaker. An SSD1306 OLED display is used to provide local display output. The entire system can be powered directly through the USB connector on the IndusBoard Coin or using a 3.3 V power supply or battery.
The complete list of components used in this project is provided in Table 1:
Bill of Materials
| Component | Description | Quantity |
| IndusBoard Coin | WIFi MCU Board | 1 |
| HX711 load cell amplifier | Load cell amplifier | 1 |
| YZC-133 | Load cell (5kg to 50kg) | 1 |
| 0.96″ OLED display (SSD1306) | SSD1306 OLED display | 1 |
| MAX98357 amplifier | I2S amplifier module | 1 |
| 8Ω Speaker | Mini speaker for audio | 1 |
| USB C cable | For flashing firmware | 1 |
| 3.3V NimH or LiPo Battery / Power Supply | 3.3V 1A Power Supply | 1 |
Weighing Scale Circuit Diagram
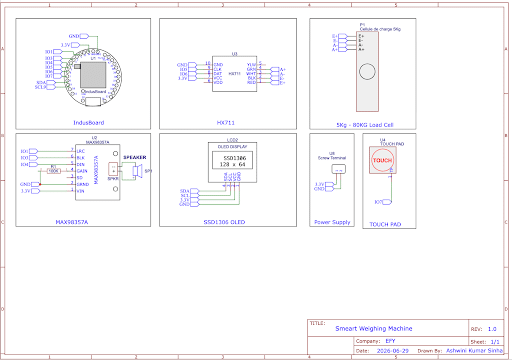
The hardware connections can now be made. First, connect the 8 Ω speaker to the output pins of the MAX98357 amplifier module. The amplifier input pins are then connected to the IndusBoard Coin as shown in the circuit diagram in Fig. 2.
Next, connect the HX711 load cell amplifier to the load cell, and then connect the HX711 module to the IndusBoard Coin using IO5 and IO6. The SSD1306 OLED display can be connected to the I2C interface of the IndusBoard Coin. A battery can be connected to the U8 screw terminal to power the entire system. The metal touch pad should be connected to Pin 8, which is used to trigger the voice announcement.
A custom PCB can also be designed around this circuit, using the IndusBoard Coin FPC connector to directly connect the newly designed hardware to the board. The complete PCB design and layout are covered in the next section.
Code for IoT Weighing Scale
The firmware for the device is developed using the Arduino IDE. The main function of the firmware is to read the real-time weight measured by the load cell and display it on the OLED. The measured weight can also be announced through voice feedback in both online and offline modes. In addition, the device hosts a Wi-Fi web server that provides a dashboard accessible from a phone, laptop, or tablet connected to the same network.
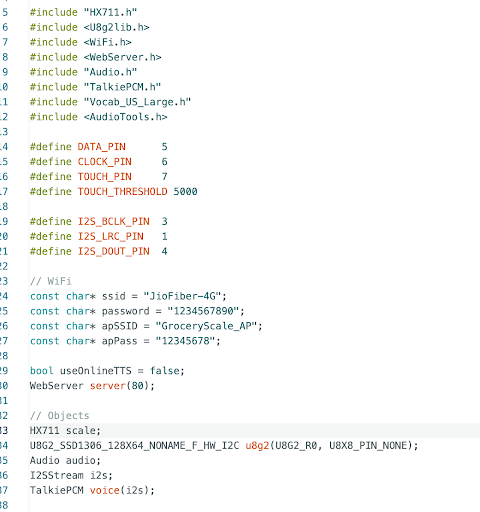
To begin with, install the required libraries that will be used throughout the project. Open the Library Manager in the Arduino IDE and install the following libraries:
- HX711.h – Used to interface with the load cell amplifier.
- U8g2lib.h – Used to drive the SSD1306 OLED display.
- Audio.h – Helps in processing audio and providing audio output through the I2S interface.
- TalkiePCM.h – Used for offline text-to-speech conversion.
- Vocab_US_Large.h – Provides the offline speech vocabulary used by the Talkie library.
- AudioTools.h – Used for audio streaming and processing.
The program begins by including all the required libraries. The pins for the load cell amplifier, I2S audio amplifier module, and touch input are then defined. The touch input is used to trigger the spoken weight output when activated.
After that, the device name along with the Wi-Fi Station (STA) mode settings is configured by entering the SSID and password of the Wi-Fi network to which the device will connect.
The web page and dashboard are designed to display live weight readings and other useful information. The dashboard can be accessed from any phone, tablet, or computer connected to the same Wi-Fi network, making it easy to monitor the weighing scale wirelessly.
Web dashboard design
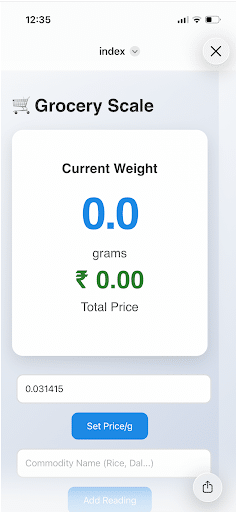
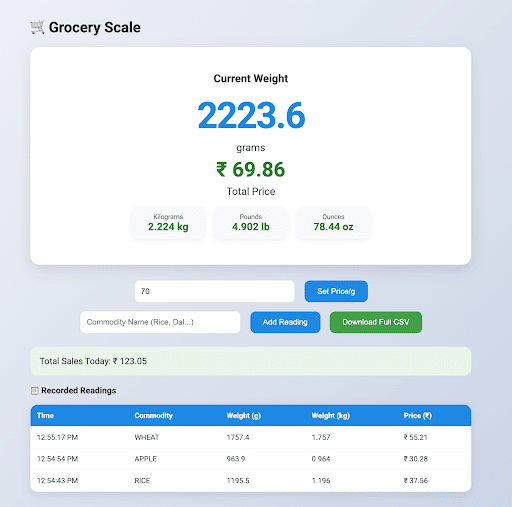
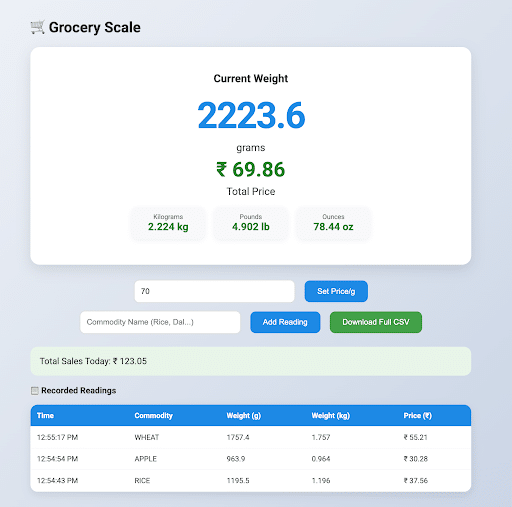
In the web page design, the weight in grams will be displayed prominently at the top in a large font for easy viewing. The dashboard also displays the total price calculated from the measured weight and shows the weight in different units, including kilograms, pounds, and ounces.
A text input is provided to set the price per gram, along with another input for entering the commodity name. A button allows each reading to be added to the database. The recorded entries are stored locally on the connected phone, tablet, or computer through the browser and can also be saved in the SPIFFS memory of the device.
At the end of the day, the recorded data can be exported using the Download CSV button. This makes it easier to calculate total sales, maintain transaction records, and perform further analysis using spreadsheet software.
The web dashboard can also be enhanced with inventory management features. It can automatically track the remaining stock after each sale and maintain an inventory database, making the system useful not only as a smart weighing scale but also as a basic inventory management solution.
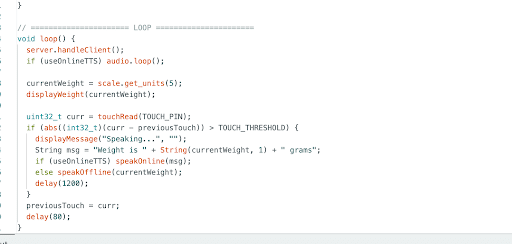
The loop() function continuously handles the major tasks of the device. It reads the real-time weight from the load cell and updates the value on the OLED display. At the same time, the latest weight data is sent to the web dashboard so that the connected phone, tablet, or laptop always displays the current reading (Refer Fig. 4).
The loop() function also monitors the touch input connected to Pin 7. When the touch pad is pressed, the device announces the measured weight along with its calculated price. With an active Internet connection, the online text-to-speech service provides the voice output. If the Internet is unavailable, the device automatically switches to the built-in offline speech engine and announces the weight and price using the locally stored speech vocabulary. This allows the device to operate in both online and offline modes without user intervention.
After completing the firmware and configuring the Wi-Fi SSID and password in the code, upload the program to the board.
Weighing Scale PCB Design
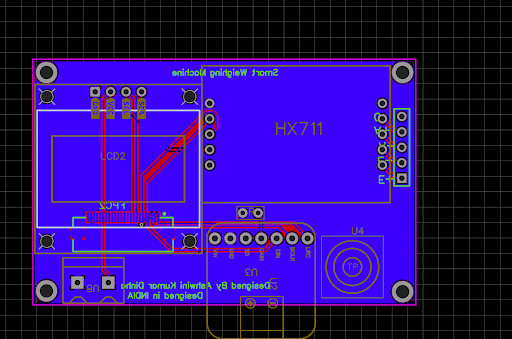
The PCB is designed with the HX711 load cell amplifier, OLED display, I2S audio output amplifier, and touch pad placed on the top layer. These components are arranged to keep the design compact while providing easy access to the display and touch control.
The bottom layer houses the FPC connector, which connects directly to the IndusBoard Coin through its FPC interface. This keeps the assembly neat, compact, and easy to assemble without additional wiring.
Once the firmware is uploaded to the IndusBoard Coin, connect the PCB to the board using the FPC connector. After connecting the load cell, speaker, and power supply, the smart weighing machine is ready to use.
Testing DIY Weighing Scale
Calibration
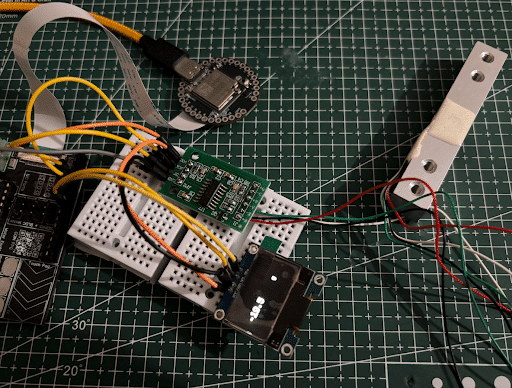
Power on the device and wait for a few seconds. The OLED display will prompt to remove any weight from the load cell. Once the load cell is empty, the device will prompt to place a 1 kg calibration weight on it. After a few seconds, it will prompt to remove the 1 kg weight. Once this process is complete, the weighing machine is automatically calibrated and ready for use.
Weighing
After calibration, place the commodity on the load cell. The OLED display will show its real-time weight. Touch the touch pad to hear the measured weight through the speaker. If a price has been configured, the system will also announce the calculated price.
App testing
Open a browser on a phone, tablet, or computer and enter the device’s IP address. The dashboard will open and display the live weight in real time. To store a reading, enter the commodity name and set its price, then click the Add Reading button. The table below will automatically display the commodity name, weight, price, and time for each recorded entry.
At the end of the day, click the Download Full CSV button to download the complete database. The downloaded file can be used for sales analysis, record keeping, and inventory management.
Testing offline mode
To test the offline mode, turn off the Wi-Fi router so that the device cannot connect to the configured network. Place a weight on the load cell and touch the touch pad. The device will still announce the measured weight using the offline speech engine.
The web dashboard also continues to work without an Internet connection. The device automatically creates its own Wi-Fi access point named GroceryScale_AP. Connect a phone or computer to this network using the password configured in the firmware. Then, open a web browser and enter 192.168.4.1 to access the dashboard and view the live weight from the device. Commodity records can be added to the database and the complete CSV file can be downloaded, just as in online mode.
The main difference between the online and offline modes is the voice quality. The online text-to-speech engine provides a more natural and clearer voice, while the offline speech engine is slightly less natural but allows the weighing scale to operate without an Internet connection.