


Imagine a vehicle cruising at 54 kilometres per hour, roughly the speed of an object moving 0.5 metres per frame at 30 frames per second (0.5×30×3.6=54 km/hr). Mounted on the vehicle’s roof is a compact, high-performance vision system built around a Raspberry Pi 5 board and a Hailo-8L AI accelerator.
This real-time setup detects objects ahead and estimates their distances from the vehicle. When an object enters a predefined safety zone, the system can instantly issue warnings or activate emergency braking, enhancing both situational awareness and reaction time.
Table of Contents
POC Video Tutorial
Built using an AI Accelerator HAT on a Raspberry Pi 5, the system operates as a production-grade AI platform capable of running at a minimum of 30 frames per second. Designed for vehicle mounting, it continuously scans the road, identifies objects in real time, and calculates their distances. These live readings are displayed on the terminal. If any object crosses a predefined proximity threshold, the system may trigger alerts via GPIO pins.

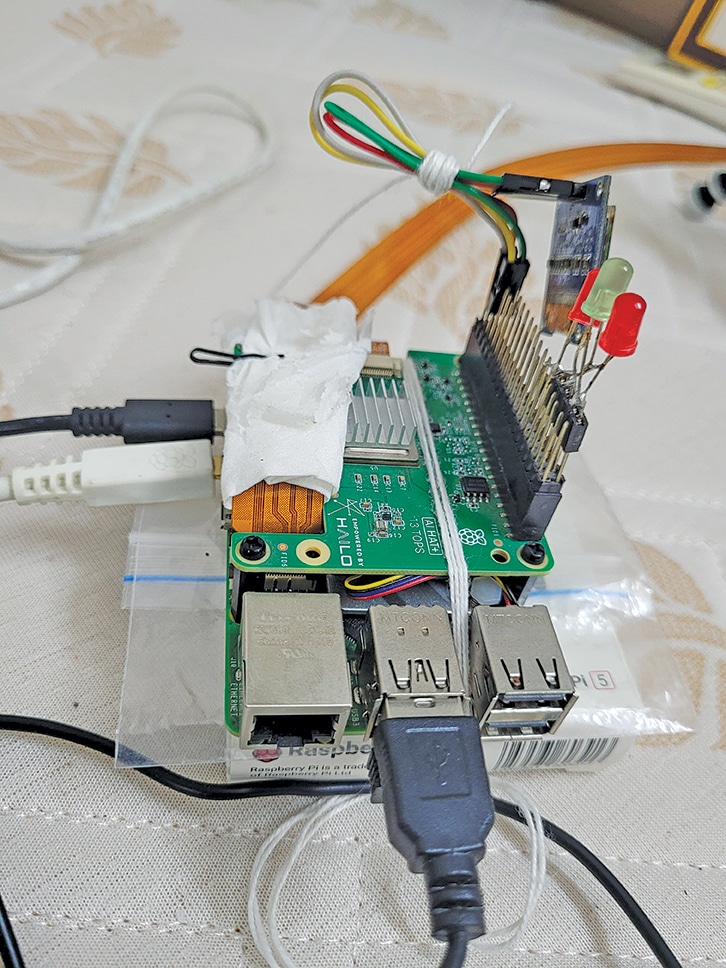
Although the alert mechanism is straightforward to implement, it remains unbuilt in the current version. The components required for assembling the system are listed in the Bill of Materials table. Fig. 1 shows the authors’ working prototype.

Connection and Mounting
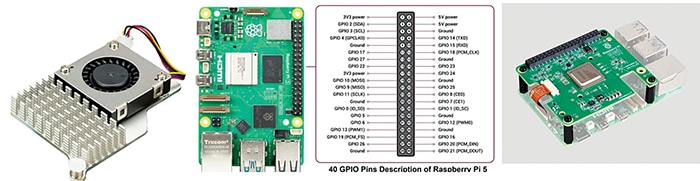
The AI accelerator can be mounted on top of the Raspberry Pi, as shown in Fig. 2. Note that since the AI HAT fully covers the main processor, the Raspberry Pi 5 tends to heat up significantly. To prevent overheating, it is strongly recommended to use an additional cooling method. In this system, only a specific fixed-type cooler fits within the narrow space available once the AI HAT is mounted. The complete setup and its individual components are shown in Fig. 2. The Raspberry Pi 5 must also be powered by a high-quality 5V, 4A power adaptor to maintain stable performance.
With active cooling, the Raspberry Pi 5 can be safely overclocked to extract additional performance, at the cost of slightly increased power consumption and heat generation. The cooler’s fan connector should be plugged into the designated fan header on the Pi 5 board. When paired with the AI HAT, the heavy lifting of YOLO-based AI processing is handled by the accelerator, allowing the Pi 5 to focus on computations and control logic. This division of labour ensures smooth and efficient operation, even at 30 frames per second.
| Bill of Materials | |
| Components | Quantity |
| Raspberry Pi 5, 8Gb or 16Gb | 1 |
| Hailo-8L AI accelerator for Pi 5, 13 TOPS to 26 TOPS | 1 |
| Pi 5 camera | 1 |
| Pi 5 power adaptor | 1 |
| High-speed SD card, 32GB or more | |
| HDMI adaptor/display | 1 |
Programming and Code
First, ensure that 64-bit Raspberry Pi OS Bookworm is installed. This system does not function on a 32-bit Pi OS. A high-quality Camera Module 3 or better is recommended for best results.
Installation guide
https://www.raspberrypi.com/documentation/computers/ai.html#getting-started
Update the Systembash
$ sudo apt-get update
$ sudo apt-get upgrade
Accessing Raspberry Pi
The most convenient method for operating the Raspberry Pi is by accessing it from a desktop or laptop via SSH:
$ ssh [email protected]When prompted, enter the password. Once authenticated, access to the Raspberry Pi 5 terminal will be granted.
Note:
SSH access is optional; a direct connection using a display, keyboard and mouse is also supported.
Enabling PCIe Gen 3.0 speeds
By default, the Raspberry Pi 5 operates at Gen 2.0 PCIe speeds. To enable Gen 3.0:
$ sudo raspi-config- Navigate to Advanced Options →PCIE Speed
- Choose ‘Yes’ to enable Gen 3 mode
- Select ‘Finish,’ and when prompted, reboot the system.
Install Hailo software stack
After rebooting, install the Hailo drivers and tools:
$ sudo apt install hailo-allThis command installs the Hailo kernel device driver, firmware, HailoRT, Hailo applications, libraries, and `rpicam-apps.` Then reboot the system:
$ sudo rebootReboot to apply all changes.Verify Hailo Installation. After reboot, run:
$ hailortcli fw-control identifyThis ensures all changes take effect.
Executing on device: 0000:01:00.0
Identifying board
Control Protocol Version: 2
Firmware Version: 4.17.0
(release,app,extended context switch
buffer) Logger Version: 0
Board Name: Hailo-8
Device Architecture: HAILO8L
Serial Number: HLDDLBB234500054
Part Number: HM21LB1C2LAE
Product Name: HAILO-8L AI ACC M.2 B+M KEY
MODULE EXT TMP
The last five lines ensure that the Hailo-8L board has been successfully installed. In some instances, the serial or part number may not be displayed, but the board will continue to function correctly. Test rpicam-hello:
$> rpicam-hello -t 10s # This will run
rpicam for 10 seconds and then stop
$> rpicam-hello --help # This displays
the help file
Once all components are installed, install the `rpicam-apps` package to enable Hailo AI accelerator features:
$> sudo apt update && sudo apt install
rpicam-apps
High-speed object detection examples can now be executed:
$> rpicam-hello -t 0 --post-process-file /

usr/share/rpi-camera-assets/hailo_yolov6_

inference.json

$> rpicam-hello -t 0 --post-process-file /

usr/share/rpi-camera-assets/hailo_yolov8_

inference.json

$> rpicam-hello -t 0 --post-process-file /

usr/share/rpi-camera-assets/hailo_yolov5_

personface.json # This command detects

faces – useful for face counting

$> rpicam-hello -t 0 --post-process-file /

usr/share/rpi-camera-assets/hailo_yolov8_

pose.json # This command detects human

poses – useful for fall detection
These commands demonstrate how to use `rpicam-hello` with different YOLO AI models.
Installation Instructions
Hailo RPi5 Examples – Installation Guide:
Step 1: Clone the repository
$> git clone https://github.com/hailo-ai/

hailo-rpi5-examples.git
Step 2: Navigate into the directory
$> cd hailo-rpi5-examplesThis directory contains two key files: `setup_env.sh` and `requirements.txt.`
As the Hailo-8L requires specific Python package versions, it is advisable to use a virtual environment to avoid conflicts. This allows for the installation of the necessary package versions locally without interfering with the system-wide Python environment. The next step is to activate the special environment as recommended by the Hailo-8L package.
Step 3: Activate the virtual environment
$> source setup_env.shOnce activated, the terminal prompt will change to indicate entry inside the virtual environment: (venv_hailo_rpi5_examples) bera@raspberrypi:~/hailo-rpi5-examples $
Step 4: Install required Python packages
(venv_hailo_rpi5_examples) bera@raspberrypi:~/hailo-rpi5-examples $ pip install -r requirements.txt
The requirements.txt file contains a list of Python packages required for the Hailo examples. To view the file contents:
$> cat requirements.txtExpected contents:
numpy<2.0.0 setproctitle opencv-python
To install them individually:
$> pip install numpy<2.0.0
$> pip install setproctitle
$> pip install opencv-python
Step 5: Download the necessary Hailo models
$> download_resources.shTo install additional Python resources, visit: https://github.com/hailo-ai/hailo-apps-infra
This repository provides Hailo Applications Infrastructure for Raspberry Pi 5. Some parts of it are optional for the current code.
$> git clone https://github.com/hailo-ai/
hailo-apps-infra.git
$> pip install --force-reinstall -v -e .
# (Optional)
The ‘git clone’ command downloads additional Python utilities for Hailo. The last pip command is entirely optional; it may be run or skipped. At this stage, all software components required for the system should be in place. Note that all of these tools fall under the category of open source software.
Begin experimenting with the Hailo-8L accelerator using Python scripts in the `basic_pipelines` directory:
Now the process can move on to working with the Hailo-8L accelerator, trying out some sample Python scripts, and eventually building individual measure_distance3.py. Two sample Python scripts are already available in the basic_pipelines subdirectory:
- detection_simple.py
- pose_estimation.py
These can accept input from pre-defined sources such as MP4 files, the Raspberry Pi camera, or a USB camera. Example usage:
$> python basic_pipelines/detection_

simple.py --input rpicam # From Pi Camera

$> python basic_pipelines/pose_estimation.

py --input test.mp4 # From video file

$> python basic_pipelines/detection_

simple.py --input /dev/video0 # From USB

camera

$> python basic_pipelines/detection.py

--help # Help for detection.py
To use custom models:
$> python basic_pipelines/detection.py \–labels-json resources/barcode-labels.json \
–hef-path resources/yolov8s-hailo8l-barcode.hef \
–input resources/barcode.mp4
Distance Measurement Theory
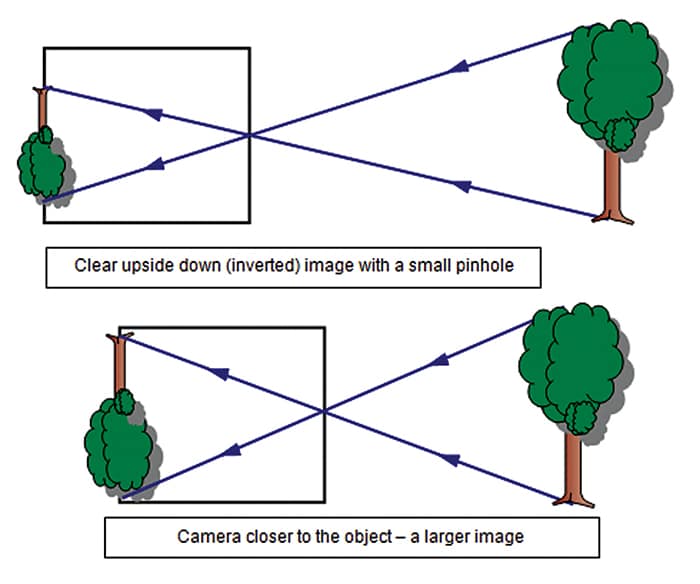
Distance is estimated by comparing an object’s known width with its perceived width in the captured image.
Based on the pinhole camera model, an object farther from the camera appears smaller. If the camera’s focal length, the object’s real-world width, and the observed image width are known, the distance can be calculated using similar triangles.
Standard widths and a default width are defined at the beginning of the code.
The segmentation model `yolov5n_seg_h8l_mz.hef` helps identify full objects, even when partially visible. The segmented image is used to estimate the object’s width, which is then compared to known dimensions to determine the distance.
# Object width dictionary for distance

estimation (in metres)

OBJECT_WIDTHS = {

“person”: 0.4, “bicycle”: 0.5, “car”:

1.8, “motorcycle”: 0.8, “bus”: 2.5,

“truck”: 2.5, “airplane”: 36.0, “train”:

3.2, “boat”: 5.0, “traffic light”: 0.6,

“fire hydrant”: 0.3, “stop sign”: 0.75,

“cat”: 0.3, “dog”: 0.6, “horse”: 1.2,

“cow”: 1.5, “elephant”: 3.2, “bear”: 1.7,

“zebra”: 1.2, “giraffe”: 2.0,

“bench”: 1.2, “chair”: 0.6, “couch”: 2.0,

“dining table”: 1.8,

“laptop”: 0.4, “tv”: 1.2

}

DEFAULT_OBJECT_WIDTH = 0.5 # Default

width (in meters) for unknown objects

FOCAL_LENGTH = 0.5 # Focal length in

meters (Raspberry Pi Camera Module 3 Wide

Spec)

To run the measure_distance3.py script

and capture data from different camera

sources:

$> python measure_distance3.py --input

rpicam # Capture data from Pi camera

$> python measure_distance3.py --input /

dev/video0 # Capture data from USB camera
The model yolov5n_seg_h8l_mz.hef supports around 80 object classes, but in this implementation, focus is only on 26 specific objects listed in the previous dictionary. These are the objects for which the standard physical widths have been provided, allowing for the estimation of their distance from the camera.
Testing
Fig. 3 illustrates the distance measurement technique, while Fig. 4 and Fig. 5 show pin details and mounting.
Power the system and run the script. Objects and their distances will be displayed in real time.
The Raspberry Pi 5, paired with the Hailo-8L AI HAT and powered by a 5V, 4A supply, is ideal for embedded or stationary applications that require real-time object detection and distance estimation.
Where can this project be used?
This system can be used for various purposes, such as:
Car dashboard monitoring
Mounted over the windshield, the system can detect vehicles and pedestrians ahead, estimate distances, and alert the driver in case of potential collisions or unsafe following distances. It can also integrate a speech synthesiser, such as espeak-ng, to issue voice advisories through a speaker.
Reverse gear monitoring with advisory
Installed at the rear of the car, it can detect nearby objects or people during parking and provide visual/audio alerts, or even trigger automatic braking mechanisms.
Smart door entry monitoring
Positioned at an entrance, the system can detect approaching individuals, classify them (such as delivery persons, known visitors, or strangers), and estimate their distance to enable automated actions, including doorbell activation, lighting, or door unlocking.
Occupancy and crowd analysis in buildings
It can be used to monitor the density and spacing of people in halls, corridors, or waiting areas. The system can trigger ventilation systems or crowd control alerts when individuals are too close to each other or the area becomes overcrowded.
Warehouse safety systems
It can detect moving forklifts or personnel and estimate their proximity to restricted zones. This can help trigger alarms or slow down automated machinery in the event of a near approach, thereby enhancing workplace safety.
Robot vision for indoor navigation
It is used in AGVs (automated guided vehicles) or indoor robots to identify obstacles and measure distances, enabling safer and more efficient navigation in indoor environments.
School zone or gate surveillance
The system monitors the presence and movement of children or guardians near school gates and generates alerts or automates gate operations based on detected behaviour and distance.
Traffic monitoring at toll booths or bridges
The system identifies vehicle types and measures distances to enable automated toll collection, detect overloading, or analyse traffic density.
School bus gate monitoring
It can help observe incoming traffic and the movement of children around school bus gates, ensuring safer entry and exit conditions.
Related Object tracking and Detection projects:
3D Object Tracking and Recognition
Object Tracking Camera using Raspberry Pi and MediaPipe
Object Detection Using Lidar Module
Object-detection using IR Sensor
Somnath Bera is an electronics enthusiast. He is a freelancer and has written several articles across the globe. Reon Samanta is an instrumentation engineer from Jadavpur University, with a passion for abstract coding and a focus on VLSI design.