


 While we still use the touch screen or button-based UI for ATM, vending machines or lifts, contactless systems have become an essential requirement in the market these days. Therefore, we will be making a solution that displays UI on the phone and can be thus used as an input to any device such as ATMs, vending machines, lifts or objects that require contactless interaction

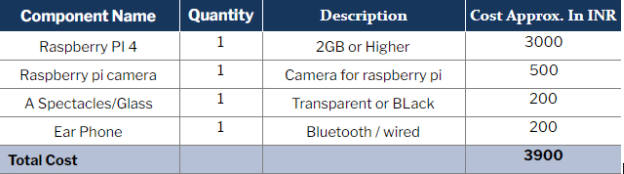
Bill Of Materials
Prerequisite
Prepare the Raspbian OS for the Raspberry Pi so that you can access its desktop UI via VNC or HDMI display. Next, install the modules and libraries required for the project. Here we are using the Apache web server to host a page containing the UI, PHP to create the UI and WiringPi to convert the UI input into an electronic digital input for the electronic ATM or vending machine.
Along with these, we need a QR code generator, which creates a QR code that users can obtain using the UI. After installing all of them, open the Linux terminal and execute the following commands:
sudo pip3 install pyqrcode
sudo apt-get install php
sudo git clone https://github.com/WiringPi/WiringPi.git
cd WiringPi
./build
Coding
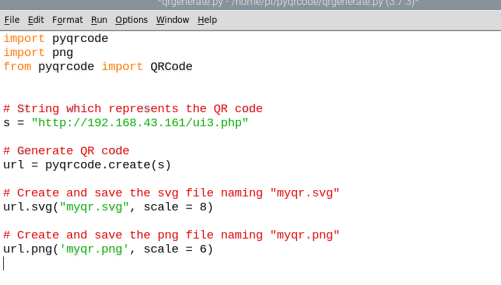
Create a code that converts the URL of the WiringPi hosted UI page into a readable and scannable QR code. To achieve this, write a Python code to create QR code.
QR Code
To generate the QR code for the webserver hosted UI page, import the module pyqrcode in Python. Then set the string to the URL name of the PHP page. After that, save the generated code to .png or .svg file format so that it can be printed and later used for scanning.
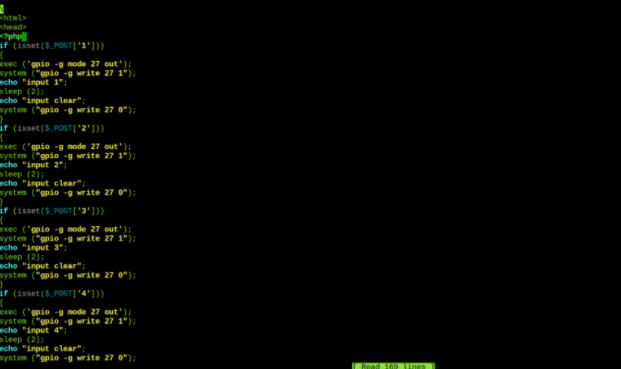
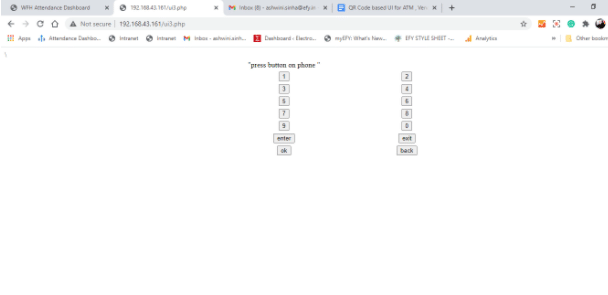
Next, create a PHP code that operates the I/O of the machine. To do that, create the UI in .php using CSS and HTML. In the code, set the functions of the button so that we can use GPIO or Raspberry Pi to enter the input to the ATM or vending machine. So, when we press a particular button on the phone then the GPIO values change from 0 to 1 for a few seconds. On releasing the button, the value will return to 0.
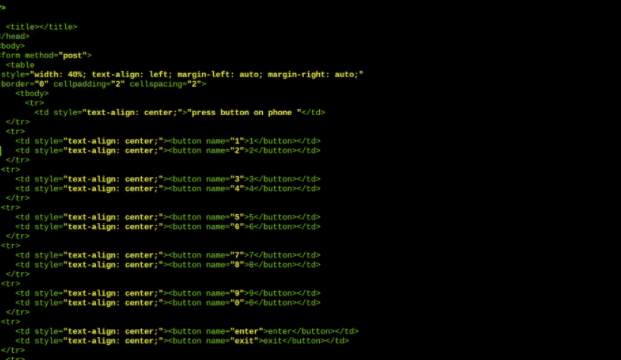
To create the code for UI, set the list of buttons for input. The number and alignment colour may differ as per need. Make the UI for the I/O of the ATM similar to that of an actual ATM. For vending machines, create buttons for selection and deselection of food items/beverages.
Testing
After generating the QR code, print and paste it on the machine (with SCAN ME written). Then open your phone browser, go to tools and click on scan QR Code (or you can download any QR code scanner app on your phone and use it).

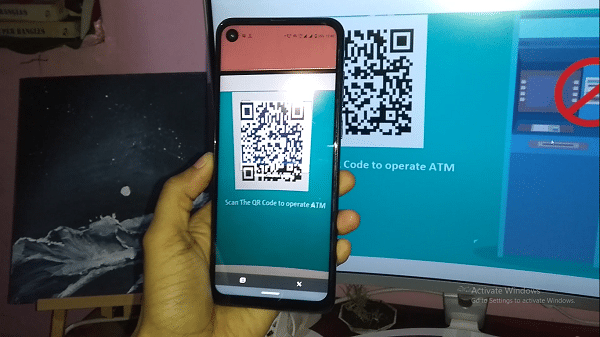
On your phone screen, the UI page will appear with which you can control the ATM, vending machine, lift, etc. Tap the buttons visible on the phone screen to provide input for the device.
For testing purposes, I have used the vending machine test code here. Simply select the drink that you want and then press its name. The GPIO pin gets toggled and the relay switches to the ON position to initiate the drink vending valve.


Can I get circuit diagram of it
Can you build me one? I will pay