


Today, home automation using Internet of things (IoT) is one of the major domains which is attracting attention from large tech companies.
We all want to own a smart home, but sometimes language becomes a barrier in setting up IOT home automation system. Most of the existing home automation systems support only a few languages, generally English.
Wouldn’t it be nice if we can control our home with multiple languages like Hindi, Bengali, Marathi and so on?

Yes, it’s possible now! In this DIY project, we are going to make an IOT home automation system that will allow you to control your home with voice commands given in your preferred language.
This home automation system uses google assistant to control the smart devices at home. So, it also supports all the languages supported by the google assistant. We will also make an app to control the system.
Let’s start the project –
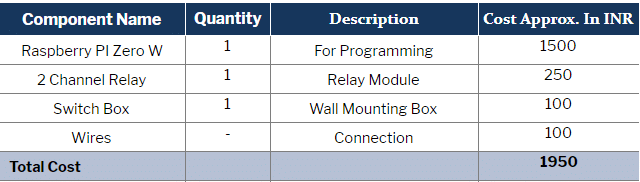
Bill of Material
Setting Raspberry Pi
The first thing we need to do is to set up an Apache server in Raspberry Pi. To do it, open the terminal window and run the following command.
sudo apt-get install apache2 -y
After successful installation of the server, we can check it by typing the I.P address of your Raspberry Pi in any web browser. If the server is working fine, we will get the Apache page in the web browser. Now, we will use our Apache server to process PHP Files, for this you need to have the latest version of PHP module for Apache. To get this module run this command –
sudo apt-get install php libapache2-mod-php -y
Next, we will create a PHP file to control the GPIO of Raspberry Pi. To do so, open terminal in Raspberry Pi and go to its html directory by this command as you can see in Fig 1.
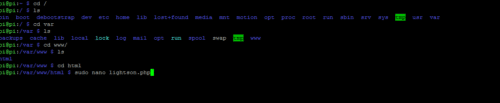
Next create a PHP file by using “sudo nano lightsoff.php” command
and write the following piece of code in it,
<?php
System (“gpio -g mode 27 out”);
System (“gpio -g write 27 0”);
?>
Then press Ctrl+X to save and exit from the editor.
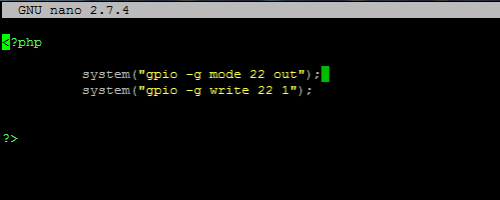
After this create a lightson.php file for turning the lights on and paste the following code in it.
<?php
System (“gpio -g mode 27 out”);
System (“gpio -g write 27 1”);
?>
Repeat the same process for controlling other GPIO of Raspberry Pi.
You can download the whole code for turning lights on and off from the link below.
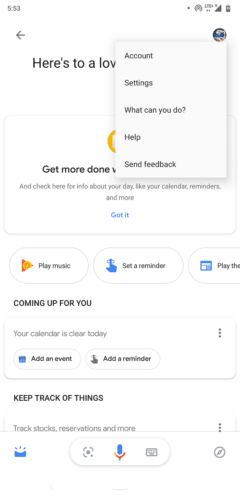
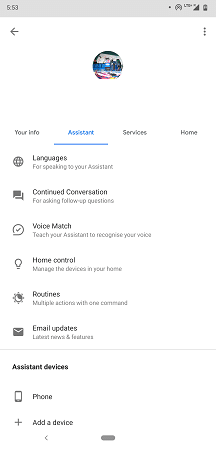
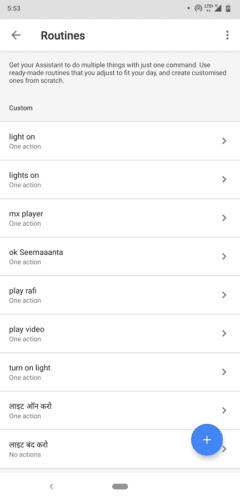
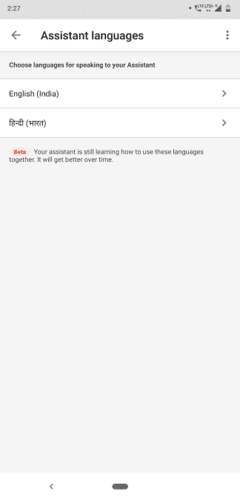
Setting Google Assistant
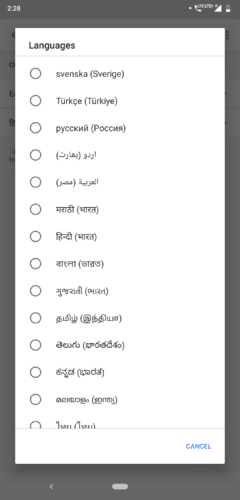
Now, we are going to prepare the google assistant for our voice command. First open the language settings of google assistant and select the language of your choice. Then open the google assistant settings and go to “Routines” option. You will get a plus floating button in the menu of Routines, click on that and then set the voice command that you want to create. For example, if you want to control lights, you can set the voice commands in your preferred language to turn on the lights. After this, set the action for that voice command in the given format (Refer Fig. 3,4,5,6,7)
“search Rpi IP address/ PHP file name”.
Search 192.168……../ lightsoff.php.
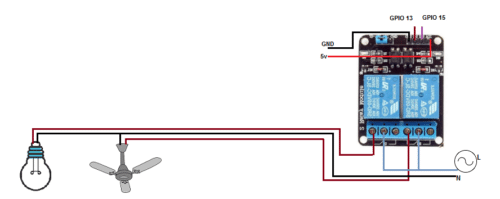
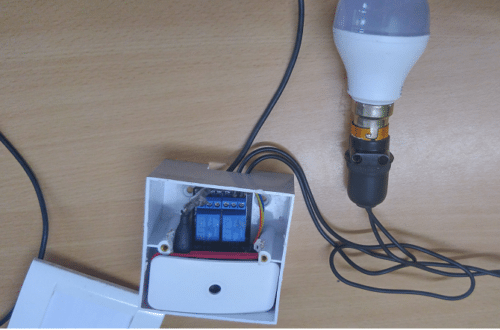
Connection
Now connect the components as illustrated below.
Raspberry pi Relay Board
GPIO 13 Relay IN 1
GPIO 15 Relay IN 2
5V Relay 5V
GND GND
App Making
We can also create an app to control the lights. Let’s make the app.
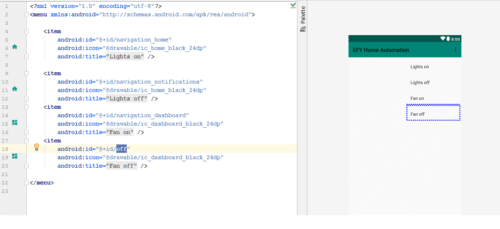
Open Android studio and create a new project with bottom navigation bar and do coding as illustrated below (Refer Fig. 10 ,11,12,13,14).
First of all, set the permission in app to access the internet because we are going to use Wi-Fi to control GPIO of RPi.

Then go to Mainactivity.java and create a WebView and String variables as in the picture below.
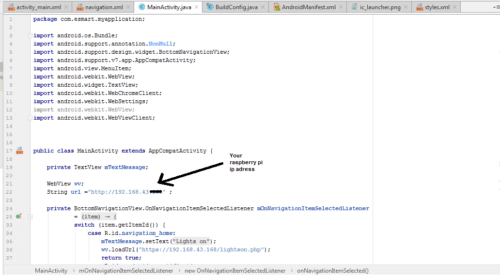
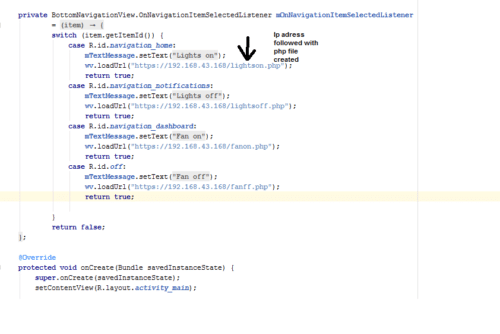
Fig 14. Creating Navigation bar

Testing :
Power the Raspberry Pi with 5V DC. Then connect Raspberry Pi and your phone to your Wi-Fi network or you can also use phone HOTSPOT. Then say “hey google” followed by the voice command that we have set in our preferred language. For example, say “hey google light on kar do”
And it will turn on the lights. You can also control lights with the app we have just created. Open the app and press the icons in navigation to turn the lights on/off
Howdy I am so grateful I found your webpage, I really
found you by accident, while I was searcing on Google for something else,
Anyways I am herre now aand would just ike to say thanks a lot for a
fantastjc post and a all round interesting blog (I also love
the theme/design), I don’t have time to read through
it all at the moment but I have bookmarked iit and also added iin your RSS feeds, so when I have time I
will be back tto read a lot more, Pleaae do keep up the excellent job.
I have to express my appreciation to this writer just for rescuing me from such a
matter. Right after scouting throughout the the web and finding proposals which are not beneficial, I assumed my entire life was gone.
Living devoid of the answers to the issues you have
resolved through your good blog post is a serious case, as well
as those which might have negatively damaged my
career if I hadn’t encountered your blog. The knowledge and
kindness in controlling the whole lot was helpful. I don’t know what I
would have done if I hadn’t come upon such a step like this.
It’s possible to at this moment look forward to my
future. Thanks so much for this reliable and result oriented guide.
I will not hesitate to endorse your blog post to anyone who would like support about this
area.
Great post. I used to be checking constantly this weblog and I am impressed!
Very useful information specifically the ultimate section 🙂 I maintain such info much.
I used to be looking for this particular info for
a long time. Thanks and good luck.
Thanks a lot, You also share idea with us .
I am regular visitor, how are you everybody?
This paragraph posted at this website is truly pleasant.
Life Saver. Thanks a lot.
You are most welcome.
when i use the command in google assistant , it gives me an error saying 404 page not found and ays the requested url/lightson.php was not found on this server
“Search 192.168……../ lightsoff.php”
Doesn’t work with Google Assistant. Please help.
Check the ip address of your RPi and write your own ip adress followed by the php file name you have created. “ipaddress/lightsoff.php”
Do we need a buffer circuit in between the relay board and the raspberry pi??? And is the code 100% working??
Depend on relay broad module, Use 5v low current requirement relay board.
Do we need a buffer circuit in between the relay board and the raspberry pi??? And is the code 100% working??
Will the 5v pin trigger the relay board??
Depends on relay board and its requirement, if you have 5v relay board then the pi 5v pin can trigger the relay board. yes code is working,
Do we have to type the whole raspberry code in the rasbpian terminal window itself?
no you can copy the php code file.
sir how to connect the circuit
As described in circuit diagram. Connect the vcc and Gnd of relay module to VCC and GND of raspberry pi. And the Relay input pin to the raspberry pi GPIO pin that you have programmed for off on
What we have to give in add actions of google routines and how to connect raspberry to google assistant
To use app/website/gassistant, we have to first give permissions to those web users to access the files or else, the browser will throw a 404 error. so I made py files to control lights and added exec line in php code. not the browser is at least loading the file. but still, it is denied the permission to execute the file.
so nice project
Its good project
Can you tell me what will be the database design of this project?
And if you have full documentation of this project than plz send it to me.thanks
it is showing,
Not Found
The requested URL was not found on this server.
Apache/2.4.25 (Raspbian) Server at 169.254.45.35 Port 80
when I give this on my browser
please help
Please check your pi IP address and then open the server in the browser.
Hi, I have issue with the Apps Code. It said missing classes. Mind help me?
hey bro, sorry for asking. Have you complete your project?
Yes , Tested. But The Google Assistant during the construction time was used the Assistant might be got updated with new versions now you find some changes in UI and option you have to look into the same option in the new version of Assistant
Kindly repeat the required components for this project.becuase in above description you have mentioned resberry pi case, reberry pi camera and others.but in the video yoi just have describe about resberry pi, relay board, ,switch box and some wires.so plz clear it.thnks
Updated The BOM
Why are we searching the php file ceated, using Rpi ip address and php file name?
Could you please share the ciruit diagram of this project with us.As there is a confusion in which is the gpio pin we are supposed to use?
When you search the ip address followed with the php file name i phone then rpi server open the file and in that file the script is set to run the command in system to turn on and off the led