


If you are still using the traditional switches, then I’m sorry to say this but they are  outdated now. Moreover, these traditional switches have mechanical moving parts which get damaged on continuous use.
Nowadays, old switch boards are getting replaced by modern touch switches that not only enhance the look of our homes but are also far easier and safer to use. Theses modern touch switches have extra functions and as no moving parts are involved in building them, they also last longer than the traditional ones.
Despite these advantages, many people still use old switches because a modern smart touch switch is quite expensive, and every person can’t afford to have it.
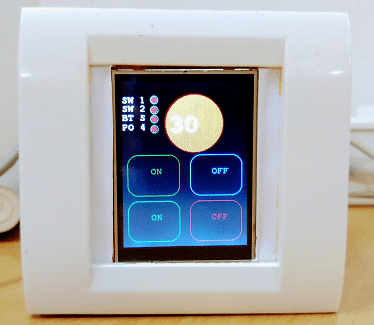
This is the reason why I decided to make an affordable “Smart LCD Display Touch Switch Board” that would be far cheaper than the ones currently available in the market. This switch board, which can be controlled wirelessly through an android app, will also have air temperature displayed on its screen.
Now, let’s collect the components to start the project
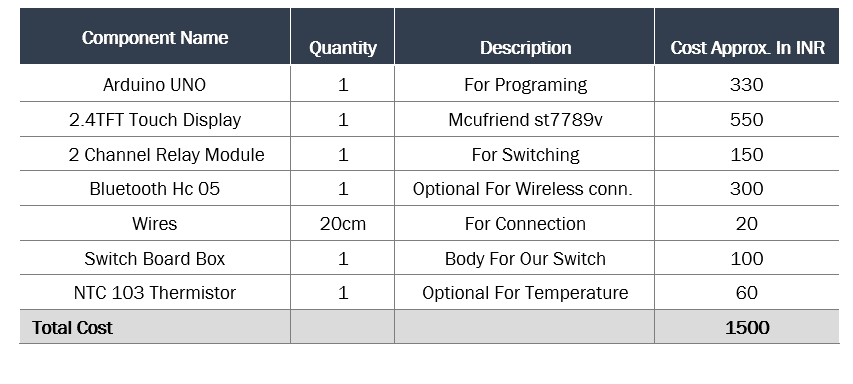
Bill Of Materials
Setting Arduino Library
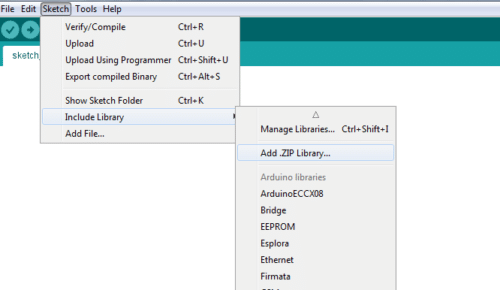
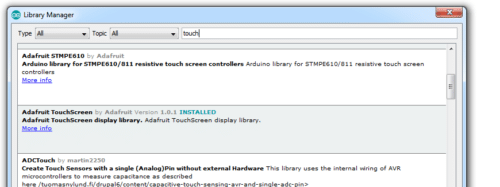
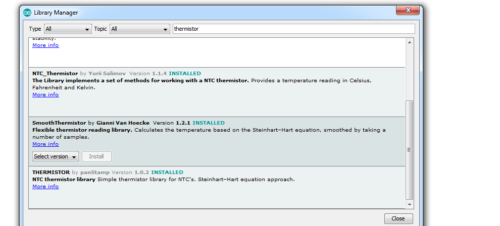
First of all, we need to install the required library to the Arduino IDE. For this, we will go to Sketch menu and click on the manage library. After this, search the library name and click on install button. The libraries needed for this project are Addafruit GFX library, Touch screen library and NTC thermistor library.
NOTE: Every touch screen has its own Library. So, find the library for your TFT screen model and install that. Here I have used MCUFriend 2.4 TFT LCD Library St7789v and installed it as shown in (Fig 3,4,5,6) .

CODING
As we have installed the required library, let’s start coding.
Download the source folder
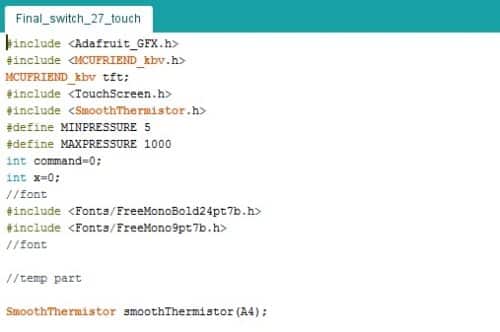
In the first part of coding, we will initialise the required libraries in code as you can see in Fig 7.
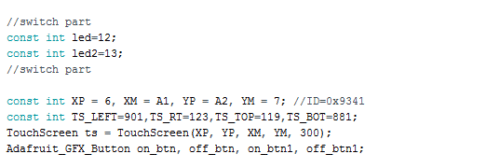
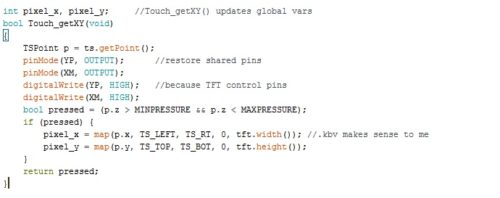
After that we will create a function to get the point of touch on LCD screen in X and Y Coordinates. Refer (Fig .8).
Next, we will add codes for the colours we are going to use in our LDC Display (Refer Fig 9).

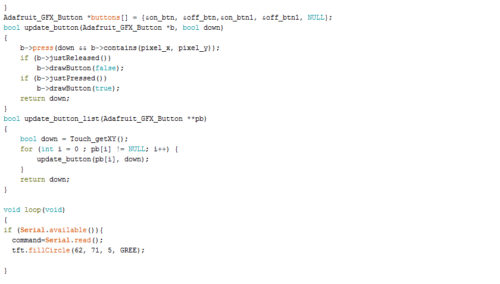
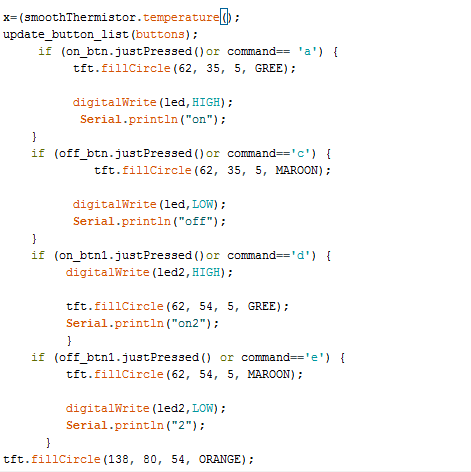
Then we will create a setup function where we will add the codes to show buttons and all other elements on LCD display. (Refer Fig 10,11)
Since we are now done with the coding part. Next is app building.
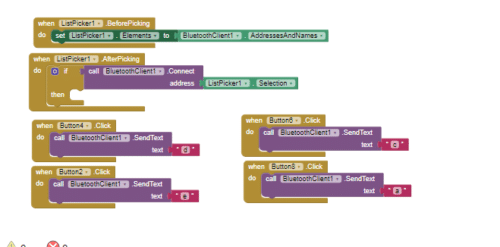
APP MAKING
First, we will create a layout for app and then add the following components to it: –
- 4 Buttons
- 1 list picker
- 1 Bluetooth Clint
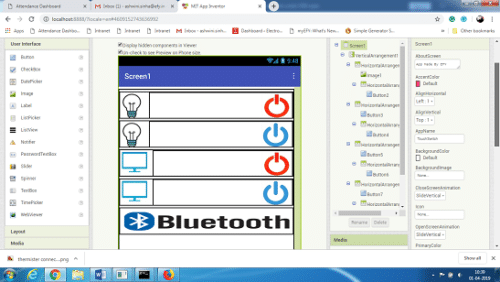
After this you can go to MIT App inventor code blocks. Pick and place the code block according to fig below Refer Fig 13.
Connection
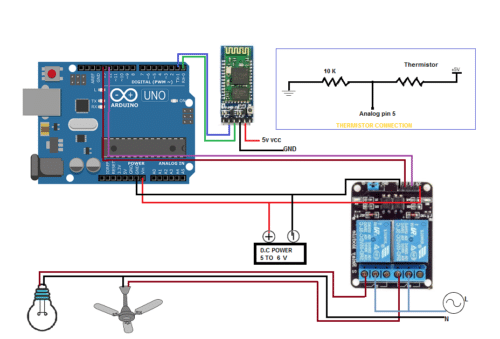
Now, we need to connect the components and fix all the components and relay module in switch box as illustrated in Fig 15,16,17,18,19.
| Arduino UNO | Components |
| 5V | Bluetooth VCC |
| GND | Bluetooth GND |
| TX | RX |
| RX | TX |
| PIN 13 | Relay IN 1 |
| PIN 12 | Relay IN 2 |
| VIN & VCC of Relay | Power Supply 5-6V |
| GND & GND of Relay | Power Supply Terminal -Ve |
| PIN A5 | Thermistor Sensor |
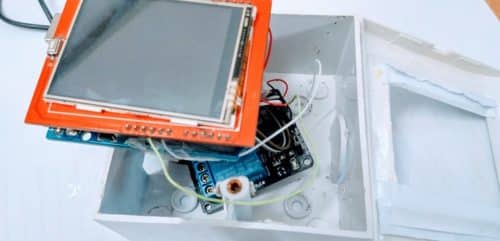
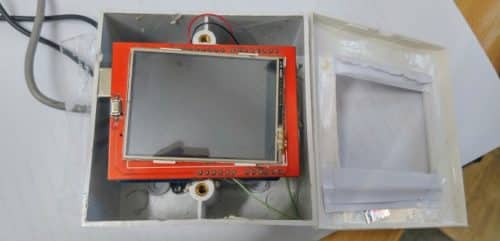
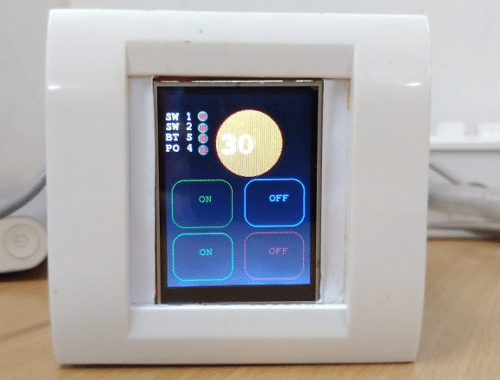
Congrats!! Your “Smart Touch Switch Board” is ready now.
Testing
Check each connection carefully as any wrong connect might result in electric short circuit. When you are sure that all the connections are being done correctly, power the Arduino and relay with 5V DC and then plug the AC appliances connected to relay for switching.
When you press the OFF button, the relay turns off the electronic appliances connected to it. When you touch the ON button, it will turn on the electronic appliances connected to it.
Now, try it using the app. Open the app and click on the Bluetooth Icon button and connect to Bluetooth HC 05 of Switch Board and then click on the ON/OFF button in app to control the electronic appliances wirelessly.
If you found this IoT project useful then you may also like Top 30+ IoT Projects | IoT Project Ideas for Enthusiasts.
Can you give your phone no
I want to talk to you
I want some help from you
You can email your no
what help you need you can ask me in comment
where are figures 10 and 11
Re check it.
which app did you use in the mobile phone
I have provided the instructions to make app in article. also provided the .apk and .aia file in source folder that you can download.
What is the use i am not understanding properly can u help me out pizza.
Modern Touch switch board that can replace traditional switches.In market people a lots of simple touch are available without display and Wireless control system. This tutorial shows how you can make it at home with wireless control system in affordable cost.
HALLO
Please provide the proper connection diagram of arduino uno with 2.4TFT , bluetooth module and relay module.
The 2.$ tft display directly fit in the pins of Arduino Uno you not need the connection diagram and other connection is explained in article if still face problem feel free to ask.
Thanks for replying. But Tft display occupies all the pins of arduino UNO. So how can the bluetooth module and relay module be connected at the same time? Do we need 2 arduino UNO?
No you do not need 2 Arduino. TFT display module have pins for touch , display, and SD card and here we are not using SD card so those pins of SD card are un used so ypu can use the Arduino pin 13,11,10,12
Thanks Ma’am. Can u please provide your email id?
hey, good evening mam.
mam we aren’t getting the meaning of adding MCUFRIEND lib file.
what’s the purpose and is there any other main directory we have to add for this MCUFRIEND?
moreover our program results with non declaration of tft under setup fuction. We have to add it anywhere?
update your arduino and search the library
hiiii
whats the use of second library file
The touch screen library is used to get the touch points from the touch display panel.
Arduino: 1.8.9 (Windows Store 1.8.21.0) (Windows 10), Board: “Arduino/Genuino Uno”
C:\Users\Manisha\Desktop\sketch_jan21a_new\sketch_jan21a_new.ino: In function ‘void setup()’:
C:\Users\Manisha\Desktop\sketch_jan21a_new\sketch_jan21a_new.ino:61:74: warning: ISO C++ forbids converting a string constant to ‘char*’ [-Wwrite-strings]
on_btn.initButton(&tft, 60, 180, 100, 80, GREE, BLACK, GREE, “ON”, 2);
^
C:\Users\Manisha\Desktop\sketch_jan21a_new\sketch_jan21a_new.ino:62:76: warning: ISO C++ forbids converting a string constant to ‘char*’ [-Wwrite-strings]
off_btn.initButton(&tft, 180, 180, 100, 80, AQUA, BLACK, AQUA, “OFF”, 1);
^
C:\Users\Manisha\Desktop\sketch_jan21a_new\sketch_jan21a_new.ino:63:75: warning: ISO C++ forbids converting a string constant to ‘char*’ [-Wwrite-strings]
on_btn1.initButton(&tft, 60, 270, 100, 80, WALL, BLACK, WALL, “ON”, 2);
^
C:\Users\Manisha\Desktop\sketch_jan21a_new\sketch_jan21a_new.ino:64:81: warning: ISO C++ forbids converting a string constant to ‘char*’ [-Wwrite-strings]
off_btn1.initButton(&tft, 180, 270, 100, 80, MAROON, BLACK, MAROON, “OFF”, 2);
^
In file included from C:\Users\Manisha\Documents\Arduino\libraries\Adafruit_TFTLCD_Library\Adafruit_TFTLCD.cpp:17:0:
C:\Users\Manisha\Documents\Arduino\libraries\Adafruit_TFTLCD_Library\pin_magic.h:362:5: warning: backslash and newline separated by space
\
^
C:\Users\Manisha\Documents\Arduino\libraries\Adafruit_TFTLCD_Library\Adafruit_TFTLCD.cpp: In member function ‘void Adafruit_TFTLCD::init()’:
C:\Users\Manisha\Documents\Arduino\libraries\Adafruit_TFTLCD_Library\Adafruit_TFTLCD.cpp:115:3: error: ‘textsize’ was not declared in this scope
textsize = 1;
^
exit status 1
Error compiling for board Arduino/Genuino Uno.
This report would have more information with
“Show verbose output during compilation”
option enabled in File -> Preferences.
Ma’am whenever i compile the program this error is displayed…please suggest me what to do?
Have you install the library ?
Yes
hi… i need to make a android push button, i mean if i press & hold the switch on mobile the light should get on. as i lift my finger the light should get switch off
if (on_btn1.justPressed()or command==’d’) {
Serial.println(“automode”);
}
if (off_btn1.justPressed() or command==’e’) {
Serial.println(“manual mode”);
what does these lines specify?
Hi, ty for the project. I cannot find the .air file. Can you help? Ty.
The code for Bulb is not there in the code provided by you?
please do provide it.
do you have a working code this code throws errors please do help if you have
Hello Sir, We really need your help. we need to submit our “smart touch screen switch board” project by 24th feb,2020. We made our project as u mentioned above. But it isn’t working properly. Our 2.4 TFT display is based on HC026400.
So please provide the correct code.
how can i buy this project compenents from efy
is this durable for permanent use
This code is having some errors can someone guide me and also where I can find hardware components
You can get the components from Kits and spares and or from amazon, or any electronics online store
Could you please share your mail ID or contact number please.
[email protected]
I used provided code. when power on screen and relay, relay just cleaning few times and gos quiet.
I can not understand the circuit how to connect?
Hi dear,
Thanks for sharing such an Awesome project.
Can you please share the code as the source code folder for Smart Arduino Touch Switch Board For Home Automation With IoT is not accessable.
Awaiting your earliest response.
Thanks & kind regards
If any one done this project can u please help us in doing connections in a clear cut.
Let me know what problem are you facing. You can contact me on whats app 7061350809 for help