


 This project is used to control computer such applications as slideshow, music, or video with a finger snap or a clap. It aims at understanding the automation of computer functions through microphone without using microcontroller boards.
The project uses Python and its package ‘sounddevice’ to access sound intensity on a microphone inbuilt in a laptop or connected externally. Python package ‘pyautogui’ is used to automate keystrokes. You may also need to install the PortAudio package by running ‘conda install portaudio’ on Command Prompt with administrator privileges or by opening Environments through Anaconda Navigator.
A test script is included to test the sensitivity of different microphones and sound ambience. This script plots the intensity of sounds and noises encountered to determine the threshold level of a person’s snap/clap. When a finger snap or a clap is detected, a single keystroke is automated.
Operating systems for laptops invariably include/support a voice assistant such as Cortana (MS Windows), Siri (Mac OS), and Mycroft (Linux). Voice assistants automate tasks but are slow and not customisable. This project overcomes all these limitations to automate any task imaginable by a developer.
How it works?
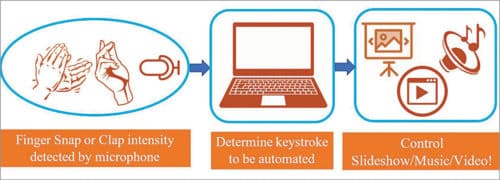
The computer application running in the background can be controlled by automating keystrokes. Fig. 1 gives a brief overview of the procedure. Microphone records sound using Python script. The sound intensity is analysed and keystrokes are mimicked to control applications such as presentation (slideshow), music, or video. For example, music is muted or unmuted by mimicking multimedia ‘mute’ key on the keyboard. The keystrokes can be changed as per requirements.

Creating a work environment
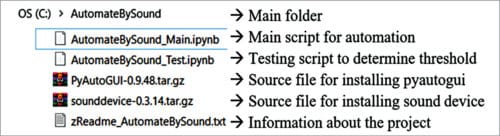
Use Anaconda Distribution on Windows Operating System. Anaconda is preinstalled with Jupyter Notebook, Python 3.xx, and many other Python packages. The AutomateBySound zipped folder consists of five files, as shown in Fig. 2. For simplicity, keep the unzipped AutomateBySound folder in C drive (location C:\AutomateBySound>).
Software installation and running the project
Step 1
First, install Python 3.7 Distribution from www.anaconda.com. With this, Anaconda PowerShell Prompt, Jupyter NoteBook, and other Python packages will also get installed.
Then, open Command Prompt. (For running in Windows 7, you would need to run PowerShell from Start Menu on the desktop to open Command Prompt.) Install Python packages offline from the AutomateBySound folder with commands, as shown in Fig. 3.
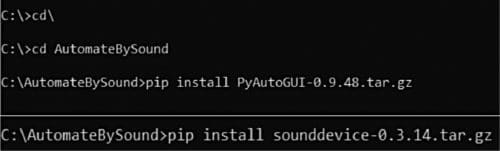
The advantage of using offline source files for package installation is that Python script runs every time without being affected by package version changes or updates or deprecation. Alternatively, for online installation, ‘pip install sounddevice’ and ‘pip install pyautogui’ commands will also work. After installation, ‘successfully installed’ or ‘requirement already satisfied’ message appears on the screen. You may also need to install the PortAudio package by running ‘conda install portaudio’ on Command Prompt with administrator privileges or by opening Environments through Anaconda Navigator.
Step 2
This step can be skipped assuming a safe threshold value of 0.1 for a finger snap, which is default scripted in AutomateBySound_Main.ipynb. To change the threshold value, follow the steps below:
- Open AutomateBySound_Test.ipynb script in Jupyter Notebook.
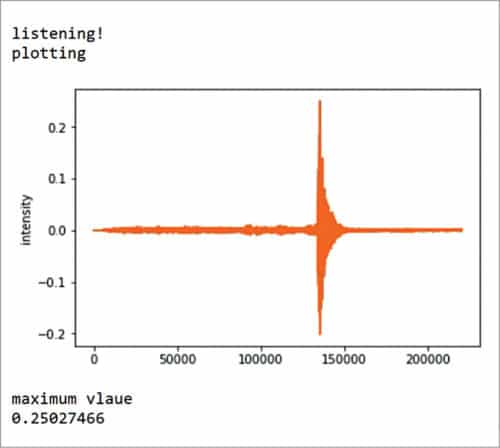
- Run the script. Provide ten snaps/claps at a gap of five seconds in front of the microphone connected to your PC/laptop. You will see ten graphs plotted on the screen with ten maximum intensity values being displayed. The threshold can be determined by observing the graphs. Fig. 4 shows a sample graph. For the sample graph shown, the threshold is 0.2.
Step 3
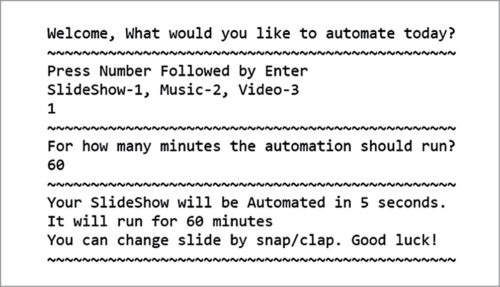
Next, open AutomateBySound_Main.ipynb in Jupyter Notebook. Edit the value of variable ‘data’ in the script with the threshold as determined in Step 2. Run the AutomateBySound_Main.ipynb script. It will prompt you for inputs, as shown in Fig. 5. Time duration of five seconds is provided by the program so that the target application (presentation/music/video) can be started by user.
Step 4
Next, you need to run the application (presentation file or audio file or video file.) In the example shown in Fig. 5, ‘1’ is selected to start a slideshow presentation that would run for sixty minutes. With a finger snap or clap, the slide will change to the next slide every five seconds by itself. Similarly, you can enter ‘2’ and run a music file; it will mute the audio. For a video application, you need to enter ‘3’ for it to pause and play video. (Note you need to first click on the first slide of the presentation file, and the audio/video file should not be in stop mode before the start of automation.)
The main script can be downloaded as a Python file(.py) and run directly by double-clicking on it. The script can be distributed as a Windows application(.exe) to other computer systems that don’t have a Python tool by using the ‘pyinstaller’ package.
Download Source Code
Challenges and future scope
Sound detection and analysis are tough because sound/voice varies from person to person, and sound is always affected by noise. Different microphones provide varied responses in terms of sound intensity and frequency.
This project runs on a single snap/clap. Suitable scripting can incorporate multiple snaps/claps. Python is a versatile language; hence, small modifications in this project can automate many tasks such as opening applications, sending automated emails, opening websites, Web scraping, mouse clicks on-screen positions, hibernating laptop, etc. The same project can be extended very easily to build applications that include microcontroller boards (Arduino, NodeMCU, ESP, Raspberry Pi, etc) and sensors to control computer functions or external actuators (LED, motor, buzzer, speaker, etc). A Fourier transform can be included to automate laptop functions based on the frequency of sound.
Vijaykumar Sajjanar is an assistant professor in the department of electronics and communication at BLDEA College of Engineering & Technology, Vijayapur, Karnataka