


Early detection of health irregularities helps identify conditions before they develop, allowing timely intervention. Continuous monitoring, however, is not easy without wearable sensors that automatically track health data.
What doctors once did manually can now be handled by smart devices that show real-time vitals, detect subtle anomalies, and even predict possible health concerns. With advances in artificial intelligence (AI) and machine learning (ML), these systems can now learn normal health patterns and recognise even the slightest deviations as they happen.
In this device, the ML model runs on the edge, ensuring instant anomaly detection. The IndusBoard Coin manages processing, dataset collection, and ML model execution, with training performed through Edge Impulse.
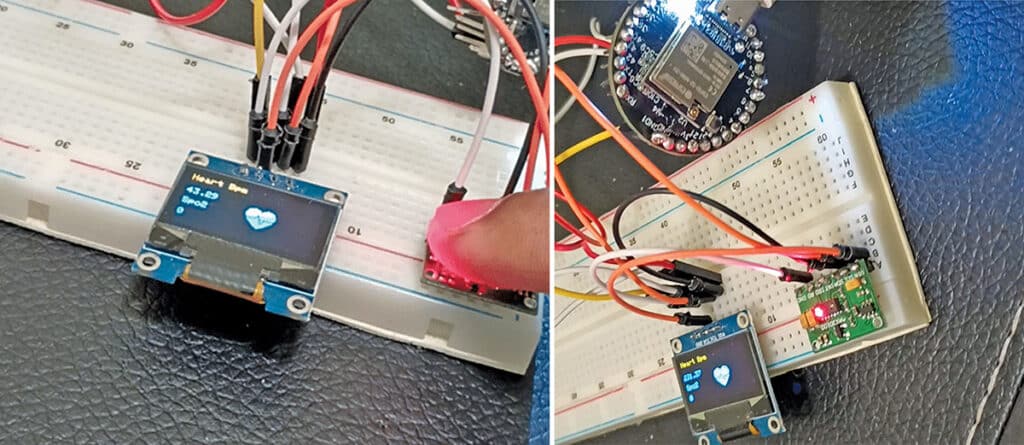
The MAX30100 sensor measures SpO2 and heart rate, while the compact 3cm IndusBoard Coin integrates an onboard battery connector and built-in sensors for temperature, magnetometer readings, and light. Its miniature form factor makes it well-suited for wearable health monitoring. Fig. 1 shows the author’s prototype.
POC Video Tutorial:
| Bill of Materials | ||
| Components | Quantity | Description |
| IndusBoard Coin V2 | 1 | IoT board |
| Max 30100 | 1 | Health sensor |
| SSD 1306 OLED | 1 | Display |
| 3.3V battery | 1 | For power source |
AI Health Monitoring System Circuit
The system is built around the IndusBoard Coin V2, interfaced with a MAX30100 health sensor and an SSD1306 OLED display via the I²C bus, using default I²C pins (8 and 9).
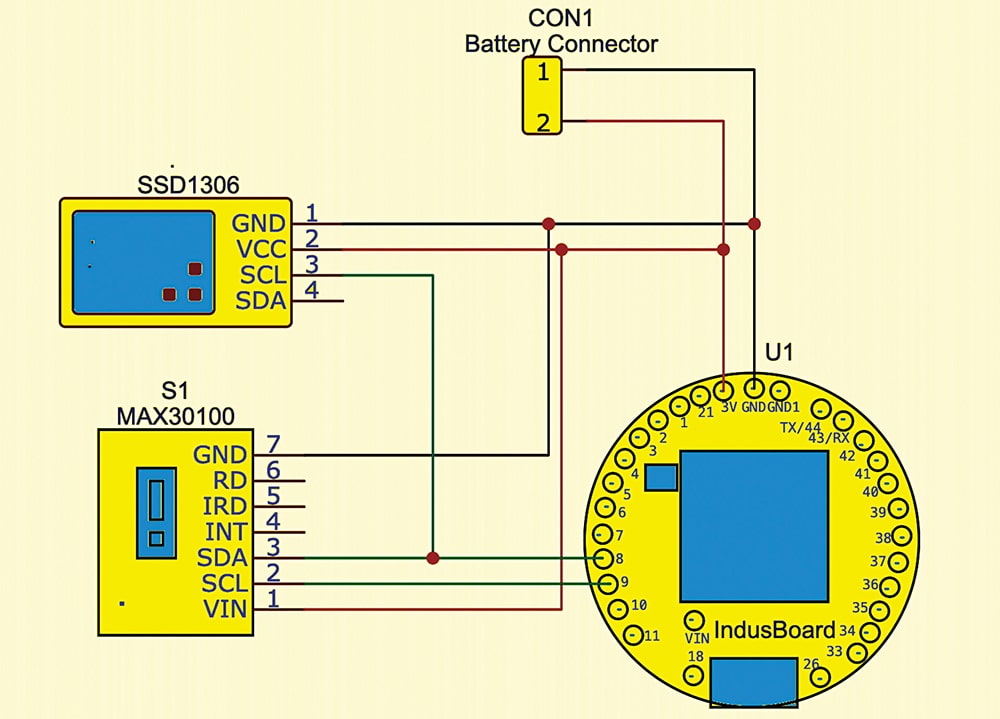
EFY note: No vibration motor, buzzer, or LED has been included for anomaly alerts in this device, but these can be added to any available pins and configured in the code.
Training ML Model
To train the ML model, the first requirement is a dataset. In this device, the vitals of a healthy person are collected and sent to Edge Impulse by connecting the sensor to the IndusBoard Coin. Connect the sensor as per the circuit diagram (refer to Fig. 2), then upload the data forwarder code to the IndusBoard Coin (QR code provided at the end of the article). After that, install Edge Impulse on a laptop and create a free account.
EFY note: Edge Impulse offers both paid enterprise-level accounts and free experimental accounts. The free version is used in this device.
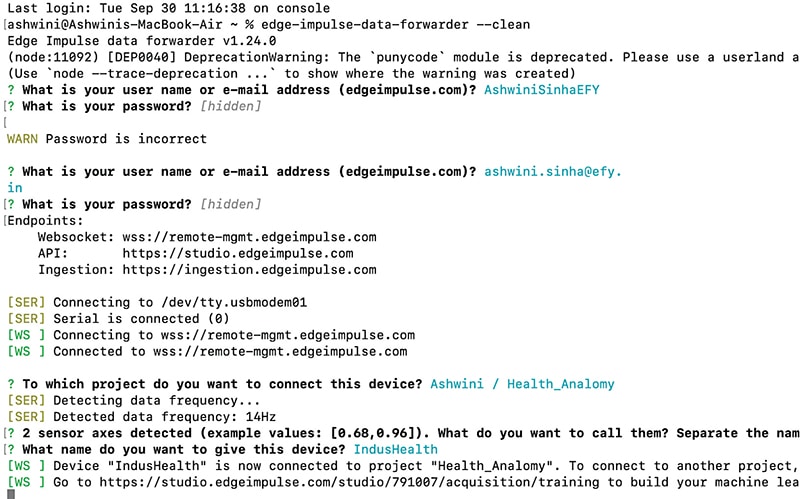
Next, create a new device profile on Edge Impulse and run the Edge Impulse Data Forwarder. Open the terminal (Linux/macOS) or CMD (Windows) and enter the command:
edge-impulse-data-forwarderA login prompt will appear for Edge Impulse credentials. Once logged in, a list of available devices will appear. Select the device created for health ML training. The USB-connected board is detected automatically, and names must be assigned to the sensed values. In this case, the device sends two sets of data: SpO2 and heart rate, which are labelled as SpO2 and HR. The device is now ready to upload data to Edge Impulse.
Place a finger on the sensor to begin readings. Then, in the Edge Impulse interface, open the Data Acquisition tab and collect data under normal health conditions. Use the same label name for all data under normal health conditions (refer to Fig. 3).


After collecting sufficient data, the impulse needs to be designed. Go to the Impulse Design option and select the method for training the ML model. For instance, the model can be trained to classify patterns in values, detect abnormalities, or predict upcoming values based on trends. In this device, the model is trained to detect abnormalities in a person’s health vitals, so anomaly detection is selected as the impulse design.
Next, features are generated from the collected values. Once the features are generated, the corresponding parameters must be saved. Then, proceed to the next tab to train the ML model for anomaly detection. A list of features and axes will be displayed. Select a few features for heart rate and a few for SpO2 that fall within a healthy person’s range and pattern, and then proceed to train the ML model.
Deploying the ML Model
After the ML model has been trained, go to the Deployment section. Select Arduino Library and click Build. This will generate the ML model for Arduino and allow the library to be exported (refer to Fig. 6).

Next, open the Arduino IDE and add the exported library. Modify the ESP32 sensor example code included in the library to integrate the MAX30100 sensor. Additional functions, such as displaying data or sending alerts over Wi-Fi or via a buzzer, can be added for anomaly detection. Finally, upload the code to the IndusBoard Coin.

Testing
Once the code is uploaded and the components are assembled on a breadboard (see Fig. 1), power on the device. If configured, real-time health vitals appear on the OLED display. Otherwise, the Serial Monitor can be used to view anomaly detection results when a finger is placed on the sensor.
Next, place the finger of a person with a heart condition on the sensor. The device will display an anomaly, whereas for a healthy person, it outputs 1. If an alert function such as a buzzer has been added in the code, it triggers accordingly. The results can also be shown on the OLED display.
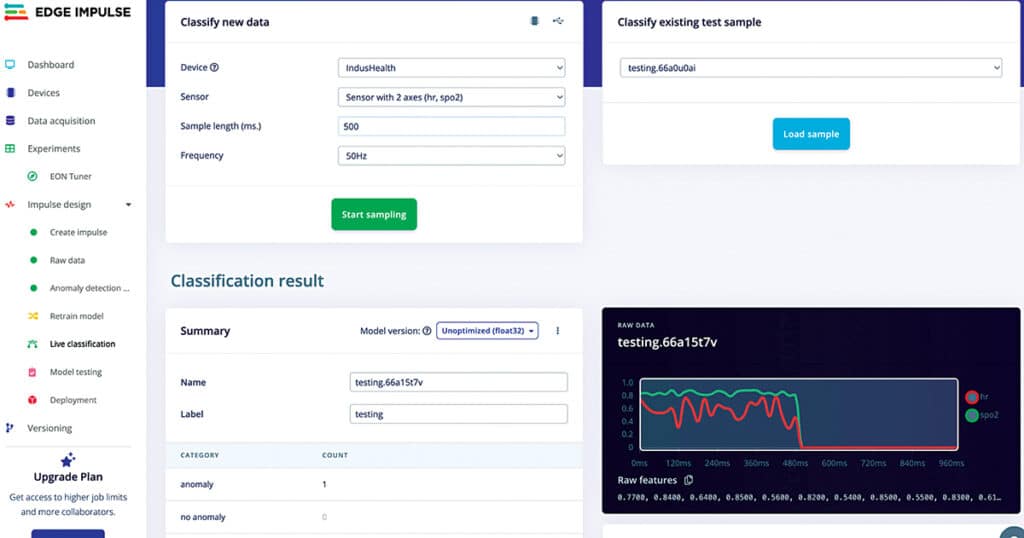
The ML model can also be tested without using the ML model library. Upload the earlier data forwarder code, then go to Live Classification. Open the terminal window on macOS or Linux (or CMD for Windows) and run the command:
edge-impulse-data-forwarderIt automatically connects to the last device used. Then, open the Edge Impulse workspace and select Live Classification. Place a finger on the sensor to view real-time anomaly data directly on the Edge Impulse platform (see Fig. 8).

